Emulsion remains the quiet foundation of pastry structure, binding fat, dairy, and air to create a stable crumb that supports heavy fruit.

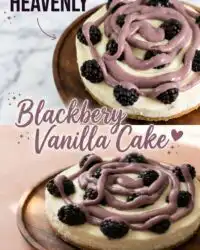
The structural integrity of a Blackberry Vanilla Cake relies on the precise suspension of dense fruit within a delicate sponge matrix. When fruit sinks, it creates a wet, dense layer at the bottom of the pan that ruins both the visual appeal and the mouthfeel of the dessert. This master recipe employs a balanced sour cream emulsion to create a stable crumb that firmly holds fresh blackberries in place. By carefully controlling the mixing time and ingredient temperatures, you will achieve a professional, bakery-standard slice that holds its shape.
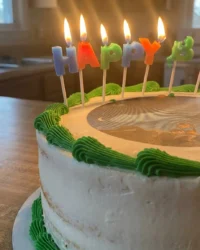
Why Precision Pays Off Here for Blackberry Vanilla Cake
Prep: 40 min · Serves: 16 · Difficulty: Medium
- Acidic sour cream tenderizes gluten strands.
- Flour-dusted berries remain beautifully suspended.
- Balanced sugar prevents structural collapsing.
- Rich vanilla bean seeds yield deep aromatics.
- Structured crumb holds its shape when sliced.
Applying exact ratios from our Succulent Fruit Fusion series keeps the crumb light yet highly supportive. This methodical formula delivers the ideal cake structure for any celebratory table. The precise balance of dairy fat and structural flour ensures that every slice presents an excellent cross-section of cake, cream, and tart berry curd.
Get The Full Cake Recipe
Print
Blackberry Vanilla Cake
- Total Time: 1 hour 15 mins
- Yield: 16 servings
Description
This professional-grade cake features a stable, tender vanilla sponge filled with tart blackberry curd and anchored by flour-dusted berries. Meticulous technique ensures a perfect structure that prevents fruit from sinking while maintaining a delicate, melt-in-your-mouth crumb.
Ingredients
- 210 grams all-purpose flour
- 112 grams unsalted butter (for cake)
- 1 cup unsalted butter (for frosting)
- 266 grams granulated sugar
- 60 grams sour cream
- 6 ounces fresh blackberries
- 3 large eggs
- 4 cups powdered sugar
- 1/2 vanilla bean (scraped)
- 1 tbsp all-purpose flour (for dusting)
- 1/4 cup blackberry curd
- 1 tbsp milk (optional)
- Baking powder and baking soda
Instructions
- Prepare oven and pans. Set your oven to 350 degrees Fahrenheit (177 degrees Celsius) and line three 6-inch round pans with parchment paper.
- Cream butter and sugar. Beat 112g butter and 266g sugar on medium speed for 2-3 minutes until pale and fluffy.
- Emulsify the eggs. Incorporate eggs one at a time on low speed, beating for 15 seconds after each addition to ensure a stable emulsion.
- Mix the batter. Alternately add dry ingredients and combined wet ingredients to the mixer, mixing for only 20 seconds after the final addition to avoid overworking the gluten.
- Anchor the berries. Toss 6 ounces of fresh blackberries in 1 tablespoon of flour until coated to prevent them from sinking.
- Portion and bake. Pour 300g of batter into each pan, top with berries, and bake for 28-33 minutes until a toothpick comes out clean.
- Prepare the frosting. Whip 1 cup butter and vanilla bean seeds on high speed, then gradually mix in 4 cups powdered sugar until velvety.
- Assemble the layers. Layer cake with buttercream, pipe a structural border of frosting, and fill the center with blackberry curd before stacking.
Notes
- Ensure all dairy and egg components are at a consistent 68 degrees Fahrenheit to prevent the emulsion from breaking during mixing.
- Using a kitchen scale for all dry ingredients is essential for maintaining the precise moisture-to-flour ratio required for the cake’s structure.
- Keep the oven door closed for the first 25 minutes of baking to protect the rising cake’s delicate internal framework.
- Heating your palette knife with hot water before smoothing the buttercream creates a professional, high-gloss finish on your finished dessert.
- Prep Time: 40 mins
- Cook Time: 35 mins
- Category: Dessert
- Method: Baking
- Cuisine: Modern Pastry
Ingredients & Their Role

Baking is an exact science where each ingredient serves a specific chemical function rather than just adding flavor. Achieving the perfect balance between liquid hydration, fat aeration, and flour structure is what makes the melt possible. When these elements are measured to the gram and combined at the correct temperature, they form a stable emulsion that supports the heavy fruit additions.
- Fresh Blackberries: These berries provide a sharp, acidic contrast to the buttery crumb while adding moisture pockets that must not collapse during the baking process.
- Sour Cream: Containing natural lactic acid, this dairy component weakens gluten proteins to produce an exceptionally tender, fine crumb that remains moist for days.
- Vanilla Bean: Scraping the fresh seeds yields an intense, natural oil dispersion that elevates the aromatic profile far beyond synthetic flavorings.
- Unsalted Butter: Creamed at 68 degrees Fahrenheit, the solid fat crystals trap micro-air bubbles to build the essential volume of your cake layers.
- Blackberry Curd: This smooth, cooked fruit emulsion serves as a thick structural barrier that binds the cake layers together without making them soggy.
- Baking Powder and Baking Soda: This dual chemical leavener balance produces the ideal carbon dioxide release to lift the heavy fruit particles.
- All-Purpose Flour: The main structural skeleton of the cake, containing gluten proteins that form a supportive mesh to suspend the fruit.
| Ingredient | Weight / Measure | Why It Matters |
|---|---|---|
| All-Purpose Flour | 210 grams | Builds the primary gluten skeleton to support the fruit weight. |
| Unsalted Butter | 112 grams | Traps micro-air bubbles during the crucial creaming stage. |
| Sour Cream | 60 grams | Weakens gluten strands with lactic acid for a tender crumb. |
| Fresh Blackberries | 6 ounces | Delivers pockets of tart moisture throughout the baked sponge. |
| Granulated Sugar | 266 grams | Retains moisture and tenderizes the cake structure. |
From Bench to Bake

Step 1: Prepare the Oven and Baking Pans
Set your oven dial to exactly 350 degrees Fahrenheit (177 degrees Celsius) to guarantee rapid, uniform heat distribution across the oven rack. Grease three 6-inch round baking pans with a thin coating of softened, unsalted butter and line the bottom of each with a circle of parchment paper. The parchment paper creates a non-stick structural floor that prevents the delicate cake bases from tearing when turned out. Gather all your dry and wet ingredients on the pastry bench to allow them to adjust to room temperature.
Step 2: Cream the Butter and Sugar to Optimal Aeration
Place the 1/2 cup (112g) of unsalted butter and 1 1/3 cups (266g) of granulated sugar into the dry bowl of a stand mixer fitted with the paddle attachment. Turn the mixer to medium speed and beat for 2 to 3 minutes until the mixture turns pale, fluffy, and stops clinging to the metal. You must observe the sugar crystals cutting into the solid fat to build microscopic air pockets that expand later in the oven. Scraping the bottom of the bowl twice guarantees that no uncreamed fat pockets remain dense.
Step 3: Emulsify the Eggs with Low-Speed Precision
Reduce the stand mixer speed to low and add the 3 large eggs one at a time to maintain a stable emulsion. Beat for exactly 15 seconds after each egg is introduced to allow the emulsifying lecithin in the yolk to bond with the liquid white. If you add the eggs too quickly, the fat and liquid will separate, resulting in a curdled batter that produces a heavy cake. The batter should look smooth, slightly shiny, and uniform in color before you proceed to the next step.
Step 4: Mix the Blackberry Vanilla Cake Batter
Whisk the 1 3/4 cups (210g) of flour, baking powder, and baking soda in a clean bowl while mixing the milk, sour cream, and vanilla extract in another. With the mixer running on low, add half of the dry ingredients, pour in all of the wet ingredients, and finish with the remaining dry mixture. Mix for only 20 seconds after the final addition until the last streaks of flour barely disappear to prevent gluten over-development. Over-mixing at this stage will turn a tender, melting crumb into a tough, bread-like structure.
Step 5: Dust and Anchor the Fresh Blackberries
Place 6 ounces of fresh, dry blackberries into a small mixing bowl and sprinkle them with exactly 1 tablespoon of all-purpose flour. Toss the berries gently using a soft silicone spatula or your fingertips until every berry is coated in a thin, powdery skin. This light flour coating acts as an anchor, gripping the surrounding cake batter to prevent the heavy fruit from sinking during the initial baking phase. Check that there is no excess, loose flour pooling at the bottom of the bowl before using the fruit.
Step 6: Portion the Batter and Bake Evenly
Place your three lined pans on a digital scale and pour approximately 300 grams of batter into each pan to guarantee uniform layers. Scatter the flour-coated blackberries evenly across the top surface of the wet batter rather than folding them deeply into the pans. Slide the pans onto the middle oven rack and bake at 350 degrees Fahrenheit (177 degrees Celsius) for 28 to 33 minutes. The cake is baked when a wooden toothpick inserted in the center comes out with a few moist crumbs.
Step 7: Whip the Vanilla Bean Frosting to a Velvet Sheen
In the clean bowl of your stand mixer, beat 1 cup of unsalted butter and the scraped seeds of half a vanilla bean on high speed for 5 to 6 minutes. The butter will undergo a physical transformation, changing from yellow to a pale ivory color as it fills with air. Turn the mixer to low, gradually add the 4 cups of powdered sugar, and beat until fully incorporated before increasing to medium-high for 2 minutes. Add 1 to 2 tablespoons of milk if needed to achieve a spreadable, silky consistency that glides easily.
Step 8: Construct the Layers and Pipe the Curd Barrier
Trim the top of your cooled cake layers using a serrated knife if they have domed slightly during baking. Place the first layer on your cake stand, spread a 1/4-inch thick layer of vanilla buttercream over the top, and smooth it with an offset palette knife. Pipe a raised, 1/2-inch border of buttercream around the outer edge to act as a secure structural barrier. Spoon 1/4 cup of smooth blackberry curd into the center of the ring, place the next cake layer on top, and repeat the process.
Pastry Bench Tips

Always weigh your dry ingredients on a digital scale rather than relying on volume-based measuring cups. A difference of only 10 grams of flour can change the structural balance from a melting crumb to a dry, dense block. When you weigh your flour, you eliminate the variance caused by packing density, ensuring that the moisture-to-flour ratio remains exactly as the formula intended.
Confirm your butter, eggs, milk, and sour cream are at a uniform 68 degrees Fahrenheit (20 degrees Celsius) before starting the batter. If your butter is too warm, it cannot hold air during the creaming stage, whereas cold ingredients will shock the fat and cause the emulsion to break. Thirty seconds decides everything when you are trying to rescue a broken emulsion, so take the time to bring ingredients to room temperature.
If your cake layers sink in the middle, here is why and how to fix it: the oven door was opened too early, releasing the trapped steam pressure before the flour’s starches had fully gelatinized. Keep the oven door closed until at least 25 minutes of baking have elapsed to secure the internal framework of the cake layers. If you notice a sink starting, increase the oven heat by 5 degrees to rapidly set the remaining liquid starches.
To achieve an immaculately smooth finish on your buttercream, run the flat edge of an offset palette knife under hot water, dry it quickly, and glide it over the chilled crumb coat. This slight warmth melts the surface sugar crystals just enough to smooth out any small air pockets. It is a simple French pastry technique that replaces the need for excessive whipping or chemical additives.
Never skip the buttercream dam when assembling the layers, or the slick fruit filling will slide out under the weight of the sponge. This protective boundary keeps the moisture secure and preserves the exterior design of your cake during slicing. Refer to our Velvet Crumb Collection for additional structural guides and professional finishing methods.
Choose dry, firm blackberries for dusting; wet or overripe berries will bleed juice into the batter and alter the local chemistry. For more background on berry-based cakes and chemical reactions in fruit batters, consult this blackberry cake composition and parameters reference. This guide will help you understand how fruit acids interact with dairy emulsions on the baking bench.
Frequently Asked Questions
Why did my blackberries sink to the bottom of the cake?
The berries sank because they were either too wet when added, or they were not properly dusted with flour before folding. The flour coating creates friction, allowing the batter to grip the fruit skin as it expands in the oven. Take care to toss the berries carefully and place them on top of the batter rather than mixing them deep into the pan.
Can I use frozen blackberries instead of fresh ones?
Yes, but you must keep them frozen until the absolute moment you place them on the batter. Thawing frozen berries releases excess moisture, which will bleed into the surrounding crumb and create wet, heavy pockets. Do not thaw them, and coat them quickly in flour before adding to the pans to keep the structure intact.
How should I store this assembled cake to keep it moist?
Store the assembled cake in the refrigerator in a sealed container or cover the exposed cut sides with plastic wrap pressed directly against the crumb. The butter in the frosting will firm up when cold, so bring the cake to room temperature for 30 minutes before serving. This allows the fat to soften, restoring the delicate melting texture.
Why did my buttercream frosting separate or look curdled?
Buttercream separates when there is a temperature mismatch between the creamed butter and the liquid ingredients like milk. If the milk is too cold, it will solidify the fat crystals and break the emulsion. Beat the frosting on low speed for several minutes while applying gentle heat to the bowl to restore the smooth texture.
Can I bake this recipe in 8-inch pans instead of 6-inch pans?
You can use two 8-inch pans, but the baking time must be reduced to 22 to 25 minutes to prevent drying out the crumb. The layers will be thinner, so adjust your frosting-to-cake ratio to keep the assembly balanced. Keep a close eye on the thermometer to avoid over-baking the shallow layers.
Is it possible to make the blackberry curd in advance?
Yes, preparing the curd 2 to 3 days in advance allows the gelatinous structure to set completely in the refrigerator. This cold setting period makes the curd firmer and easier to pipe between the cake layers during assembly. Keep it tightly covered with plastic wrap touching the surface to prevent a skin from forming.
What is the best way to clean-cut this layered cake?
To get clean, professional slices, dip a long serrated knife into hot water and wipe it dry before every single cut. The heated metal blade will melt through the firm buttercream dam without pulling the blackberry curd into the white vanilla crumbs. This maintains the clean, distinct layers of your cake slice.
How do I prevent my vanilla cake layers from being dry?
Dryness is almost always a result of over-baking or inaccurate flour measurement by volume. Make sure to weigh your flour on a digital scale and start checking the cake for doneness at the 25-minute mark. Remember that the cake continues to bake from residual heat for a few minutes after being removed from the oven.
Tested Variations
Blending a delicate herbal brightness to this cake, fold 1 teaspoon of fresh lemon thyme leaves and the grated zest of half a lemon into the dry flour mixture. This sharp citrus oil cuts through the buttery sweetness, complementing the tart blackberry curd beautifully without breaking the cake’s delicate crumb. If you enjoy bright fruit pairings, our technical tips in the Cocoa Dream Lab outline how acid behaves in chocolate-free batters.
Adding a small undercurrent of warmth, fold 1/2 teaspoon of ground green cardamom into the flour mixture to introduce a complex spice profile that pairs naturally with vanilla bean. The spice deepens the earthy notes of the blackberries without overwhelming the tender crumb structure of the cake. Be sure to weigh the spice carefully to avoid masking the delicate berry oils, as too much spice can dry out the baking batter.
Replacing the blackberry curd with a smooth raspberry gelée offers a vibrant twist, especially when you fold 50 grams of finely shaved white chocolate into the cake batter. The cocoa butter in the white chocolate adds extra richness and structural support during the baking cycle. This variation yields a slightly sweeter cake with a beautiful pink accent that is perfect for elegant table displays.
Serving the Structure
Plating a delicate layered cake requires clean, deliberate actions to preserve the interior separation of curd and crumb. Use a long, thin chef’s knife dipped in hot water and wiped dry before making each slice. This clean heat glides through the dense buttercream without compressing the tender vanilla layers beneath. Make sure to wipe the blade clean between cuts to avoid dragging dark berry curd across the white frosting.
Pair each slice with a warm cup of Earl Grey tea to let the bergamot oils highlight the natural vanilla bean aromatics. The subtle tannins in the tea cleanse the palate, making each bite of buttercream feel light and balanced. Consult our Decadent Occasions guide for more sophisticated pairing structures and afternoon tea layouts.
For special events, display this cake on a flat, pedestal stand without a lip to make slicing and lifting effortless. Surround the base of the stand with fresh, whole blackberries and small vanilla orchids to echo the internal flavor components. This visual cue lets your guests appreciate the structural beauty before the first slice is even served.

What the Technique Gives You
Precision is not about restriction; it is the blueprint that allows delicate flavors to stand tall. By mastering the creaming process and fruit stabilization, you secure a reliable dessert that delivers consistent texture. Let this technique guide your future baking ventures with confidence, knowing that structure is what makes the melt possible.
For more structured recipes and pastry insights, browse our complete Petite Indulgences archive. Share your baking triumphs and structural successes with our growing culinary community online. Join the conversation on Pinterest and follow our technical steps on Facebook. We look forward to seeing your beautiful kitchen creations.

