Thirty seconds decides everything when balancing heat and starch gelatinisation in a microwave, turning a wet batter into a structurally sound crumb.

Home bakers often struggle with microwave baking because steam escapes too rapidly, leaving behind a tough, rubbery sponge. This precise Chocolate Mug Cake relies on a balanced ratio of lipids to starches to trap moisture within the crumb. By employing a digital scale and managing the thermal energy, you can produce a bakery-quality texture in a single-serving vessel. Understanding how the ingredients interact under rapid heat guarantees a tender result every single time.
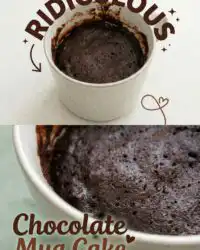
Why Precision Pays Off Here for Chocolate Mug Cake
Prep: 4 min · Serves: 1 · Difficulty: Easy
- Weighed components produce an ideal balanced crumb.
- Rapid steam expansion mimics traditional oven rise.
- Controlled lipid ratios prevent a rubbery texture.
- Dark chocolate chunks create a rich molten centre.
- Hot milk dissolves instant coffee for deep flavour.
Developing a single-serving bake requires the same rigor as preparing a multi-tiered sponge. This recipe relies on the technical principles detailed in our petite indulgences guide to achieve structural balance. Precision for the sake of mouthfeel.
Get The Full Cake Recipe
Print
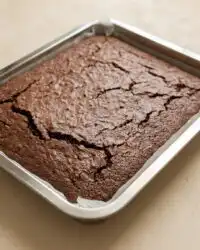
Chocolate Mug Cake
- Total Time: 7 mins
- Yield: 1 serving
- Diet: Vegetarian
Description
This precise, single-serving chocolate mug cake uses a balanced ratio of lipids and starches to achieve a tender, bakery-quality crumb in under two minutes. By weighing ingredients and carefully controlling microwave heat, you can enjoy a rich, molten-centered dessert with perfect structural integrity.
Ingredients
- All-purpose flour
- White sugar
- Cocoa powder
- Baking powder
- Pinch of salt
- Full-fat milk
- Instant coffee granules
- Vanilla extract
- Unflavoured vegetable oil
- Dark chocolate chunks
Instructions
- Whisk dry components. Combine flour, sugar, cocoa powder, baking powder, and salt in a microwave-safe mug until uniform and free of lumps.
- Hydrate the coffee. Stir instant coffee into the milk in a separate small vessel until completely dissolved and smooth.
- Combine wet ingredients. Pour the coffee-milk mixture, vanilla, and vegetable oil into the mug, stirring gently until just combined.
- Microwave the cake. Press dark chocolate chunks into the batter and microwave on high for 60 seconds until the cake rises and sets.
- Rest and serve. Test the center with a skewer for doneness, then allow the cake to rest for two minutes before eating.
Notes
- Use a 350-milliliter mug with straight vertical walls for the most uniform heat distribution.
- Avoid overmixing the batter to prevent the development of a tough, rubbery gluten network.
- Stop the microwave the moment the surface of the cake loses its wet sheen to prevent drying.
- Ensure your vegetable oil is at room temperature to facilitate a stable emulsion with the milk.
- Prep Time: 4 mins
- Cook Time: 1 min
- Category: Dessert
- Method: Microwave
- Cuisine: Modern American
The Working Components

Every component in this micro-bake serves a specific structural purpose to counteract the aggressive nature of microwave cooking. Standard cakes rely on slow, ambient heat, but this rapid method demands precise hydration and fat distribution to protect the starches. Weighing each ingredient guarantees the delicate balance between moisture retention and structural collapse is maintained.
- All-purpose flour: Providing the gluten network that forms the structural walls of your cake, this starch traps the expanding steam.
- Unflavoured vegetable oil: Coating the flour proteins to inhibit excessive gluten development, this lipid keeps the crumb tender.
- Full-fat milk: Serving as the primary hydrating agent, its proteins and sugars contribute to a soft, rich crumb.
- Cocoa powder: Adding structural solids and rich acidity, this powder deepens the chocolate profile when properly hydrated.
- Dark chocolate chunks: Creating pockets of molten chocolate that remain fluid even after the cake structure sets.
- Instant coffee: Acting to magnify the flavor, this tiny addition intensifies the cocoa notes without adding excess liquid.
| Ingredient | Why It Matters |
|---|---|
| Vegetable Oil | Prevents starch retrogradation and maintains crumb tenderness under rapid heating. |
| Baking Powder | Generates carbon dioxide gas rapidly to lift the heavy cocoa-laden batter. |
| Dark Chocolate | Melts into rich pools to contrast against the set cake structure. |
| Full-Fat Milk | Hydrates the starches and proteins to allow proper gelatinisation during the short cook cycle. |
From Bench to Bake

Step 1: Whisk the Dry Components
Place the all-purpose flour, white sugar, cocoa powder, baking powder, and a pinch of salt into your chosen microwave-safe mug. Use a small wire whisk or a fork to combine these dry ingredients until they form a uniform, pale brown mixture with no visible streaks. This initial blending disperses the baking powder evenly throughout the flour to prevent localized over-inflation during the baking process. If you notice any stubborn lumps of cocoa powder, press them against the side of the mug to break them down completely.
Step 2: Hydrate the Coffee and Milk
In a separate small vessel, measure out the full-fat milk and stir in the instant coffee granules. Agitate the mixture until the coffee completely dissolves into the liquid, forming a smooth, aromatic emulsion. Dissolving the crystals before they contact the flour guarantees an even distribution of flavor without leaving bitter pockets in the finished crumb. This step also warms the milk slightly if it was cold, which helps the liquid blend more smoothly with the fats later.
Step 3: Combine Wet and Dry Phases
Pour the prepared coffee milk, vanilla extract, and vegetable oil directly into the mug containing the whisked dry components. Stir the mixture gently with a fork, drawing the dry ingredients from the bottom corners of the vessel into the wet center. You want to stop mixing the moment the last trace of dry flour disappears, which usually takes about twenty seconds of gentle folding. Overworking the batter at this stage develops excess gluten, which will make your cake tough and rubbery once cooked.
Step 4: Microwave the Chocolate Mug Cake to Set the Structure
Drop the coarsely chopped dark chocolate chunks into the center of the batter, pressing them down slightly so they are submerged. Place the mug in the center of your microwave and cook on high power for exactly sixty seconds. Watch the cake through the glass as it rises rapidly above the rim of the mug and then settles back down slightly. This rise and fall indicates that the starches have gelatinised and the steam has successfully expanded the cellular walls of the crumb.
Step 5: Test the Crumb and Rest
Insert a clean wooden skewer or a thin knife into the center of the cake to verify the interior structure is set. The skewer should come out clean, or with a few moist crumbs attached, but no wet batter. If the blade shows raw batter, return the mug to the microwave for an additional ten seconds of cooking. Allow the hot cake to rest on the bench for two minutes to let the internal steam pressure stabilize before eating.
Pastry Bench Tips

If your cake is dense and rubbery, here is why and how to fix it. This texture occurs when you stir the batter too vigorously or cook the cake for even ten seconds too long. High-frequency microwave waves heat water molecules rapidly, causing them to escape as steam; if the cake is overcooked, all moisture is lost, leaving behind a tough protein web. To fix this, always use a digital scale for accuracy and stop the microwave the moment the top of the cake loses its wet sheen.
Selecting the correct vessel size is critical for achieving an even bake throughout the crumb. A standard 350-milliliter mug with straight, vertical sides provides the ideal depth for the heat to penetrate uniformly. You can study this double chocolate microwave dessert science guide to see how different mug shapes alter heat distribution. Avoid using tapered mugs, as the narrow base restricts heat distribution, leaving the bottom of your dessert wet while the top overcooks.
For a deeper understanding of chocolate hydration and fat distribution in sponge cakes, consult our technical breakdown in the cocoa dream lab resource. Balancing the ratio of dry cocoa solids to liquid fats prevents the flour from seizing during rapid thermal expansion. Keeping your vegetable oil at room temperature also aids in creating a stable emulsion with the cold milk.
If you want to create a truly molten centre that holds its shape, place a solid disk of dark chocolate directly into the middle of the mug. As the surrounding batter bakes and sets into a stable crumb, the chocolate core melts into a thick, luxurious fudge pool. This technique mirrors the physical principles of a classic French chocolate lava cake.
Never skip the tiny pinch of salt in this single-serving recipe. Sodium chloride acts to magnify the flavor by reducing the perception of bitterness in cocoa while highlighting the natural sweetness of the sugar. It also strengthens the gluten network slightly, helping the rapid rise hold its shape without collapsing.
Frequently Asked Questions
How long should I microwave a mug cake?
The standard cooking time is sixty seconds when using a 1000-watt microwave on high power. However, microwaves vary in power from 700 to 1200 watts, meaning you must adjust the cooking duration accordingly. Start checking the texture at fifty seconds for high-powered machines, or extend the time to seventy-five seconds for lower-powered models.
What size mug should I use?
Use a standard 350-milliliter (12-ounce) ceramic mug with straight, vertical walls to guarantee even heat penetration. Mugs that are too wide will cause the batter to spread too thin, resulting in a dry, flat disk rather than a tall sponge. Tapered mugs should be avoided because they trap heat unevenly at the base.
Why did my mug cake turn out rubbery or dry?
A rubbery texture is caused by over-mixing the batter, which develops too much gluten, or by overcooking the cake in the microwave. Since microwaves heat by exciting water molecules, extending the cook time past the sweet spot evaporates all moisture. Weighing your ingredients precisely on a digital scale prevents these structural failures.
Can I make a mug cake without eggs?
Yes, this specific recipe is formulated without eggs, relying instead on a precise balance of baking powder, milk, and oil to build its structure. Eggs can often make single-serving microwave cakes rubbery and give them an unpleasant, spongy texture. Omitting the egg results in a tender, moist crumb that melts on the tongue.
Can I make a mug cake in the oven?
While you can bake this batter in a conventional oven, you must use an oven-safe ramekin instead of a standard ceramic mug. Bake the mixture at 175 degrees Celsius (350 degrees Fahrenheit) for approximately twelve to fifteen minutes until a toothpick inserted comes out clean. The texture will be closer to a traditional cupcake, with a drier outer crust.
How should I store leftover mug cake if I cannot finish it?
This dessert is designed to be eaten warm immediately after baking while the crumb is at its softest. If you must store it, cover the top of the mug tightly with plastic wrap to trap the remaining moisture. Keep it at room temperature for up to twenty-four hours, and warm it in the microwave for ten seconds before eating.
Can I use alternative milks for this recipe?
You can substitute full-fat dairy milk with almond, oat, or soy milk without compromising the structural integrity of the cake. However, keep in mind that oat and soy milk contain different protein and fat ratios, which may slightly alter the richness of the crumb. Avoid using water, as the lack of lipids and proteins will result in a bland, weak structure.
Considered Adjustments
The Brown Sugar Gooey Crumbs. Replacing the white granulated sugar with dark brown sugar alters the moisture profile of the cake. Brown sugar contains molasses, which is highly hygroscopic, meaning it actively attracts and retains water molecules during the baking process. This substitution yields a denser, stickier crumb that mimics the rich interior of our devils food cake recipe. Reduce the microwave cooking time by five seconds to maximize this soft, fudgy texture.
The Salted Caramel Core. For a complex flavor profile that plays on sweet and salty contrasts, drop a soft caramel square into the center of the batter. As the cake cooks, the caramel melts into a molten core, surrounded by the set chocolate cake walls. Dust the top of the cake with sea salt flakes immediately after baking to complement the rich, buttery caramel pool inside.
Spiced Cocoa Infusion. Adding a pinch of ground cinnamon and a tiny dash of cayenne pepper transforms the profile into a Mexican chocolate dessert. The spices bloom beautifully in the warm vegetable oil during the rapid microwave heating cycle. This subtle warmth cuts through the richness of the cocoa, creating a sophisticated flavor experience reminiscent of high-end pastry work.
Serving the Structure
Presentation is as important for a single-serving dessert as it is for an elaborate showpiece. To serve this cake at its best, pair it with a contrast of textures and temperatures that complement the warm, soft crumb. A single scoop of cold vanilla bean ice cream resting on the warm surface provides a beautiful thermal contrast as it begins to melt. If you prefer a richer experience, study the plating techniques used for our classic chocolate lava cake 2 to learn how to plate molten desserts elegantly.
For an elegant afternoon tea setting, place the mug on a matching saucer alongside a silver spoon and a fresh cup of Earl Grey tea. The bergamot notes in the tea cut through the intense chocolate fats, cleansing the palate between bites. You can also dust the top of the cake with a fine layer of powdered sugar using a small tea strainer. This dusting creates a clean, professional finish that highlights the dark, rich color of the chocolate cake beneath.

Recipe Recap
Mastering the physics of microwave baking allows you to create bakery-quality desserts in minutes. By focusing on ingredient weights and heating times, you protect the delicate starch structure from becoming tough or dry. This single-serving bake is the perfect proof that technical precision yields remarkable textures, even in the simplest of vessels. For more structured chocolate inspiration, study our detailed recipe for an old fashioned chocolate cake to further expand your pastry skills.
We invite you to share your baking results and technical triumphs with our community of passionate home bakers. Post your successful mug creations on our Pinterest channel or join the conversation on Facebook to exchange tips with other makers. You can also find quick video demonstrations of these pastry principles on our TikTok feed or receive direct updates via our Telegram channel. Structure is what makes the melt possible.


