In the pastry kitchens of London, we were taught that the darkness of a chocolate cake is not merely aesthetic; it is a result of precise chemical reactions. True Devil’s Food Cake distinguishes itself through a specific pH balance—originally achieved by the interaction of natural cocoa and high amounts of baking soda—which creates a reddish-black hue and an exceptionally open, tender crumb. This recipe respects that history while utilizing Dutch-processed cocoa and a hybrid fat method to ensure the structure is robust enough to layer, yet possesses a melt-in-your-mouth quality that pure butter cakes often lack.

Achieving the perfect “melt” requires a calculated balance of lipids and hydration. By combining butter for flavor with vegetable oil for sensation, and blooming the cocoa in hot coffee to release its full aromatic profile, we create a batter that defies dryness. This is not a dense mud cake; it is a lesson in textural contrast—a velvety, airy interior protected by a structured exterior.
Structure Meets Texture
This cake represents the ultimate triumph of formulation over simple mixing. You will appreciate the specific use of hot liquid incorporation, which gelatinizes the starches in the cocoa immediately, ensuring a depth of flavor that cold mixing cannot achieve. The crumb is distinct—it possesses a “squidge” factor, a technical term we use for moistness that bounces back, rather than collapsing into a dense paste.
Furthermore, the dual-sugar approach provides both structural integrity (granulated) and hygroscopic moisture retention (brown sugar). This ensures the cake stays fresh for days, maintaining its precise texture long after it has cooled. It is the ideal vessel for a rich buttercream, as the sponge is light enough to not be overwhelming, yet sturdy enough to hold its shape under the weight of frosting.
Print
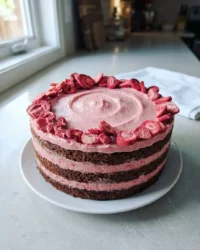
Devil’s Food Cake
- Total Time: 1 hour 5 mins
- Yield: 12 servings
Description
This scientifically formulated Devil’s Food Cake utilizes a hybrid fat method and a cocoa-oil slurry to produce an incredibly moist, dark, and tender crumb. By blooming the cocoa in hot coffee and balancing pH with sour cream, this recipe achieves a professional-grade structure perfect for layering.
Ingredients
- 240g all-purpose flour
- 100g Dutch-processed cocoa powder
- 113g unsalted butter, room temperature
- 120ml vegetable oil
- 200g granulated sugar
- 200g light brown sugar, packed
- 3 large eggs, room temperature
- 120g sour cream, room temperature
- 120ml whole milk, room temperature
- 240ml hot brewed coffee
- 2 tsp baking soda
- 1 tsp baking powder
- 1/2 tsp salt
- 2 tsp vanilla extract
Instructions
- Preheat your oven to 350°F (175°C) and grease two 9-inch round cake pans, lining the bottoms with parchment paper for easy removal.
- In a large bowl, sift together the all-purpose flour, baking soda, salt, and baking powder to ensure even distribution of leavening agents.
- Cream the room temperature butter in a stand mixer, then incorporate a slurry made from the cocoa powder and vegetable oil along with both sugars, beating for 5 minutes until aerated.
- Add the eggs one at a time to the butter mixture, ensuring each is fully emulsified before adding the next, then stir in the vanilla extract.
- On low speed, alternate adding the dry flour mixture and the combined milk and sour cream, beginning and ending with the flour to minimize gluten development.
- Gently whisk in the hot coffee by hand or on the lowest speed until the batter is thin, fluid, and uniform.
- Divide the batter evenly between the prepared pans and bake for 40 to 45 minutes until the center springs back, then cool completely in the pans before inverting.
Notes
For the best results, ensure all dairy and egg ingredients are strictly at room temperature to prevent the emulsion from breaking when combined with the fats. Using high-quality Dutch-processed cocoa is essential for the characteristic deep color and smooth flavor profile, as natural cocoa will react differently with the leavening agents.
- Prep Time: 20 mins
- Cook Time: 45 mins
- Category: Dessert
- Method: Baking
- Cuisine: American
The Technical Foundation

To achieve the signature tenderness of this cake, precision in ingredient selection is non-negotiable.
- Dutch-Processed Cocoa Powder (100g): Unlike natural cocoa, this has been treated with an alkalizing agent to reduce acidity. It provides a darker color and a smoother, more earthy flavor profile.
- Fats (Butter & Oil): We use 113g of unsalted butter for the creamy mouthfeel and 120ml of vegetable oil to coat the flour proteins, preventing gluten formation and ensuring the cake remains soft even when chilled.
- Sour Cream (120g): This provides the necessary acidity to activate the baking soda (2 tsp), creating the carbon dioxide bubbles responsible for the cake’s lift and open crumb structure.
- Hot Coffee (240ml): The thermal energy here is functional. It blooms the cocoa butter, releasing volatile flavor compounds, and helps emulsify the batter for a uniform consistency.
- All-Purpose Flour (240g): A standard protein content is perfect here. We do not want the chewiness of bread flour, nor the crumbling of cake flour; all-purpose provides the necessary scaffolding.
The Method
Step 1: Thermal Preparation
Preheat your oven to 350°F (175°C). Precision in temperature is vital; a cool oven will result in a dense, gummy layer at the bottom. Butter and flour two 9-inch round cake pans, or spray with baking spray. Lining the bottoms with parchment paper is mandatory for structural safety during removal.
Step 2: Aeration of Dry Goods
In a large bowl, sift together the flour, baking soda, salt, and baking powder. Sifting is not an optional step in fine pastry; it ensures the leavening agents are evenly distributed, preventing metallic tasting pockets and uneven rising.
Step 3: Lipid Manipulation
In the bowl of a stand mixer fitted with the paddle attachment, beat the room temperature butter on medium speed until creamy. In a separate medium bowl, whisk the cocoa powder and oil together until smooth. This creates a “cocoa slurry.” Add this slurry to the butter along with the granulated and brown sugars. Beat on medium speed for a full 5 minutes. We are looking for significant aeration here—the mixture should look pale and fluffy.
Step 4: Emulsification
With the mixer running, add the room temperature eggs one at a time. Allow each egg to fully disappear into the emulsion before adding the next. This preserves the air bubbles created in the previous step. Beat in the vanilla extract. Scrape down the bowl to ensure no butter streaks remain.
Step 5: The Hydration Alternation
Turn the mixer to low speed. Add one-third of the flour mixture, followed by half of the milk and sour cream. Repeat this pattern (flour, liquids, flour), ending with dry ingredients. Mixing only until just combined is critical to minimize gluten development, which would toughen the crumb.
Step 6: The Bloom
Scrape down the bowl one last time. Pour in the hot coffee. Carefully whisk by hand or mix on the lowest speed until the batter is fluid and uniform. The batter will be thin; this is correct for high-ratio cakes.
Step 7: Baking and Structural Set
Divide the batter evenly between the prepared pans. Bake for 40 to 45 minutes. The cake is done when the edges pull away from the pan slightly and the center springs back when gently pressed. Cool completely in the pans before inverting. The crumb is extremely tender while warm and requires the proteins to set during cooling.
Precision Secrets

- Temperature Discipline: Your sour cream, milk, and eggs must be at room temperature (approx 70°F/21°C). If cold ingredients hit the aerated butter-oil mixture, the fat will seize, breaking the emulsion and leading to a greasy mouthfeel.
- Visual Cues for Doneness: Do not rely solely on a timer. Watch for the “shrink.” When the cake structure creates a gap between the sponge and the pan wall, the proteins have coagulated sufficienty.
- Handling the Crumb: Because this recipe uses oil and hot liquid, the resulting crumb is softer than an old-fashioned-chocolate-cake. Do not attempt to level or stack these layers until they are completely cool, or even slightly chilled, to prevent tearing.
- Cocoa Clumping: If your cocoa powder is lumpy, whisk it with the oil vigorously. This step is far more effective than sifting alone for breaking down cocoa butter solids.
Technical Variations
- Stout Integration: Replace the hot coffee with a hot stout or porter. The malt profile pairs exceptionally well with the cocoa, offering a deeper, savory note often found in British puddings.
- Candy Bar Inspiration: For a texture contrast, consider adding chopped peanuts and caramel between layers, similar to our snickers-cake. The saltiness cuts through the rich cocoa profile.
- Alternative Frostings: While chocolate buttercream is standard, a Swiss Meringue Buttercream offers a lighter mouthfeel that balances the density of the sponge. The structural stability of meringue also assists in achieving sharp edges.
- Preppy Kitchen Variation: If you prefer a version that leans heavily on sour cream without the oil-cocoa slurry technique, you might compare this with the method found at Preppy Kitchen. However, I find the oil blend here superior for longevity.
Presentation Precision

When serving a high-ratio cake like this, the cut is as important as the bake. Use a long, sharp chef’s knife dipped in hot water and wiped dry between slices. The heat helps the blade glide through the frosting and the tender crumb without dragging, preserving the distinct layers.
For a sophisticated finish, I recommend plating this with a contrasting texture. A dollop of unsweetened crème fraîche or a crisp tuile works beautifully. If you enjoy exploring different crumb textures, review our velvet-crumb-collection for more pairing ideas. Serve at room temperature; cold chocolate cake often has a waxy mouthfeel because the butter is solid.
The Technical Truth
Mastering this Devil’s Food Cake is a testament to understanding how ingredients interact. The result is a sponge that balances the structural needs of a layer cake with the delicate mouthfeel of a high-hydration dessert. It is dark, complex, and scientifically superior to box mixes.
Precision pays off. Once you have achieved this texture, you might want to experiment further in our cocoa-dream-lab for more advanced chocolate work.
Share your structural triumphs with us on social media:


