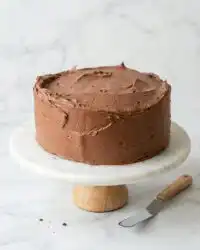
Retirement marks a huge life shift, so the celebration deserves a texture that lingers in the memory without requiring days of stress in the kitchen. I love this recipe because it combines the grandeur of a fondant-covered centerpiece with a sponge that stays impossibly moist and tender. It is the perfect way to say “thank you” with a slice of comfort.

This isn’t just a showpiece; it is a vanilla-infused delight that cuts cleanly without crumbling, delivering a melt-in-your-mouth experience in every bite. Whether you are a seasoned baker or just need a reliable win for a party, this method balances traditional baking with efficient prep for a flawless finish.
The Perfect Send-Off
You will love this recipe because it delivers bakery-level stability with a homemade texture that is never dry. The sponge is robust enough to hold the fondant weight but remains soft and buttery on the palate.
- Feeds a Crowd: This substantial 23cm cake yields plenty of slices for a party.
- Stay-Fresh Texture: The balance of margarine and milk keeps the crumb moist for days.
- Perfect Canvas: The sturdy structure makes it ideal for smooth fondant work and decorations.

Retirement Cake
- Total Time: 1 hour 50 mins
- Yield: 12 servings
- Diet: Vegetarian
Description
Celebrate a career milestone with this classic vanilla sponge cake, designed specifically for a professional fondant finish. Its moist, tender crumb and sturdy structure make it the perfect centerpiece for a grand retirement send-off.
Ingredients
- 225g soft margarine or unsalted butter, room temperature
- 225g caster sugar
- 4 large eggs
- 2 tablespoons milk
- 225g self-raising flour
- 1 teaspoon vanilla extract
- 100g softened butter
- 200g icing sugar
- 500g roll-out fondant icing
Instructions
- Preheat the oven to 160°C (Gas mark 2.5) and grease and line a deep 23cm round baking tin with greaseproof paper.
- Cream the margarine and caster sugar together in a large bowl until the mixture is pale and very fluffy.
- In a separate bowl, beat the eggs and milk together using a fork until well combined.
- Fold the egg mixture and the self-raising flour into the creamed base using alternating spoonfuls, then whisk in the vanilla extract until the batter is smooth.
- Spoon the batter into the prepared tin and bake for 1 hour and 15 minutes, or until a wooden skewer comes out clean.
- Let the cake cool in the tin for 10 minutes before transferring it to a wire rack to cool completely.
- Beat the softened butter and icing sugar with a splash of milk to create a buttercream, then coat the top and sides of the cold cake.
- Roll out the fondant on a surface dusted with icing sugar to a 0.5cm thickness, drape over the cake, smooth with a tool, and trim the excess.
Notes
For the smoothest possible finish, ensure your buttercream layer is chilled in the fridge for 20 minutes before applying the fondant. This ‘crumb coat’ creates a firm foundation that prevents any cake crumbs from marring the look of the icing. If you are baking in a warmer climate, consider using a high-quality butter instead of margarine for better stability.
- Prep Time: 35 mins
- Cook Time: 1 hour 15 mins
- Category: Dessert
- Method: Baking
- Cuisine: British
What You’ll Need

This recipe relies on standard pantry staples to create a luxurious result. There is no need for hard-to-find specialty items here—just quality basics.
- Soft Margarine or Butter: Room temperature is non-negotiable for that fluffy, aerated base.
- Caster Sugar: Dissolves quickly for a finer, tender crumb.
- Self-Raising Flour: Provides the lift needed for this deep cake without extra baking powder.
- Eggs & Milk: Beating these together before adding creates a lighter emulsion.
- Vanilla Extract: Essential for that classic, nostalgic flavor profile.
- Fondant & Buttercream: Simple butter and icing sugar for the crumb coat, plus roll-out icing for the professional finish.
How to Make It
Step 1: Prep and Preheat
Start by preheating your oven to 160°C (Gas mark 2.5). Grease and line a deep, round 23cm baking tin with greaseproof paper to prevent any sticking.
Step 2: Cream the Base
In a large mixing bowl, cream the margarine (or butter) and caster sugar together. Keep beating until the mixture is pale, light, and very fluffy. This aeration is the secret to a light texture.
Step 3: The Egg Mixture
In a separate bowl, use a fork to beat the eggs and milk together. This express step helps prevent the batter from curdling later.
Step 4: Combine
Add the egg mixture and the flour to the creamed butter in alternating spoonfuls. Mix gently after each addition until all ingredients are incorporated. Finally, whisk until smooth and beat in the vanilla extract.
Step 5: Bake
Spoon the batter into the prepared tin. Bake for 1 hour and 15 minutes. Test by inserting a wooden skewer; if it comes out clean, the cake is ready. Let it cool in the tin for 10 minutes before transferring to a wire rack.
Step 6: Buttercream Crumb Coat
While the cake cools, beat the softened butter and icing sugar with a splash of milk and vanilla until creamy. Once the cake is completely cold, cover the top and sides with this buttercream to seal in moisture and provide a sticky base for the fondant.
Step 7: Fondant Finish
Roll out your fondant on a surface dusted with icing sugar until it is about ½ cm thick. Lift it over the cake, smoothing it down the sides with your hands and a smoothing tool to remove air bubbles. Trim the edges for a neat finish.
Meagan’s Texture Secrets

To get that professional finish without the headache, knead your fondant until it is pliable before rolling; if it feels stiff, the heat from your hands will help. For the smoothest surface, I highly recommend using a fondant smoother tool rather than just your palms.
If you are looking for more recipes that prioritize that specific tender bite, check out our velvet crumb collection for more inspiration. Also, this classic approach is inspired by traditional methods like those found at Beechcroft, proving that tried-and-true techniques often yield the best flavor.
Easy Twists
- Zesty Lemon: Swap the vanilla extract for a tablespoon of lemon zest in the sponge and a squeeze of juice in the buttercream for a brighter flavor.
- Chocolate Richness: If the retiree prefers cocoa, you can easily adapt this by replacing 50g of flour with cocoa powder, similar to our old fashioned chocolate cake.
- Jam Filling: Slice the cooled cake horizontally and add a layer of raspberry jam before buttercreaming for a Victoria sponge vibe.
Instant Enjoyment

This cake is a statement piece, so serve it on a simple pedestal stand to let the decoration shine. Since the fondant seals in freshness, you can easily prep this a day in advance. For a fun, personalized touch, you might even shape the fondant decorations to look like a car cake element if the retiree is a motoring enthusiast.
The Sweet Truth
Retirement is a time for joy, and this cake delivers that feeling in every tender crumb. It is a classic, dependable recipe that looks impressive but tastes like home. If you are planning a different kind of celebration, our fruit cake is another timeless option that travels well.
Share your retirement bakes with us on Pinterest, Instagram, Facebook, or TikTok.


