In the world of pastry arts, we typically strive to create depth and dimension, but this technique inverts that principle to create a striking two-dimensional illusion. The “comic cake” relies on precise black piping to flatten the visual perspective, a method that demands a steady hand and a keen understanding of geometric outlines. It is a delightful exercise in *trompe-l’œil*, proving that structural precision can fool the eye while delighting the palate.
 10")
Beneath the fondant artistry lies a robust peanut butter sponge, chosen specifically for its dense, moist crumb that holds its shape under the weight of decoration. Paired with a 54% dark chocolate ganache, the flavor profile balances salinity with sweetness, ensuring the eating experience matches the visual spectacle of the exterior.
Visual Architecture Meets Flavor
The appeal of this gateau lies in the tension between its flat appearance and its three-dimensional structure. It is a technical triumph that plays with perspective, making it a perfect centerpiece for those who appreciate the intersection of art and baking. Beyond the visuals, the peanut butter sponge offers a richness that prevents the fondant from becoming cloying, providing a necessary textural counterpoint to the sweet icing.
Print 11")
Comic Cake (2D Cake)
- Total Time: 2 hours 30 mins
- Yield: 8 servings
- Diet: Vegetarian
Description
This striking comic cake uses bold black outlines and clever fondant placement to create a mind-bending 2D cartoon illusion. Beneath the artistry lies a moist peanut butter sponge paired with a decadent 54% dark chocolate ganache, offering a sophisticated flavor profile to match its playful appearance.
Ingredients
- 175g Unsalted butter, softened
- 175g Crunchy peanut butter
- 350g Caster sugar
- 4 Large eggs
- 350g Self-raising flour, sifted
- 1 tsp Baking powder
- 50ml Whole milk
- 1 tsp Vanilla extract
- 200g Dark chocolate (54% cocoa)
- 150ml Double cream
- 1 tbsp Caster sugar (for ganache)
- 50g Unsalted butter (for ganache)
- Pinch of sea salt
- White, pink, yellow, and red fondant icing
- Black royal icing mixed with black gel food coloring
Instructions
- Preheat your oven to 190°C (170°C fan/375°F/Gas 5) and grease and line a 20cm round cake tin.
- In a stand mixer, beat the softened butter, caster sugar, peanut butter, eggs, flour, baking powder, milk, and vanilla extract until the batter is smooth and fully emulsified.
- Transfer the mixture to the prepared tin and bake for 20-25 minutes until the sponge is golden and springy to the touch.
- Prepare the ganache by heating the cream, sugar, butter, and salt to a simmer, then pouring it over the dark chocolate; let sit for 2 minutes before stirring until glossy.
- Once the cake is completely cool, cut it into quarters and stack them, trimming the edges with a serrated knife to form a sharp wedge shape.
- Sandwich the sponge layers with ganache, then apply a smooth crumb coat to the exterior and chill until firm.
- Roll out white fondant to cover the straight sides of the wedge, then drape pink fondant over the top and curved edge, trimming the meeting point into a wavy drip line.
- Add decorative fondant details including yellow and pink strips for filling, a red fondant cherry, and a white fondant swirl on top.
- Using a number 3 nozzle, pipe thick black royal icing outlines along every edge and detail of the cake to complete the 2D comic effect.
Notes
To ensure the sharpest 2D effect, keep your piping bag at a consistent angle and use a steady pressure to avoid breaks in the black outlines. If the fondant feels too soft to handle during the carving stage, place the crumb-coated cake in the freezer for ten minutes to provide a more stable surface for decorating.
- Prep Time: 1 hour
- Cook Time: 25 mins
- Category: Dessert
- Method: Baking
- Cuisine: British
The Structural Components
 12")
- Unsalted Butter & Crunchy Peanut Butter: We use a blend of fats here. The peanut butter adds protein and oil, creating a tighter crumb structure essential for carving the wedge shape without crumbling.
- Self-Raising Flour: Sifted to aerate. In British baking, we rely on the consistent lift of pre-mixed raising agents to ensure an even rise without large air pockets.
- Dark Chocolate (54%): For the ganache. This percentage provides enough cocoa solids to set firm—acting as the “cement” for our layers—without being too bitter against the sweet fondant.
- Fondant (White, Pink, Yellow, Red): Quality matters. It must be pliable enough to drape over the sharp angles of the wedge without tearing or creating elephant skin.
- Royal Icing & Black Gel: This is your ink. It must be stiff enough to hold a sharp line but fluid enough to pipe smoothly without breaking.
The Method
Step 1: Precise Temperature Control
Preheat your oven to 190°C (170°C fan/375°F/Gas 5). Accurate heat is vital for the peanut butter sponge to rise evenly without doming excessively. Grease and base-line your 20cm cake tin to ensure a clean release.
Step 2: Emulsifying the Batter
In a stand mixer or large bowl, beat the softened butter, caster sugar, peanut butter, eggs, flour, baking powder, milk, and vanilla extract. Beat until smooth and homogenous, ensuring the fats are fully emulsified for a tender crumb.
Step 3: Baking for Structure
Spoon the mixture into the prepared tin and level with a palette knife. Bake for 20-25 minutes. We are looking for a light golden color and a sponge that is springy to the touch—this indicates the gluten structure has set.
Step 4: The Ganache Foundation
While the cake cools, prepare the ganache. Heat the cream, sugar, butter, and sea salt to a gentle simmer, then pour over the dark chocolate. Let it sit for 2 minutes to temper the chocolate before stirring to a glossy finish. Allow it to cool until thickened; this viscosity is crucial for stability.
Step 5: Carving the Form
Once the sponge is completely cool, turn it out and cut it into quarters. Stack the quarters and trim them with a serrated knife to create a sharp cake wedge shape. Precision here dictates the final look of the comic slice.
Step 6: Layering and Crumb Coat
Sandwich each sponge layer with a generous amount of ganache. Coat the exterior sides and top with the remaining ganache, smoothing it with an offset spatula. Chill the cake to firm up the chocolate, creating a solid substrate for the fondant.
Step 7: Fondant Drapery
Roll the white fondant into a rectangle (25 x 12cm) and wrap it around the straight sides of the wedge. Roll the pink fondant (5mm thick) and drape it over the curved edge and top. Use a fondant smoother to eliminate air bubbles and ensure adhesion.
Step 8: Creating the Illusion
Trim the pink fondant into a “wobbly” drip line where it meets the white. Add the fondant “sausages” (pink and yellow) between the layers to simulate filling. Shape the red fondant into a cherry and the white into a buttercream swirl, attaching them with edible glue.
Step 9: The Outline
Using the black royal icing and a number 3 nozzle, pipe an outline along every edge of the cake, including the decorative details and filling lines. This outlining is what creates the 2D effect. Pipe small circles on the sponge area to mimic air bubbles.
Precision Engineering
 13")
- Temperature is Key: Ensure your cake is completely cool before carving. A warm cake will tear under the serrated knife, ruining the sharp edges needed for the comic effect.
- Ganache Consistency: If your ganache splits, it likely overheated. For a foolproof guide on chocolate management and consistency, refer to our old-fashioned chocolate cake techniques.
- Piping Lines: Keep your piping bag at a 45-degree angle and apply consistent pressure. The black lines must be uniform thickness to effectively maintain the cartoon illusion.
Technical Variations
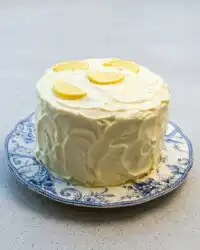
- Citrus Infusion: If peanut butter is too heavy for your palate, a lemon sponge offers a lighter crumb that still holds structure. See our lemon rainbow cake for a zest-based sponge formula.
- Buttercream Alternative: If you prefer to avoid fondant, you can achieve a similar effect using crusting buttercream smoothed to perfection. This technique is often explored by fellow technical bakers like British Girl Bakes, though it requires excellent temperature control to prevent melting.
Presentation Precision
 14")
- The Cut: Use a hot, sharp knife to slice through the fondant without dragging the black lines. Clean the blade between cuts to maintain the stark contrast of the layers.
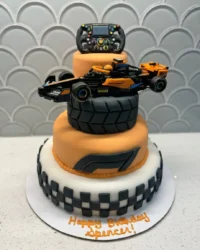
- Theming: This cake is structurally sound enough to be a centerpiece. For a larger themed event, it pairs exceptionally well with our car cake for a complete visual narrative that delights both children and adults.
Mastering the Illusion
This comic cake is a testament to the fact that pastry is as much about engineering as it is about flavor. By controlling the fondant thickness and the viscosity of your royal icing, you create a masterpiece that defies perspective. It requires patience, but the result is a stunning optical illusion. For more technical challenges and structural desserts, explore our full recipe index.
Share your structural triumphs with us on Pinterest, Instagram, or Facebook.

