In the world of professional pastry, the architecture of a tiered build is just as vital as the flavor profile itself. During my early training, I learned that structural integrity provides the canvas upon which texture can truly shine. This project requires the precise handling of temperature and moisture to create a dessert that is as stable as it is tender.

This Frozen Cake is a masterpiece of technical skill, utilizing frozen yoghurt sponges to provide a firm foundation for intricate fondant work. By mastering the hard-crack stage of sugar and the delicate art of figure sculpting, you will create a centerpiece that captures the magic of winter with professional-grade precision.
A Triumph of Structural Artistry
This recipe offers a unique technical challenge that rewards the methodical baker with a stunning visual and textural result. The use of yoghurt cakes is a deliberate choice; the acidity of the yoghurt reacts with the leavening agents to create a tight, moist crumb that holds its shape under the weight of heavy decorations. This is not just a cake; it is a lesson in the physics of baking.
Working with different mediums—fondant, royal icing, and hard-crack sugar—broadens your pastry repertoire. You will find that the contrast between the crisp, brittle sugar castle and the soft, pliable fondant creates a sensory experience that is far superior to standard grocery store offerings. It is a project that demands patience and rewards it with a beautiful, professional finish.
Print
Frozen Cake
- Total Time: 29 hours
- Yield: 1 tiered cake (18 servings)
- Diet: Vegetarian
Description
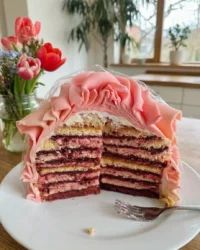
This technical masterpiece features a moist yoghurt cake base layered with professional-grade fondant and intricate sugar glass decorations. Perfect for advanced bakers, it combines structural stability with delicate artistry to create a stunning winter-themed centerpiece.
Ingredients
- Full-fat yoghurt cake layers (23 cm and smaller tiers)
- Professional-grade white fondant
- Professional-grade blue fondant
- Glucose syrup
- Gel food colors (blue, green, black)
- Royal icing
- Granulated sugar
- Water
- Edible glue
- Buttercream icing for crumb coating
- Cornstarch for dusting
Instructions
- Bake the yoghurt cakes at least 24 hours in advance, then wrap and freeze them to lock in moisture and stabilize the crumb for carving.
- Knead gel food colors into the fondant incrementally until the shade is uniform and streak-free, working in a cool environment.
- Sculpt the Elsa figure starting with a fondant head and torso supported by a wooden skewer, then add the skirt and cape.
- Create Olaf using fondant spheres and craft textured trees by snipping green fondant cones with embroidery scissors at a 45-degree angle.
- Combine sugar, water, and glucose in a heavy-bottomed saucepan and heat to exactly 150°C (302°F) before tinting blue and pouring into molds.
- Level the frozen cakes with a serrated knife, apply a crumb coat of icing, stack the layers, and finish with a smooth layer of rolled fondant.
Notes
To maintain the clarity of your sugar glass, avoid making it on high-humidity days as moisture can cause the ‘ice’ to become sticky and lose its structure. Always use a digital thermometer to reach the precise hard-crack stage for structural integrity.
- Prep Time: 4 hours
- Cook Time: 1 hour
- Category: Dessert
- Method: Baking and Sculpting
- Cuisine: Contemporary
The Technical Foundation of Ingredients

Precision begins with your Mise en Place. Each component of this build has been selected for its specific contribution to the final structure and mouthfeel. We focus on hydration and stability to guarantee the cake remains flawless from the first cut to the last bite.
- Yoghurt Cake Base: The inclusion of full-fat yoghurt provides a dense crumb structure. This is essential for a Frozen Cake that must be carved and stacked without crumbling. The moisture retention is vastly superior to standard sponges.
- Professional Grade Fondant: High-quality fondant with good elasticity is required for sculpting Elsa and Olaf. This allows for thin rolling without tearing, which is vital for the cape and dress details.
- Glucose Syrup: This is used in the sugar work to prevent crystallization. It provides the necessary clarity for our ice-blue castle pieces.
- Gel Food Colors: Unlike liquid colors, gels do not alter the hydration levels of your fondant or sugar, maintaining the chemical balance of your materials.
- Royal Icing: This acts as our technical ‘glue’ and creates the textural contrast of snow. Its ability to dry hard makes it perfect for adding structural detail to the trees.
The Methodical Process
Step 1: Preparing the Structural Bases
Bake your yoghurt cakes at least 24 hours in advance. Once cooled, wrap them tightly in professional-grade plastic wrap and place them in the freezer. Freezing the layers is a critical technical step; it locks in moisture and makes the leveling process significantly cleaner, as the cold fat stabilizes the crumb.
Step 2: Fondant Color Modification
Prepare your palette by kneading gel colors into your white fondant. Use a toothpick to add color incrementally to prevent oversaturation. Knead until the color is perfectly uniform with no visible streaks. This process should be done in a cool environment to prevent the butter fats from your hands from softening the fondant too much.
Step 3: Sculpting the Elsa Figure
Begin with the head, using a small ball of fondant to define the cheekbones and chin. Use a ball tool to create eye sockets without deforming the skull. The torso is a tapered teardrop shape; insert a wooden skewer through the center to provide a skeletal structure. Attach the blue fondant skirt and use an exacto knife to score vertical lines, creating the illusion of fabric movement. Finish by attaching the fabric cape with a minimal amount of edible glue.
Step 4: Crafting Olaf and the Trees
For Olaf, roll three distinct spheres of white fondant, ensuring the proportions match your reference imagery. Use a bamboo skewer to recess the mouth area, creating a cavity for the black fondant interior. For the trees, roll green fondant into tall cones and use sharp embroidery scissors to snip the surface at a 45-degree angle. This creates ‘branches’ that provide a realistic, jagged texture.
Step 5: The Chemistry of Sugar Glass
In a heavy-bottomed saucepan, combine sugar, water, and glucose syrup. Bring the mixture to a boil without stirring to prevent crystallization. Using a digital thermometer, monitor the temperature until it reaches exactly 150°C (302°F). This is the hard-crack stage where the sugar will become brittle and clear. Tint with a single drop of blue gel, then pour into your prepared molds to set.
Step 6: Final Assembly and Crumb Coating
Remove the frozen cakes and level the tops with a serrated knife using a sawing motion. Place the 23 cm (9 inch) cake on the board and apply a thin, smooth layer of icing. This crumb coat seals in the moisture and creates a tacky surface for the fondant. Stack the smaller cakes with a layer of icing between them. Chill the cakes for 30 minutes before draping the final rolled fondant layers over them for a pristine finish.
Precision Secrets for the Master Baker

When working with sugar at the hard-crack stage, the humidity of your kitchen is a significant factor. If the air is too damp, your sugar castle will become sticky and lose its structural clarity. Aim for a dry day or use a dehumidifier in your workspace to keep the ‘ice’ looking sharp. Always use a digital thermometer; even a few degrees below 150°C will result in sugar that remains tacky and won’t hold its shape.
For the smoothest fondant finish, I recommend using a pair of fondant smoothers simultaneously—one to hold the cake in place and the other to buff out imperfections. This technique prevents finger marks from marring the surface. If you find your fondant is becoming too soft, a light dusting of cornstarch is better than icing sugar, as it provides a silkier glide. For another technical challenge involving delicate layers, you might consider mastering our raspberry white chocolate cake which focuses on a similar balance of moisture and strength.
Technical Tweaks for Advanced Bakers
While the yoghurt cake provides excellent stability, you can vary the flavor profile by incorporating a citrus-infused sponge. Adding lemon zest to the batter provides a bright acidity that cuts through the sweetness of the fondant. If you prefer a more traditional approach, you can find inspiration in our lemon rainbow cake which utilizes a similar layering technique.
Another advanced modification involves the sugar work. Instead of pouring flat panels for the castle, you can use silicon molds to create 3D ice pillars. This requires even more precision during the pouring stage to avoid air bubbles. For those who want to see how these techniques translate to other themed designs, checking out the resources at Manus Menu can provide additional perspective on aesthetic variations.
Presentation and Textural Balance

When serving a masterpiece like this, the presentation must be as precise as the construction. Use a sharp, thin-bladed knife dipped in hot water and wiped dry between every cut. This ensures that you slice through the fondant and the sugar glass cleanly without crushing the tender yoghurt sponge underneath.
To balance the sweetness of the fondant, I suggest serving each slice with a dollop of unsweetened Chantilly cream or a sharp berry coulis. The acidity of the berries complements the yoghurt in the cake perfectly. For those interested in other cakes that require specific cutting techniques for structural integrity, take a look at our guide for the car cake.
Mastering the Craft
Building a themed dessert of this magnitude is a true test of a pastry chef’s patience and technical skill. By following these methodical steps and respecting the science of sugar and sponge, you have created a dessert that stands as a testament to your baking precision. The balance between the rigid structure of the sugar ice and the soft melt of the yoghurt cake is what separates a professional build from a simple home bake. For more foundational knowledge on high-quality sponges, see our old fashioned chocolate cake.
I would be proud to see your technical triumphs in the kitchen. Please share your creations with our community and continue to refine your craft through precision and passion.
Find more inspiration on our social channels:

