My British pastry training taught me that a fairy cake is the ultimate litmus test for a baker’s ability to achieve a delicate emulsion. If the butter and sugar are not aerated with methodical precision, the structural integrity fails, resulting in a heavy crumb rather than a melt-in-the-mouth texture. Achieving that iconic light-as-air feel requires a deep understanding of how fat and air interact during the creaming stage.

These traditional British treats are distinct from their American cousins, the cupcake, due to their smaller scale and lighter, more delicate sponge. We focus on a specific ratio of ingredients that guarantees a tender crumb, finished with a classic glacé icing that provides a crisp structural contrast to the soft interior. It is a masterclass in simplicity, where every degree of temperature and second of mixing determines the final success.
Technical Mastery of the Light Sponge
You will appreciate this recipe because it prioritizes the physics of baking over mere decoration. The fairy cake relies on a perfect balance of moisture and aeration to create a texture that is firm enough to hold its shape but soft enough to dissolve instantly on the palate. Unlike dense muffins, these cakes are designed for elegance and technical purity.
This method teaches you the importance of the creaming process, where we create a matrix of tiny air bubbles trapped in fat. These bubbles expand in the oven, supported by the protein structure of the eggs and flour. The result is a consistent, fine-grained crumb that serves as the perfect canvas for a variety of finishes. It is a foundational skill that every serious pastry enthusiast must master to understand the science of the sponge.
Print
Fairy Cake
- Total Time: 35 mins
- Yield: 12 cakes
- Diet: Vegetarian
Description
Master the delicate art of the traditional British fairy cake with this precision-focused recipe. These light-as-air sponges feature a tender crumb and a classic smooth glacé icing, perfect for an elegant afternoon tea or technical baking practice.
Ingredients
- 125g unsalted butter, softened to 18-20°C
- 125g caster sugar
- 2 large eggs, at room temperature
- 125g self-raising flour, sifted
- 1 tsp vanilla extract
- 200g icing sugar, sifted
- 1–2 tbsp whole milk
Instructions
- Preheat the oven to 180°C (350°F), or 160°C (320°F) for fan-forced ovens, and line a 12-hole cupcake tin with paper cases.
- In a clean bowl, beat the softened butter and caster sugar together until the mixture is pale, fluffy, and significantly increased in volume.
- Gradually add the room-temperature eggs one at a time along with the vanilla extract, beating thoroughly after each addition to maintain a stable emulsion.
- Sift the self-raising flour over the wet ingredients and gently fold it into the batter using a large metal spoon or spatula until no streaks remain.
- Divide the batter equally among the 12 cases and bake for 20 minutes until golden brown and a skewer inserted into the center comes out clean.
- Transfer the cakes to a wire rack to cool completely, then prepare the icing by mixing icing sugar and milk to a coating consistency and spooning it over the cold cakes.
Notes
For the best results, ensure your eggs are at room temperature to prevent the butter from seizing during the creaming stage. Achieving the correct ‘ribbon stage’ with your glacé icing is key; it should be thick enough to hold its shape for a few seconds before leveling out smoothly on the cake surface.
- Prep Time: 15 mins
- Cook Time: 20 mins
- Category: Dessert
- Method: Baking
- Cuisine: British
The Technical Foundation

To achieve the perfect fairy cake, every ingredient must be at the correct temperature and specification. We are building a delicate structure, so quality is paramount.
- Unsalted Butter (125g): It must be softened to approximately 18°C-20°C (64°F-68°F). This temperature allows the fat to be plastic enough to trap air during creaming without melting.
- Caster Sugar (125g): The fine crystals of caster sugar are essential for creating small, uniform air pockets. Granulated sugar is too coarse and will create an uneven, ragged crumb.
- Eggs (2 Large): These must be at room temperature to prevent the butter from seizing. Eggs provide the lecithin needed for a stable emulsion and the protein for structural strength.
- Self-Raising Flour (125g): This flour contains a precise distribution of leavening agents. Sifting it is non-negotiable, as it introduces further aeration and prevents clumps that would hinder the melt-in-the-mouth feel.
- Vanilla Extract (1 tsp): Use a high-quality liquid extract rather than a paste to keep the batter’s moisture balance exact.
- Icing Sugar (200g): For the glacé icing, the fineness of the sugar determines the smoothness of the finish.
- Whole Milk (1-2 tbsp): Added drop by drop to achieve the perfect viscosity for the icing to set with a slight snap.
The Method
Step 1: Calibrating the Environment
Begin by preheating your oven to 180°C (350°F), or 160°C (320°F) if using a fan-forced oven. Precision in temperature is vital; an oven that is too hot will cause the cakes to peak and crack, while one too cool will result in a flat, dense texture. Line a 12-hole cupcake tin with high-quality paper cases to provide the necessary lateral support during the rise.
Step 2: Mastering the Creaming Method
In a clean bowl, combine the softened butter and caster sugar. Using a paddle attachment or a hand mixer, beat them together until the mixture is pale, soft, and significantly increased in volume. This is not merely mixing; you are mechanically forcing air into the fat. Look for a visual cue where the yellow butter turns almost white and the texture appears fluffy and light.
Step 3: Creating the Emulsion
Gradually add the room-temperature eggs one at a time, along with the vanilla extract. Each addition should be followed by thorough beating to maintain the emulsion. If the mixture begins to look curdled, the fat and water phases are separating. To fix this, add a single tablespoon of the weighed flour to bind the liquid. The final emulsion should be smooth and glossy.
Step 4: Incorporating the Dry Structure
Sift the self-raising flour directly over the wet ingredients. Using a large metal spoon or a spatula, gently fold the flour into the batter. This must be done with a light touch to avoid overworking the gluten. Stop the moment no streaks of white remain. Over-mixing at this stage will create a tough, bread-like texture rather than a delicate cake.
Step 5: Precision Baking
Divide the batter equally among the 12 cases. Place the tin in the center of the oven and bake for 20 minutes. Do not open the oven door during the first 15 minutes, as the sudden drop in temperature can collapse the delicate air cells. The cakes are done when they are golden brown and a skewer inserted into the center comes out clean, indicating the internal structure has set.
Step 6: The Glacé Finish and Cooling
Transfer the cakes to a wire rack immediately to prevent the bottoms from steaming and becoming soggy. While they cool, prepare the icing by sifting the icing sugar and gradually adding milk until the mixture reaches a coating consistency—it should slowly fall off the spoon and hold its shape for a few seconds. Once the cakes are stone cold, spoon the icing over the center, allowing it to move naturally toward the edges.
Precision Secrets

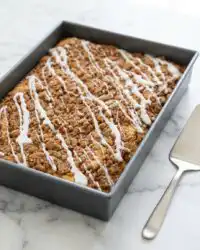
Temperature control is the most frequent point of failure in this recipe. If your eggs are cold, they will cause the butter to clump, ruining the aeration you worked so hard to achieve. If you find yourself in this position, you can place the eggs in a bowl of warm water for five minutes before cracking them. This small adjustment protects the delicate emulsion. For those looking to master even more complex moisture balances, our guide on fruit cake explains how different sugars affect the final hydration of the crumb.
Another technical detail is the ‘ribbon stage’ of the icing. If the icing is too thin, it will soak into the cake and create a sticky surface; if it is too thick, it will not level out smoothly. Aim for a consistency that mimics heavy cream. Always sift your icing sugar twice to eliminate the tiny lumps that can ruin the visual perfection of the glaze.
Technical Tweaks
One of the most popular variations is the ‘Butterfly Cake.’ To achieve this, once the cakes are cool, use a sharp paring knife to cut a small disc out of the top of each cake. Cut the disc in half to create ‘wings.’ Fill the cavity with a small amount of stiff whipped cream or buttercream, then place the wings back on top at an angle. This modification adds a structural element that completely changes the mouthfeel and presentation. You can also experiment with citrus by adding the zest of one lemon to the batter, similar to the flavor profile found in our lemon-rainbow-cake.
For a more detailed look at professional variations, you might find this guide to fairy cakes helpful for understanding regional differences in British baking. You can also replace 20g of the flour with high-quality cocoa powder to create a chocolate version, though you must increase the milk in the icing slightly to compensate for the drying effect of the cocoa solids.
Presentation Precision

When serving these cakes, presentation should reflect their delicate nature. I recommend placing them on a tiered cake stand to showcase the uniform rise and the smooth finish of the icing. Because the texture is so light, they pair beautifully with a sharp fruit preserve or a dollop of clotted cream on the side. If you are planning a larger spread, these provide a wonderful textural contrast to a richer raspberry-white-chocolate-cake, which offers a more substantial mouthfeel.
Serve these at room temperature to ensure the butter in the sponge remains soft and the flavor profile is fully accessible. If they have been stored in a cool larder, give them 30 minutes to temper before serving. This allows the fat molecules to relax, enhancing the melt-in-the-mouth sensation that defines a well-executed fairy cake.
Master the Craft
Perfecting the fairy cake is a significant achievement for any baker. It proves that you have mastered the fundamental mechanics of the creaming method and understand how to manage a delicate emulsion. This technical foundation will serve you well as you move on to more substantial bakes, such as our old-fashioned-chocolate-cake. Remember that in pastry, precision is the primary driver of quality, and even the simplest recipes deserve your full attention to detail.
I invite you to share your results with me as you practice these techniques. You can follow my latest technical experiments and join our community of ambitious bakers on Instagram, Pinterest, and Facebook. Happy baking, and may your sponges always be light and your structures always sound.

