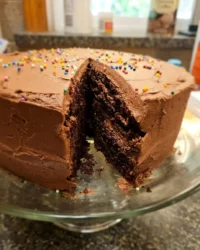
During my early training in a professional London patisserie, I learned that a Flourless Chocolate Cake is not merely a dense block of fudge, but a complex study in aeration and structural integrity. Achieving that characteristic crackle on the surface while maintaining a velvet-smooth, melting interior requires a disciplined approach to protein coagulation and fat emulsion. This recipe represents the pinnacle of that technical balance, proving that precision in the kitchen leads to superior mouthfeel.

This particular method relies on a stable egg foam to provide the necessary lift and structure that flour would typically offer. By carefully timing the whipping process and monitoring the temperature of your melted chocolate, you create a dessert that is substantial yet defies gravity on the tongue. It is a masterclass in how simple ingredients, when handled with expert technique, produce a result far greater than the sum of their parts.
The Architecture of a Perfect Melt
The primary reason you will find success with this recipe is the way it treats the Flourless Chocolate Cake as a structural challenge rather than a simple mixing task. In traditional cakes, gluten provides the framework; here, we use the proteins in six large eggs to trap air and create a delicate web that supports the weight of the cocoa and fats. This creates a texture that is impossibly smooth, lacking the graininess sometimes found in flour-based desserts.
Furthermore, the use of two types of sugar—granulated and light brown—provides a dual function. The granulated sugar assists in stabilizing the egg foam, while the molasses in the brown sugar contributes to a moist, fudgy center that resists drying out during the baking process. The result is a cake that offers a definitive snap on the exterior followed by a slow, luxurious melt that covers the palate. It is a triumph of pastry science that delivers a sophisticated, intense chocolate experience without being cloying.
Print
Flourless Chocolate Cake
- Total Time: 3 hours 50 mins
- Yield: 12 servings
- Diet: Gluten-Free
Description
A masterful gluten-free dessert that combines a delicate, meringue-like crust with a rich, velvety center. By utilizing a high-volume egg foam and premium dark chocolate, this cake delivers an intense cocoa experience with a sophisticated, professional finish.
Ingredients
- 8 oz. Semisweet Chocolate (60% cocoa), chopped
- 1 cup (2 sticks) Salted Butter, cubed
- 6 Large Eggs, room temperature
- 1/2 cup Unsweetened Cocoa Powder, sifted
- 1/2 cup Granulated Sugar
- 1/2 cup Light Brown Sugar
- 1 teaspoon Vanilla Extract
- 1/2 teaspoon Kosher Salt
Instructions
- Preheat your oven to 325°F (163°C) and prepare a 9-inch nonstick springform pan by spraying it with nonstick spray and lining the bottom with a parchment paper circle.
- In a double-boiler or a heatproof bowl set over simmering water, melt the chopped chocolate and cubed butter together until the mixture is glossy and smooth, then set aside to cool slightly.
- Using a stand mixer fitted with a whisk attachment, beat the granulated sugar, light brown sugar, and room temperature eggs on medium-high speed for 8 to 10 minutes until the thick ribbon stage is reached.
- Reduce the mixer speed to low and gradually add the sifted cocoa powder, vanilla extract, and salt, mixing only until streaks disappear.
- Gradually drizzle the cooled chocolate-butter emulsion into the egg foam while mixing on low speed until the batter is a uniform mahogany color.
- Pour the batter into the prepared pan and bake for 40 to 45 minutes until the edges are set and the center has a slight, rhythmic jiggle.
- Cool the cake completely on a wire rack for 2 hours, then refrigerate for at least one additional hour (or overnight) before releasing it from the springform pan.
Notes
To ensure the best texture, avoid over-baking; the slight jiggle in the center is essential for that fudgy, melt-in-the-mouth consistency once chilled. For the cleanest presentation, use a thin knife dipped in hot water and wiped dry between each cut to prevent the chocolate from sticking to the blade.
- Prep Time: 20 mins
- Cook Time: 45 mins
- Category: Dessert
- Method: Baking
- Cuisine: International
Precision in Every Component

To achieve the perfect Flourless Chocolate Cake, every ingredient must be selected for its specific contribution to the final structure and flavor profile. High-quality fats and proteins are the foundation of this bake.
- 8 oz. Semisweet Chocolate (Chopped): Choose a chocolate with approximately 60% cocoa solids. This provides enough cocoa butter for a firm set while maintaining a balanced sweetness. Avoid chocolate chips, as they contain stabilizers that can interfere with the smooth emulsion.
- 1 cup (2 sticks) Salted Butter: The fat in the butter is what creates the “melt” in your mouth. Using cubing ensures even melting during the double-boiler process, preventing the fat from separating from the milk solids.
- 6 Large Eggs (Room Temperature): This is the most critical structural component. Room temperature eggs reach their maximum volume when whipped, creating the tiny air pockets necessary for a light, souffle-like texture.
- 1/2 cup Unsweetened Cocoa Powder: This adds a deep, earthy intensity. Sifting the cocoa is vital to avoid pockets of dry powder that could compromise the uniformity of the crumb.
- Light Brown Sugar & Granulated Sugar: The combination provides both structural stability and moisture retention. The sugars also lower the coagulation temperature of the egg proteins, allowing the cake to set gently.
- Vanilla Extract and Kosher Salt: These are not just for flavor; they act as a bridge, making the chocolate notes more vibrant and cutting through the richness of the butter.
The Technical Method
Step 1: Prepare the Foundation
Preheat your oven to 325°F (163°C). A precise oven temperature is vital for the slow set of the proteins. Spray a 9-inch nonstick springform pan with nonstick spray and line the bottom with a circle of parchment paper. Coat the top of the paper with more spray. This double-layer of protection ensures the delicate edges of the cake remain intact during removal, preserving its structural beauty.
Step 2: Create the Chocolate Emulsion
In a double-boiler or a heatproof bowl set over a pot of barely simmering water, combine the chopped chocolate and cubed butter. Stir constantly with a silicone spatula. You are looking for a glossy, smooth emulsion where the butter and chocolate have become one. Once melted, remove from the heat and allow it to cool for several minutes. The temperature should be warm to the touch but not hot; if it is too hot, it will deflate the egg foam in later steps.
Step 3: Achieve the Ribbon Stage
In the bowl of a stand mixer fitted with the whisk attachment, combine the granulated sugar, light brown sugar, and the room temperature eggs. Beat at medium-high speed for 8 to 10 minutes. This is a significant duration, but it is necessary to reach the ‘ribbon stage’—when the mixture is thick, pale, and leaves a trail that sits on the surface for several seconds. This volume is what gives the cake its lift.
Step 4: Sift and Incorporate
Reduce the mixer speed to low. Gradually add the cocoa powder, vanilla extract, and salt. It is important to do this slowly to avoid a ‘cloud’ of cocoa and to prevent the physical weight of the powder from collapsing the air bubbles you worked so hard to create. Mix only until the streaks of cocoa disappear.
Step 5: The Final Folding
With the mixer still on low, slowly drizzle the cooled chocolate and butter mixture into the bowl. This process, often called tempering the foam, allows the fat to be distributed evenly without overwhelming the egg proteins. Continue mixing only until the batter is a uniform, deep mahogany color. Do not overmix, as this will lead to a tough, rubbery texture.
Step 6: The Controlled Bake
Pour the batter into the prepared pan and smooth the top with a spatula. Bake for approximately 40 to 45 minutes. The cake is done when the edges are set and have begun to pull away slightly from the sides of the pan, and the center still has a slight, rhythmic jiggle. The surface should have developed a thin, parchment-like crust.
Step 7: The Cooling and Setting Phase
Remove the cake from the oven and place it on a wire rack. Allow it to cool completely in the pan; this will take at least 2 hours. As the cake cools, the center will sink slightly—this is normal and creates the dense, fudgy texture we desire. Once cool, cover and refrigerate for at least one additional hour (or up to overnight) before releasing from the springform pan. Total time from start to finish is 3 hours 50 mins.
Jordan’s Secrets for Structural Success

To master the Flourless Chocolate Cake, one must respect the thermodynamics of the ingredients. Always ensure your eggs are truly at room temperature; if you are in a rush, place the whole eggs in a bowl of warm water for 10 minutes. This increases the elasticity of the egg whites, allowing them to hold more air. For those looking to see how these techniques compare to traditional flour-based structures, I recommend reviewing our old-fashioned-chocolate-cake for a comparison of crumb development. Another vital tip is to use a high-quality thermometer to check your oven; even a 10-degree variance can be the difference between a moist center and a dry, crumbly edge. If you are interested in alternative preparation methods, you can see how others handle similar chocolate textures here. Finally, always use a sharp knife dipped in hot water to slice the cake, wiping the blade between each cut to maintain a clean, professional presentation.
Advanced Technical Variations
While the base recipe is a masterpiece of balance, you can introduce technical tweaks to alter the sensory experience. For a deeper, more resonant cocoa profile, try ‘blooming’ your cocoa powder in two tablespoons of hot espresso before adding it to the mix; this liquid will not compromise the structure but will significantly intensify the dark notes. You might also consider exploring the cocoa-dream-lab for more ideas on flavor infusions. Another advanced variation involves replacing the brown sugar with muscovado sugar for a more complex, toffee-like undertone. If you wish to introduce a textural contrast, a layer of finely ground hazelnuts can be folded in at the final stage, though this will slightly increase the density of the final bake. For those avoiding dairy, a high-quality vegan butter with at least 80% fat content can be used, though the melt-point will differ slightly from traditional dairy fat.
Presentation and Textural Balance

The visual appeal of a Flourless Chocolate Cake lies in the contrast between its dark, matte interior and a light dusting of powdered sugar. I prefer to serve this cake at a slightly cool room temperature to allow the fats to soften just enough to melt immediately upon contact with the palate. For a perfect pairing, serve each slice with a dollop of unsweetened Chantilly cream or a side of fresh berries to provide acidity. The brightness of fruit is an excellent counterpoint to the richness of the cocoa, much like the balance found in our raspberry-white-chocolate-cake. If you are serving this for a formal occasion, a drizzle of salted caramel or a sprinkle of Maldon sea salt can add a sophisticated final touch that highlights the quality of the chocolate.
Achieving Pastry Mastery
Mastering the Flourless Chocolate Cake is a significant victory for any home baker, as it demonstrates a true understanding of how air and temperature dictate texture. By following these precise steps, you have created a dessert that is both structurally sound and exquisitely tender. If you enjoyed this technical challenge, you might find our snickers-cake to be another rewarding project for your repertoire. We invite you to share your results and join our community of devoted bakers on Pinterest, Instagram, and Facebook. Happy baking, and may your textures always be perfect.


