During my early days in a professional British pastry kitchen, I learned that the final finish is not merely aesthetic; it is the structural seal of the dessert. Achieving the perfect chocolate cake decoration requires an understanding of how temperature affects fat stability and gloss. This recipe focuses on a balanced sponge that provides the ideal foundation for technical artistry.

This chocolate cake uses a precise equal-weight method to ensure a sturdy yet melting crumb. It is designed specifically to support various decorative techniques, from tempered shards to smooth ganache. By following these exact measurements, you will produce a professional-standard result that tastes as exquisite as it looks.
Technical Mastery and Structural Balance
You will appreciate this recipe because it prioritizes the science of the sponge to facilitate superior decoration. Many cakes are too fragile to handle the weight of professional finishes, but this structure is engineered for stability. The use of golden caster sugar provides a subtle caramel note that complements the bitterness of high-quality cocoa powder.
We focus on the creaming method to create a stable emulsion, which prevents the cake from crumbling during the masking process. This structural integrity allows you to apply intricate designs without risking the cake’s physical form. It is the definitive balance between a firm build and a melt-in-the-mouth texture.
Print
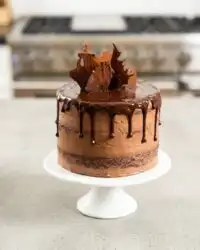
Chocolate Cake Decoration
- Total Time: 55 mins
- Yield: 12 servings
- Diet: Vegetarian
Description
This professional-grade chocolate sponge is engineered with a stable crumb structure specifically designed to support intricate decorations and heavy finishes. By employing a precise creaming method and temperature-controlled ingredients, you create a reliable foundation that balances rich flavor with the physical integrity required for high-end pastry work.
Ingredients
- 200g Unsalted Butter, softened to 18°C
- 200g Golden Caster Sugar
- 4 Large Eggs, room temperature
- 200g Self-Raising Flour, sifted twice
- 2 tbsp Dutch-processed Cocoa Powder
- 1 tsp Baking Powder
- ½ tsp Vanilla Extract
- 2 tbsp Whole Milk
Instructions
- Preheat your fan-assisted oven to 160°C (320°F) and prepare two 20cm round tins by greasing them with butter and lining the bases with parchment paper.
- In a stand mixer, beat the softened butter and golden caster sugar on medium speed for 5 minutes until the mixture is pale and voluminous.
- Whisk the eggs in a separate bowl and add them to the mixer one tablespoon at a time on low speed, adding a spoonful of flour if the mixture starts to curdle.
- Sift the self-raising flour, cocoa powder, and baking powder together from a height, then gently fold them into the wet batter using a large metal spoon and a figure-eight motion.
- Gently fold in the milk to achieve a dropping consistency, then divide the batter equally between the two tins and level the tops with an offset spatula.
- Bake in the center of the oven for 25–30 minutes until a skewer comes out clean, then cool in the tins for 10 minutes before transferring to a wire rack to cold completely.
Notes
To ensure the most stable surface for detailed piping or heavy ganache, wrap your cooled sponges tightly in plastic wrap and refrigerate them for several hours; the cold temperature sets the fats and makes the cake much easier to trim and mask without excessive crumbling.
- Prep Time: 25 mins
- Cook Time: 30 mins
- Category: Dessert
- Method: Baking
- Cuisine: British
The Technical Foundation of Ingredients

Success in pastry is determined by the quality and temperature of your raw materials. Each component here plays a specific role in the cake’s final architecture.
- Unsalted Butter (200g): Softened to exactly 18°C (64°F) for optimal aeration during the creaming stage. High-quality European-style butter with at least 82% fat content is preferred for a better mouthfeel.
- Golden Caster Sugar (200g): Its fine crystals dissolve more readily into the fat, creating a more uniform air cell structure than standard granulated sugar.
- Large Eggs (4): These must be at room temperature to prevent the emulsion from splitting. They provide the protein structure that holds the crumb together.
- Self-Raising Flour (200g): Sifted twice to ensure even distribution of the raising agents and to incorporate air.
- Cocoa Powder (2 tbsp): Use a Dutch-processed cocoa for a darker hue and smoother flavor profile. This affects the acidity levels and the final rise.
- Baking Powder (1 tsp): Provides the secondary lift necessary to keep the crumb light despite the weight of the cocoa solids.
- Vanilla Extract (½ tsp): A high-quality bean extract acts as a flavor bridge between the fat and the cocoa.
- Whole Milk (2 tbsp): Adjusts the batter’s viscosity to reach the correct ‘dropping consistency’ for even baking.
The Method of Precision
Step 1: Preparing the Environment
Preheat your fan-assisted oven to 160°C (320°F). Grease two 20cm (8-inch) round tins with unsalted butter and line the bases with parchment paper. This ensures the edges of the sponge remain smooth for easier side-wall decoration.
Step 2: The Creaming Stage
Place the softened butter and golden caster sugar into a stand mixer. Beat on medium speed for approximately 5 minutes until the mixture is pale and has reached a voluminous, fluffy texture. This step is critical; you are building the air pockets that define the final crumb.
Step 3: Emulsifying the Liquids
Whisk the eggs in a separate bowl. With the mixer on low, add the eggs one tablespoon at a time. If the mixture begins to look curdled, add a spoonful of the flour to re-stabilize the emulsion. Incorporate the vanilla extract at the very end of this process.
Step 4: Sifting and Folding
Sift the self-raising flour, cocoa powder, and baking powder together from a height to maximize aeration. Using a large metal spoon, gently fold the dry ingredients into the wet mixture. Use a figure-eight motion to avoid knocking out the air you worked so hard to incorporate.
Step 5: Adjusting Viscosity
Add the milk and fold gently. The batter should reach a ‘dropping consistency’—when a spoonful is tipped, it should fall off the spoon after a count of three. Divide the batter equally between the two prepared tins and smooth the tops with an offset spatula.
Step 6: The Bake and Cooling
Bake in the center of the oven for 25–30 minutes. The cakes are done when they have shrunk slightly from the sides and a skewer inserted into the center comes out clean. Leave them in the tins for 10 minutes before transferring to a wire rack. They must be completely cold—ideally chilled for 2 hours—before you begin any decoration.
Precision Secrets for Chocolate Finishes

Temperature control is the most vital factor when working with chocolate. If your room is too warm, your chocolate shards will lose their temper and bloom, resulting in a dull, streaky finish. Always aim for a workspace temperature of 20°C (68°F). When melting chocolate for drizzle or piping, use a digital thermometer to ensure you don’t exceed 45°C (113°F) for dark chocolate, as this will burn the solids and ruin the texture.
For those looking to deepen their understanding of how moisture affects cocoa, you can study the techniques used in our cocoa dream lab to see how different fats react with dry cocoa solids. Remember that even a single drop of water in your melting chocolate will cause it to seize, destroying the smooth flow required for professional decoration. For further inspiration on professional-grade finishes, you can see these chocolate cake decorating ideas.
Technical Variations for Advanced Texture
Once you have mastered the basic sponge, you can experiment with the structural elements of the decoration. A popular variation is the use of a mirror glaze, which requires a perfectly smooth crumb-coated surface. To achieve this, freeze the cake for 30 minutes before pouring the glaze at exactly 32°C (90°F) for the ultimate high-gloss finish.
You might also consider a salted caramel integration between the layers. This provides a soft, flowing contrast to the firm sponge. We use a similar structural approach in our snickers cake, where the balance of nut proteins and fats creates a complex mouthfeel. For a lighter variation, replace 50g of the flour with ground almonds to increase moisture, though this will make the cake slightly more fragile during the stacking process.
Presentation Precision and Textural Balance

When serving a decorated chocolate cake, the temperature is paramount. If the cake is served straight from the refrigerator, the butter in the sponge and the fats in the chocolate decoration will be firm, masking the subtle flavors. Allow the cake to sit at room temperature for at least 30 minutes before serving. This allows the fats to soften slightly, creating that signature melt-in-the-mouth sensation.
To achieve professional slices, use a thin-bladed knife dipped in hot water and wiped dry between every single cut. This prevents the decoration from dragging through the crumb. For a stunning visual contrast, serve a slice of this dark chocolate masterpiece alongside the vibrant colors of our raspberry white chocolate cake. The acidity of the berries perfectly balances the deep bitterness of the cocoa.
Master the Craft of Chocolate Artistry
Mastering chocolate cake decoration is a journey of technical discipline. By respecting the temperatures of your ingredients and the science of the emulsion, you create a foundation that allows your creativity to flourish. Precision in the kitchen is what separates a good home baker from a true pastry artist. Once you have perfected this base, I encourage you to try our old-fashioned chocolate cake to see how different ratios can alter the structural outcome.
I would love to see your technical triumphs. Please share your creations with the community on Pinterest and follow my latest experiments on Instagram. You can also find more of my methodology on Facebook. Happy baking, and remember: precision is the key to the perfect melt.


