During my early training at a patisserie in London, I spent weeks mastering the art of the paper-thin crepe. It was a lesson in thermal management; the pan must be hot enough to set the batter instantly but cool enough to allow for a graceful, circular swirl. That experience solidified my belief that the most impressive results come from the most basic techniques performed with absolute precision.

This Crepe Cake, or *Gâteau de Mille Crêpes*, represents the pinnacle of structural repetition. Each of the twenty-five layers must be identical in thickness to guarantee the final cake stands tall and cuts with the clean lines of a professional pastry. It is a dessert that celebrates the delicate balance between the snap of cold chocolate and the soft, yielding texture of a perfectly cooked crepe.
Structure Meets Texture in Every Layer
There is a specific victory in creating a dessert that relies on architecture as much as flavor. This Crepe Cake is a masterpiece of mouthfeel. When you bite through the stack, your fork meets a series of micro-resistances from the crepes before melting into the luscious chocolate cream. It is a sensation that a traditional sponge cake simply cannot replicate.
The beauty of this recipe lies in its honesty. There are no chemical leaveners or complex stabilizers here; the structure is built purely through the protein in the eggs and flour, combined with the cooling properties of high-fat dairy. It is a technical challenge that rewards the patient baker with a visual and textural triumph.
Beyond the texture, the flavor profile is deeply sophisticated. By using dark chocolate with at least 70% cocoa solids, we balance the sweetness of the crepe batter. This creates a dessert that is rich without being cloying, making it a favorite for those who appreciate the darker, more intense side of cocoa and cream. It is a stunning centerpiece that commands attention on any dessert table.
Print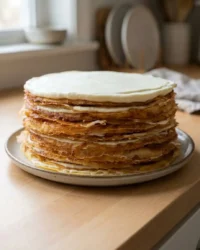
Crepe Cake
- Total Time: 2 hours 30 mins
- Yield: 12 servings
- Diet: Vegetarian
Description
This architectural French masterpiece, also known as Gâteau de Mille Crêpes, features twenty-five layers of paper-thin crepes stacked with a luscious chocolate cream. Finished with a glossy 70% dark chocolate ganache, it is a sophisticated dessert that celebrates the perfect balance of texture and intense cocoa flavor.
Ingredients
- 800 ml Full-Fat Milk
- 305 g Plain Flour (All-Purpose)
- 4 Large Eggs
- 80 g Sugar
- 25 g Melted Butter
- Pinch of Salt
- 625 ml Double Cream (for filling)
- 250 ml Double Cream (for ganache)
- 70% Dark Chocolate
- Icing sugar
- Cocoa powder
Instructions
- In a high-speed blender, combine eggs, milk, sugar, plain flour, salt, and melted butter; blend on medium speed for 30 seconds until completely smooth.
- Pour the batter into a bowl and let it rest for at least one hour at room temperature (or overnight in the refrigerator) to allow the gluten to relax.
- Heat a non-stick 8 or 9-inch frying pan over medium-low heat and lightly film with melted butter.
- Pour 1/4 cup of batter into the center, tilting the pan immediately to create a thin, even layer; cook for 2 minutes until the edges lift.
- Flip the crepe in one swift motion and cook the second side for 30 seconds, then transfer to a wire rack to cool completely.
- Whisk the 625 ml of double cream with icing sugar and cocoa powder until stiff peaks form, ensuring a thick, spreadable consistency.
- Place a crepe on a serving plate, spread a thin layer of chocolate cream (2-3 tablespoons) to the edges, and repeat with remaining crepes, finishing with a plain crepe.
- Make the ganache by heating 250 ml double cream to a simmer, pouring it over finely chopped dark chocolate, and stirring until glossy before pouring over the cake.
Notes
To achieve the signature clean slices, it is vital to chill the assembled cake for at least 4 hours to allow the fats in the double cream to stabilize. Using a crepe pan with low sides will significantly simplify the flipping process and help maintain the delicate, thin edges of each layer.
- Prep Time: 45 mins
- Cook Time: 45 mins
- Category: Dessert
- Method: Pan-frying
- Cuisine: French
The Technical Foundation of the Batter and Cream

To achieve the perfect melt-in-your-mouth experience, we must look at the science of our ingredients. Every gram matters when you are building twenty-five layers of vertical structure.
- 800 ml Full-Fat Milk: This is our primary hydrating agent. The fat content is vital for a tender crumb; skimmed milk will result in a rubbery crepe that lacks the necessary suppleness.
- 305 g Plain Flour (All-Purpose): We use a moderate protein flour to provide enough gluten for structural integrity without making the crepes tough. Precision in weighing this is critical.
- 4 Large Eggs: These provide the protein network that holds the crepe together during the flip. They also add a rich, custard-like flavor to the base.
- 80 g Sugar: This is a small amount, designed to help with the Maillard reaction—the browning process that gives the crepes their characteristic toasted flavor.
- 25 g Melted Butter: Adding fat directly to the batter prevents the gluten from becoming too elastic, which guarantees a tender bite.
- Double Cream (625 ml for filling, 250 ml for ganache): In British baking, double cream has a fat content of about 48%. This high fat content is what allows the cream to hold its shape between layers without the need for gelatin.
- 70% Dark Chocolate: The cocoa solids provide the structural ‘snap’ to the ganache topping, creating a beautiful contrast with the soft layers below.
Temperature is your silent partner in this process. Make sure your milk and eggs are at room temperature before mixing to create a perfect emulsion. If the milk is too cold, it will seize the melted butter, creating tiny clumps that ruin the smoothness of your batter.
The Method of Precision
Step 1: Create the Batter Emulsion
In a high-speed kitchen blender, combine the eggs, milk, sugar, plain flour, salt, and melted butter. Blend on medium speed for 30 seconds until the mixture is completely smooth. This method is superior to hand-whisking as it breaks down every flour pearl, resulting in a silk-like consistency. Scrape down the sides with a flexible spatula and pulse once more to collect any stray flour.
Step 2: The Maturation Period
Pour the batter into a clean bowl and let it rest for at least one hour at room temperature, or ideally, overnight in the refrigerator. This step is non-negotiable. Resting allows the gluten to relax and the starch granules to fully hydrate. A rested batter produces a crepe that is significantly more tender and less likely to tear during cooking. If you refrigerated the batter, bring it back to room temperature and give it a gentle whisk before proceeding.
Step 3: Thermal Management and Cooking
Place a non-stick 8 or 9-inch frying pan over medium-low heat. Brush the surface lightly with a thin film of melted butter. Using a 1/4 cup measure, pour the batter into the center of the pan and immediately tilt the pan in a circular motion to coat the bottom. Aim for the thinnest layer possible. Cook for approximately 2 minutes until the edges start to lift and the bottom is a light golden brown.
Step 4: The Flip and Finish
Carefully slide a thin offset spatula or a skewer under the edge of the crepe. Flip it over in one swift motion. Cook the second side for only 30 seconds. It should be barely colored. Transfer the cooked crepe to a wire rack or a large plate to cool completely. Repeat this process until all the batter is used, stacking them only once they are no longer steaming to prevent sticking.
Step 5: Stabilize the Chocolate Cream
In a chilled bowl, combine the double cream, icing sugar, and cocoa powder. Whisk on medium-high speed until you reach stiff peaks. Be careful not to over-whisk, as double cream can turn to butter quickly. You are looking for a thick, spreadable consistency that holds its shape when the whisk is lifted. This cream will act as the mortar for our crepe skyscraper.
Step 6: Architectural Assembly
Place one crepe on your serving plate or a cardboard cake round. Apply a small dollop of chocolate cream (about 2-3 tablespoons) and spread it into a paper-thin, even layer using an offset spatula. Leave a tiny margin at the very edge to prevent the cream from squeezing out. Place the next crepe on top, pressing gently to remove air pockets. Repeat until all crepes are used, finishing with a plain crepe on top.
Step 7: The Ganache Crown
Finely chop the dark chocolate and place it in a heat-proof bowl. Heat the remaining 250 ml of double cream until it just reaches a simmer (do not boil). Pour the hot cream over the chocolate and let it sit for 2 minutes. Stir gently from the center outward until a glossy, smooth ganache forms. Pour this over the top of the chilled cake, letting it drip naturally down the sides.
Precision Secrets for Structural Success

To achieve the cleanest slices, you must respect the cooling process. A crepe cake is a living structure until the fats in the cream have fully set. I recommend chilling the assembled cake for at least 4 hours, though overnight is better for the flavors to meld and the texture to stabilize. If you find your crepes are too thick, dilute the batter with a tablespoon of milk at a time until it reaches the consistency of heavy cream. For more insights into maintaining the integrity of layered bakes, see our guide on fruit cake. Using a crêpe pan with low sides makes the flipping process much easier and prevents the edges from curling upward. Always wipe your pan between every five crepes to remove any burnt butter solids that might affect the flavor of the delicate batter.
Technical Tiers and Advanced Options
Once you have mastered the basic chocolate structure, you can experiment with different flavor profiles. A popular variation involves substituting the chocolate cream with a citrus-infused mascarpone for a lighter, brighter finish. You can also incorporate fruit by adding a very thin layer of raspberry coulis every five layers of cream. This adds a necessary acidity to cut through the richness of the fats. If you enjoy the combination of berries and cream, our raspberry white chocolate cake offers a similar balance of sweet and tart. For a truly professional finish, try dusting the top with tempered chocolate shavings instead of the ganache to add a textural snap to the presentation.
Presentation and Slicing Precision

To showcase the internal architecture of the cake, you must use a very sharp, thin-bladed knife. Dip the knife in hot water and wipe it dry between every single cut. This prevents the cream from dragging and ensures that each layer remains distinct and beautiful. Serve the cake chilled but let the slice sit at room temperature for five minutes before eating; this allows the chocolate in the cream to soften just enough to achieve that signature melt. A side of fresh berries or a light lemon curd can provide a sharp contrast to the rich chocolate. For more inspiration on serving colorful, layered desserts, look at our lemon rainbow cake. A dollop of unsweetened whipped cream on the side can also help balance the intensity of the 70% dark chocolate ganache.
Master the Craft of Vertical Layering
Success with a Crepe Cake is a testament to your patience and your understanding of pastry fundamentals. By focusing on the consistency of your batter and the temperature of your pan, you have created a dessert that is as structurally sound as it is delicious. This methodical approach is what separates a good home baker from a true pastry enthusiast. For another exploration into deep, rich textures, I invite you to try our old-fashioned chocolate cake. Please share your technical triumphs with us on Instagram or pin this guide on Pinterest to save for your next special occasion. For more detailed technique videos, visit our YouTube channel.