During my time in a London patisserie, I learned that the secret to a cake’s structural integrity often lies in the most counterintuitive step: adding boiling water. This method ensures the cocoa blooms fully, providing a deep, resonant flavor while the heat partially sets the proteins for a tender, open crumb. It is a lesson in how temperature dictates texture.

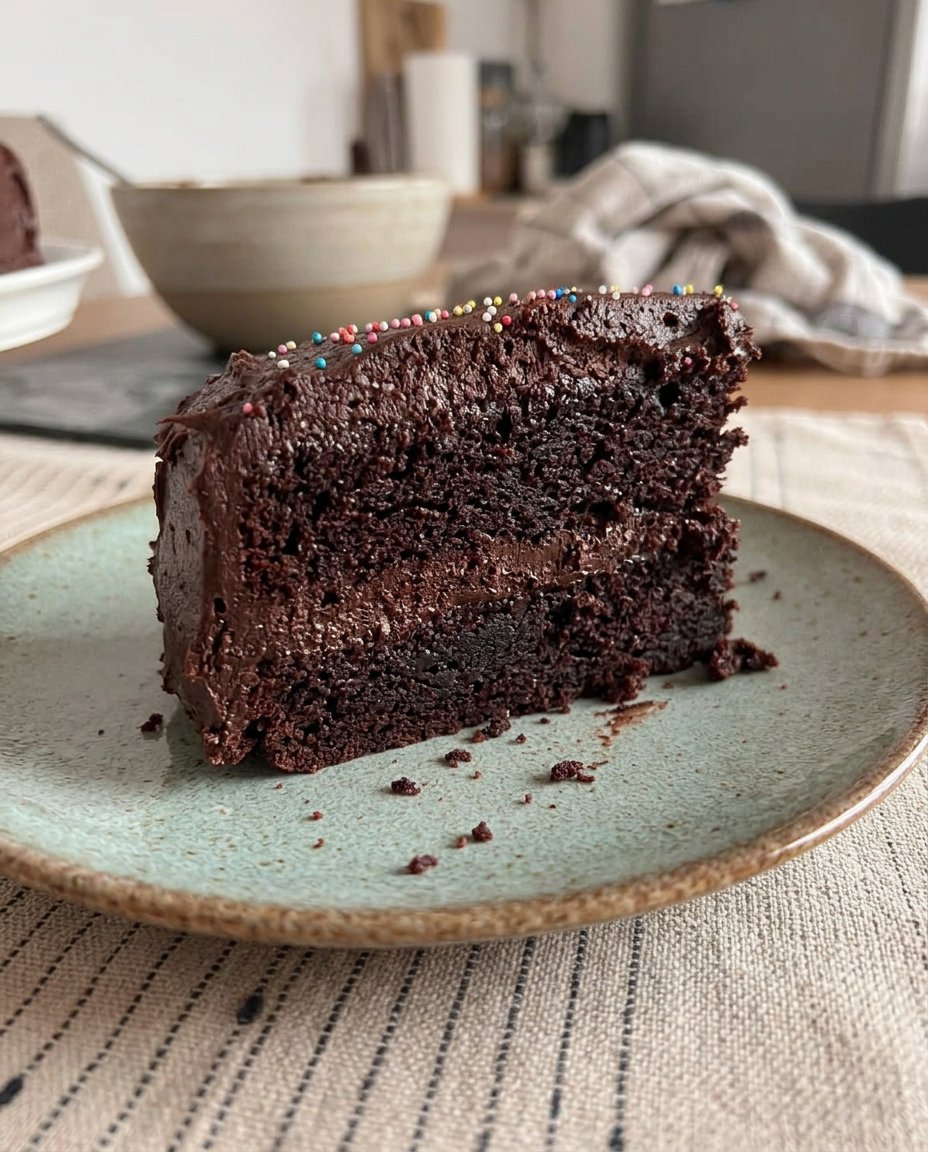
This specific chocolate cake is a masterclass in moisture management, achieving a crumb that is remarkably soft yet stays together under the weight of a silk-smooth buttercream. By balancing the acidity of cocoa with precise leavening, we create a structure that literally dissolves on the palate. Achieving this result requires strict adherence to the mixing sequence and temperature controls outlined below.
The Physics of the Perfect Crumb
This recipe succeeds because it respects the delicate balance between hydration and aeration. Most cakes rely solely on creamed butter for structure, but this oil-based method provides a superior mouthfeel that remains moist even when chilled. The addition of boiling water (237ml) at the final stage of mixing is the technical triumph here; it lowers the viscosity of the batter, allowing for a more even rise and a finer crumb than traditional methods.
Furthermore, the interaction between the Dutch-processed cocoa and the dual-leavening system of baking powder and baking soda (bi-carb) creates a controlled lift. This prevents the cake from collapsing under its own weight while maintaining a richness that is often lost in lighter sponges. It is a reliable, professional-grade foundation for any ambitious baker looking to master the art of the chocolate sponge.
Finally, the structural beauty of this cake is its versatility. Whether you are building a multi-tiered celebration piece or a simple afternoon treat, the integrity of the crumb allows for clean slicing and easy handling. It is a recipe where precision in measurement results in a victory of texture, providing that elusive melt-in-your-mouth experience that distinguishes a pastry chef’s work from a standard home bake.
Print
Chocolate Cake
- Total Time: 50 mins
- Yield: 12 servings
- Diet: Vegetarian
Description
This professional-grade chocolate cake utilizes a boiling water blooming technique to unlock deep cocoa flavors and create an incredibly moist, tender crumb. It is a reliable, structurally sound sponge that serves as the perfect foundation for elaborate celebration cakes or a simple afternoon treat.
Ingredients
- 1 3/4 cups (210g) all-purpose flour
- 3/4 cup (75g) Dutch-processed cocoa powder
- 1 1/2 tsp baking powder
- 1 1/2 tsp baking soda
- 2 cups (400g) granulated sugar
- 1/2 tsp salt
- 2 large eggs
- 1 cup milk
- 1/2 cup (120ml) vegetable oil
- 2 tsp vanilla extract
- 1 cup (237ml) boiling water
Instructions
- Preheat your oven to 180°C (350°F), or 160°C for fan-forced, and grease two 22cm (9″) cake pans, lining the bases with parchment paper.
- Sift the flour, cocoa powder, baking powder, and baking soda into a large bowl, then whisk in the sugar and salt for 15 seconds to aerate.
- Create a well in the center and add the eggs, milk, oil, and vanilla extract, whisking vigorously for 30 seconds until the batter is lump-free.
- Pour in the boiling water and whisk gently until fully incorporated; the batter will be very thin and liquid.
- Divide the batter equally between the two pans and bake for 35 minutes or until a skewer inserted into the center comes out clean.
- Let the cakes rest in their pans for 10 minutes before turning them out onto wire racks upside down to naturally level the tops while cooling.
Notes
For the most consistent results, always use an external oven thermometer to verify your temperature, as even small variances can affect the rise. Additionally, using room temperature eggs and milk ensures a stable emulsion that prevents the batter from breaking or becoming dense.
- Prep Time: 15 mins
- Cook Time: 35 mins
- Category: Dessert
- Method: Baking
- Cuisine: International
The Technical Foundation of Flavor and Form

To achieve the perfect chocolate cake, one must understand that every ingredient serves a structural purpose. We are not just mixing flavors; we are building a stable emulsion that can withstand the heat of the oven.
- All-Purpose Flour (1 3/4 cups / 210g): This provides the gluten framework. I recommend a flour with approximately 10-11% protein to ensure the cake is sturdy enough to frost but tender enough to eat with a fork.
- Cocoa Powder (3/4 cup / 75g): While regular cocoa works, Dutch-processed cocoa is neutralized with alkali, which results in a darker color and a smoother, more mellow flavor profile that doesn’t compete with the leaveners.
- Leavening Agents (1.5 tsp each of Baking Powder and Soda): The baking soda reacts immediately with the acidity in the cocoa and milk, while the baking powder provides a secondary lift during the baking process.
- Granulated Sugar (2 cups / 400g): Beyond sweetness, sugar is hygroscopic, meaning it attracts water. This is essential for keeping the crumb moist and preventing the gluten from becoming too tough.
- Vegetable Oil (1/2 cup / 120ml): Unlike butter, oil remains liquid at room temperature, which contributes to a superior ‘melt’ factor in the mouth.
- Boiling Water (1 cup / 237ml): This is the catalyst for ‘blooming’ the cocoa. It dissolves any clumps and extracts the maximum depth of flavor from the cocoa solids while helping the sugar dissolve completely for a smooth batter.
The Method for Technical Success
Step 1: Atmospheric Calibration and Pan Preparation
Preheat your oven to 180°C (350°F), or 160°C if using a fan-forced oven. Prepare two 22cm (9″) cake pans by greasing them with softened butter. Line the bases with circles of parchment paper; this is a non-negotiable step for structural safety. For those using springform pans, apply a ‘butter plug’ by thick-smearing butter where the base meets the wall to prevent the thin batter from leaking.
Step 2: Sifting and Dry Aeration
Sift the flour, cocoa powder, baking powder, and baking soda into a large mixing bowl. Add the sugar and salt. Use a balloon whisk to combine these for 15 seconds. This process doesn’t just mix; it aerates the dry ingredients, ensuring no dense pockets of flour remain to disrupt the crumb later.
Step 3: Emulsifying the Wet Ingredients
Create a well in the center and add the eggs, milk, oil, and vanilla extract. Whisk vigorously for exactly 30 seconds. You are looking for a lump-free consistency. During this stage, the fats in the oil and eggs are coating the flour particles, which limits gluten development and guarantees a tender result.
Step 4: The Boiling Water Bloom
Pour the boiling water into the batter. Whisk gently until the water is fully incorporated. The batter will appear exceptionally thin, almost like a heavy cream. Do not be alarmed; this low viscosity is exactly what allows the steam to escape evenly during baking, creating a uniform pore structure within the cake.
Step 5: Thermal Execution and Baking
Divide the batter equally between the two prepared pans. Bake for 35 minutes. To test for readiness, insert a wooden skewer into the center; it must come out clean or with a few moist crumbs. Avoid overbaking, as the residual heat will continue to set the structure during the cooling phase.
Step 6: Controlled Cooling and Structural Set
Allow the cakes to rest in their pans for 10 minutes. This allows the internal proteins to firm up. Turn the cakes out onto wire racks upside down. This technique uses gravity to flatten the domes, creating a perfectly level surface for frosting without the need for excessive trimming.
Precision Secrets for Structural Wisdom

To ensure your cake has the best possible texture, always check your oven’s true temperature with an external thermometer. Even a five-degree variance can affect how the leavening agents react, leading to a peaked center or a sunken middle. If you find your cakes are often dry, it is likely they are spending too long in the oven; start checking for doneness five minutes before the recipe suggests. For a deeper understanding of chocolate chemistry, you might look at our old-fashioned-chocolate-cake guide which details the interaction between fats and cocoa solids. Another professional trick is to use room temperature eggs and milk; cold ingredients can shock the batter and cause the fats to seize, resulting in an uneven emulsion.
Technical Tweaks for Advanced Bakers
While the base recipe is a classic, you can adjust the structural elements for different flavor profiles. For a ‘smoky’ edge, replace half of the boiling water with a very strong, dark roast coffee; the acidity and bitterness of the coffee sharpen the chocolate notes without changing the batter’s hydration level. If you prefer a sturdier cake for carving, reduce the oil by 20ml and add an extra egg yolk to increase the protein-to-fat ratio. For those looking for a more decadent, layered approach, you can find inspiration in our snickers-cake which utilizes a similar high-moisture base but adds structural layers of caramel and nougat. Always remember that any addition of moisture must be balanced by a slight increase in dry ingredients to maintain the cake’s integrity.
Presentation Precision and Textural Balance

When serving this cake, temperature is paramount. If the cake has been refrigerated, allow it to sit at room temperature for at least 30 minutes before slicing; this ensures the fats in the buttercream soften to a velvety consistency. Use a long, serrated knife dipped in hot water and wiped dry between each cut to achieve clean, professional edges. To balance the intense richness of the chocolate, I recommend serving with a dollop of unsweetened crème fraîche or a handful of tart berries. For a more elaborate presentation, you might pair it with elements from our raspberry-white-chocolate-cake for a contrast in both color and acidity. The goal is to provide a textural counterpoint to the soft, melting sponge.
Mastery of the Technical Truth
Baking is as much about physics as it is about flavor. By following this methodical process, you have created a dessert that respects the science of ingredients to produce a superior sensory experience. True mastery comes from understanding why we bloom cocoa or why we line our pans with such care. For those ready to continue their journey into the depths of pastry science, I invite you to study our findings in the cocoa-dream-lab. You can also find more technical demonstrations and structural advice on our social channels. We would be proud to see your results, so please share your bakes with us on Facebook, Instagram, or Pinterest. For further inspiration on the chemistry of chocolate, refer to the foundational work at RecipeTin Eats.


