In the pastry kitchens of London, my mentor taught that a no-bake cheesecake is a study in hydrocolloids and fat crystallization, not merely a shortcut. We learned that the difference between a weeping mess and a sliceable masterpiece lies in the precise temperature of the cream cheese and the aeration of the double cream. This recipe applies that rigorous discipline to the American classic, creating a pumpkin cheesecake with structural integrity and a melt-in-your-mouth finish.

We construct this dessert on a tightly packed gingersnap foundation, providing a crisp counterpoint to the velvet filling. By folding stiffly whipped cream into the spiced pumpkin mixture, we achieve a mousse-like texture that sets firmly without the need for gelatin or eggs. It is a triumph of textural balance, requiring only patience and the correct thermal conditions to perfect.
Structure Meets Seasonal Warmth
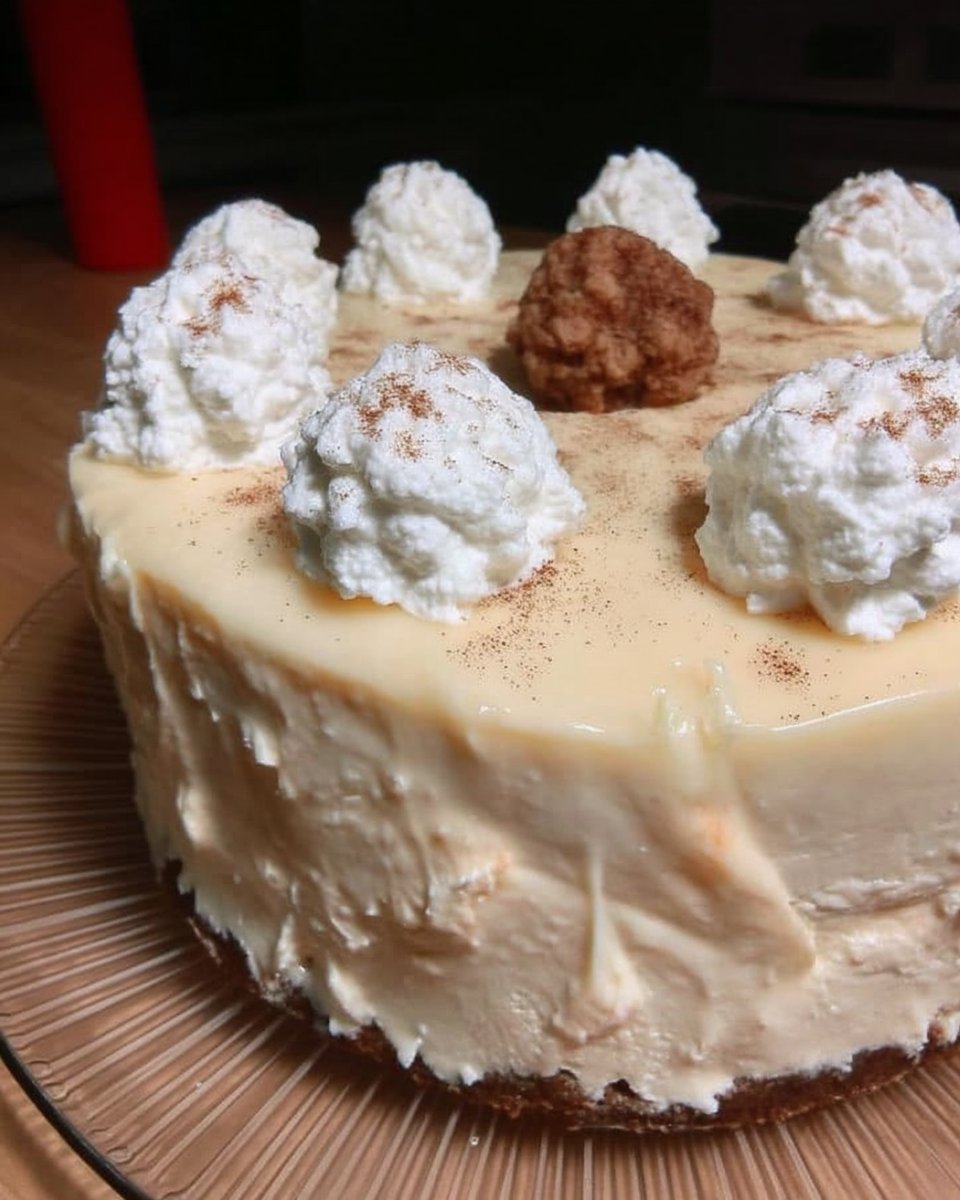
The beauty of this dessert lies in its textural duality: a shattering, spicy crust supporting a cloud-like, aerated filling. Unlike baked cheesecakes which can be dense and heavy, this method relies on mechanical leavening—air trapped in fat—to create a lightness that dissolves on the tongue. It offers the complex flavor profile of a pumpkin pie but with the refined mouthfeel of a high-end mousse.
Print
Pumpkin Cheesecake
- Total Time: 8 hours 30 mins
- Yield: 12 servings
- Diet: Vegetarian
Description
This elegant no-bake pumpkin cheesecake features a spicy gingersnap crust paired with a light, mousse-like filling. By utilizing precise aeration techniques and high-fat dairy, it achieves a sophisticated texture that is both stable and incredibly creamy without the need for baking.
Ingredients
- Gingersnap crumbs
- Melted butter
- Granulated sugar
- Full-fat brick cream cheese
- Heavy whipping cream
- Pure pumpkin puree
- Confectioners’ sugar
- Vanilla extract
- Ground cinnamon
- Ground ginger
- Ground nutmeg
Instructions
- Combine gingersnap crumbs, melted butter, and sugar in a bowl until the mixture resembles wet sand, then press firmly into a 9-inch springform pan and freeze for 15 minutes.
- In a chilled mixing bowl, whip the cold heavy cream on medium-high speed until stiff peaks form and the whisk leaves deep tracks.
- In a separate large bowl, beat the softened cream cheese until perfectly smooth before adding the pumpkin puree, sugars, vanilla, and spices, mixing until homogenous.
- Gently fold the whipped cream into the pumpkin mixture using a silicone spatula in a cut-and-turn motion to maintain the aerated structure.
- Spread the filling evenly over the frozen crust and refrigerate for at least 8 hours or overnight to allow the fats to recrystallize and set firmly.
Notes
Ensure your cream cheese is completely at room temperature to prevent any lumps in the final mousse, while the heavy cream must remain fridge-cold for successful aeration. For the best structural results, use a heavy-bottomed glass or measuring cup to pack the crust as tightly as possible before freezing. Slicing with a warm, clean knife between each cut will produce the professional finish this dessert deserves.
- Prep Time: 30 mins
- Cook Time: 0 mins
- Category: Dessert
- Method: No-Bake
- Cuisine: American
The Technical Foundation

Precision in ingredient selection is paramount for structural success. Substitutions here will alter the setting point and mouthfeel.
- Full-Fat Brick Cream Cheese: Do not use tub varieties. We need the lower moisture content and higher stabilizer count of block cheese to allow the filling to hold its shape at room temperature.
- Heavy Whipping Cream: This must be cold (around 40°F/4°C) to achieve maximum volume during aeration. The fat network traps air bubbles, providing the cheesecake’s structure.
- Gingersnap Crumbs: These provide a spicy, structural base that resists becoming soggy against the moisture of the filling. The snap is essential for texture contrast.
- Pumpkin Puree: Use pure pumpkin, not pie filling. We need absolute control over the spice and sugar levels to prevent the filling from becoming cloying.
- Confectioners’ Sugar: The cornstarch in this sugar acts as a microscopic stabilizer, absorbing excess moisture from the pumpkin.
The Method for Perfect Aeration
Step 1: Construct the Base
Combine the gingersnap crumbs with the melted butter and sugar. The mixture should resemble wet sand. Press this into a 9-inch (23cm) springform pan with significant force—I use the flat bottom of a measuring cup. We need a compact layer to support the filling. Freeze this for 10–20 minutes to solidify the butter fat.
Step 2: Create the Aerated Structure
In a chilled bowl, whip the cold heavy cream until stiff peaks form. Watch for the moment the whisk leaves deep tracks that do not collapse. This usually takes about 4 minutes on medium-high speed. Set this aside; this is your structural air.
Step 3: Emulsify the Filling
Beat the softened cream cheese until it is perfectly smooth. Any lumps remaining at this stage will persist in the final product, ruining the mouthfeel. Add the pumpkin puree and sugars, beating until homogenous. Scrape the bowl efficiently to verify no dense cheese sticks to the bottom. Incorporate the spices and vanilla.
Step 4: Fold for Texture
This is the critical texture point. Gently fold the whipped cream into the pumpkin mixture using a silicone spatula. Use a “cut and turn” motion. We want to incorporate the mixtures without deflating the air bubbles we worked so hard to create. Stop as soon as the streaks disappear.
Step 5: The Chill and Set
Spread the filling over the frozen crust, smoothing the top with an offset spatula for a professional finish. Cover tightly and refrigerate. The proteins and fats need time to recrystallize and set—8 hours is the minimum, but an overnight chill yields superior sliceability.
Jordan’s Precision Secrets

- Temperature is King: Your cream cheese must be truly softened (68°F/20°C) to blend smoothly, but your heavy cream must be fridge-cold to whip properly. If the cheese is too cold, you get lumps; if the cream is too warm, you lose volume.
- Blot the Pumpkin: If your puree seems watery, spread it on paper towels for a few minutes to wick away excess moisture. This prevents the filling from weeping later.
- Structural Integrity: For a dessert that holds up even better on the plate, make certain you pack the crust “very tightly” as noted. Loose crumbs lead to structural failure when plating.
- Technique Reference: This method of folding cream for lift is a classic technique, similar to the precision required in our raspberry-white-chocolate-cake where texture is paramount.
- Source Credit: We acknowledge the technical guidance found in Sally’s Baking Addiction for the ratios of cream to cheese in this no-bake method.
Technical Variations
- The Crust Variable: While gingersnaps offer a superior snap, you may substitute graham crackers or digestive biscuits. Increase the butter by 1 tablespoon if using drier biscuits to help the crust bond correctly.
- Salted Caramel Finish: A layer of salted caramel between the crust and filling acts as a moisture barrier and adds a rich, saline contrast to the sweet filling.
- Chocolate Contrast: For a darker profile, use chocolate wafers for the crust. This pairs exceptionally well if you enjoy the depth of flavor found in our old-fashioned-chocolate-cake.
Presentation Precision

To serve this cheesecake with the dignity it deserves, maintain the temperature chain—keep it chilled until the moment of service. As it warms, the aeration becomes softer and less distinct. A dollop of extra whipped cream, piped with an Ateco 849 tip, adds visual height and indicates the lightness of the filling to the palate. For more dessert inspirations and topping ideas, consult our recipe-index.
Mastering the Chill
This pumpkin cheesecake proves that patience is a valid ingredient. By allowing the fats to recrystallize slowly in the refrigerator, we achieve a texture that is stable yet ethereal. It is a perfect example of how simple components, treated with respect and precision, yield a superior result. If you are looking for a dessert with a different type of density, consider our fruit-cake for your next project.
Share your structural triumphs with us on Pinterest, Instagram, or Facebook.
