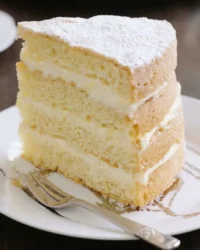
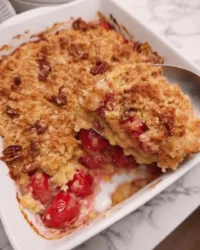
A crisp, golden exterior protecting a tender crumb is the hallmark of a well-executed Strawberry Vanilla Cake, achieved through precise ratios and temperature control for the home baker.

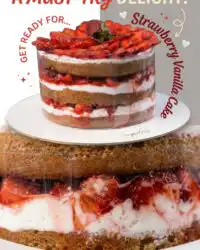
This three-layer construction relies on the specific chemistry of acid-base reactions rather than eggs to provide lift and structure. The result is a sponge that absorbs strawberry syrup without losing its integrity or becoming soggy. Precise measurement of ingredients ensures a predictable outcome every time, allowing the delicate vanilla and fruit flavors to remain the focal point of the dessert.
What Makes the Texture of This Strawberry Vanilla Cake Right
Prep: 20 min · Serves: 8 · Difficulty: Medium
- Build stable layers that hold their shape.
- Achieve a soft crumb without using eggs.
- Balance sweetness with natural acidity from fruit.
- Utilize pantry staples for professional results.
- Create a moisture-locked sponge through syrup soaking.
Structure is what makes the melt possible. In this classic vanilla cake, the architectural integrity of the sponge allows for a generous application of fresh fruit and cream without collapse.
Get The Full Cake Recipe
Print
Strawberry Vanilla Cake
- Total Time: 1 hour 45 mins
- Yield: 8 servings
- Diet: Vegetarian
Description
This elegant eggless strawberry vanilla cake features a tender, moisture-locked sponge layered with fresh berries and marbled whipped cream. A professional-grade dessert that relies on precise chemistry to achieve structure without the need for eggs.
Ingredients
- 2 cups all-purpose flour (maida)
- 1 cup yogurt
- 1 cup sugar
- 1/2 cup oil
- 1 tbsp vinegar
- 1 cup milk
- 1 tsp baking powder
- 1/2 tsp baking soda
- 1 tsp vanilla essence
- 1 cup whipping cream
- 1/4 cup strawberry jam
- 1 cup fresh strawberries, sliced
- 1/4 cup simple syrup
Instructions
- Prepare the buttermilk. Combine milk and vinegar in a bowl and let sit for five minutes until curdled.
- Emulsify wet ingredients. Whisk yogurt, sugar, oil, and vanilla essence with the prepared buttermilk until smooth and glossy.
- Fold dry ingredients. Sift flour, baking powder, and baking soda into the wet mixture and fold gently using the J-fold method.
- Bake the layers. Transfer to a 5-inch tin and bake at 180°C for 20 to 25 minutes until golden and set.
- Cool and level. Allow the cake to cool completely, then slice horizontally into three even layers using a serrated knife.
- Macerate the fruit. Slice fresh strawberries and toss with a light dusting of sugar to release natural juices.
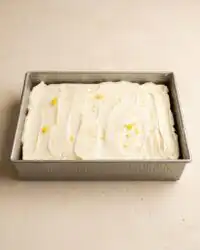
- Prepare the cream. Beat chilled whipping cream to stiff peaks and gently fold in the strawberry jam for a marbled effect.
- Assemble the cake. Layer the sponge with syrup, strawberry cream, and fruit slices, finishing with a final coating of cream and fresh berries.
Notes
- Ensure all dairy ingredients are at room temperature to prevent the batter from seizing during mixing.
- Use a serrated knife to cut the sponge while it is cold to minimize crumbling and ensure clean, sharp layers.
- Keep the assembled cake in the refrigerator for at least one hour to allow the cream to firm up and the flavors to meld.
- If the whipped cream begins to lose its shape, briefly re-chill it in the freezer for five minutes before finishing the assembly.
- Prep Time: 20 mins
- Cook Time: 25 mins
- Category: Dessert
- Method: Baking
- Cuisine: Contemporary
Ingredients & Their Role

The success of this sponge depends on the interaction between acidic components and chemical leaveners. Each ingredient must be weighed using a digital scale to prevent the density that often plagues eggless bakes.
- Maida (All-purpose flour): Provides the protein structure required to support the weight of the strawberries.
- Vinegar: Acts as the catalyst for the baking soda, creating the carbon dioxide bubbles necessary for lift.
- Yogurt: Adds moisture and fat, contributing to a tender mouthfeel and a tighter crumb.
- Oil: A liquid fat that coats flour proteins, preventing excessive gluten development for a softer bite.
- Baking Powder and Soda: These dual leaveners provide both immediate and heat-activated expansion during the bake.
- Sugar Syrup: Essential for hydration, this solution prevents the cake from drying out during assembly.
- Strawberry Jam: Intensifies the berry profile within the cream without adding excessive water content.
- Whipping Cream: Must contain a high fat percentage to maintain stiff peaks during the stacking process.
| Ingredient | Why It Matters |
|---|---|
| Vinegar | Initiates the chemical reaction for aeration in eggless batters. |
| Yogurt | Provides the acidity needed for a tender, moist interior crumb. |
| Oil | Keeps the cake soft even after refrigeration by remaining liquid at cool temperatures. |
| Baking Soda | Works with vinegar to produce significant lift and a light texture. |
| Sugar Syrup | Controlled hydration that ensures the cake layers remain moist throughout storage. |
The Tested Procedure

Step 1: Initiating the Buttermilk Emulsion
Begin by combining the milk and vinegar in a clean glass bowl. This process, known as acidification, thickens the milk and mimics the properties of traditional buttermilk, which is vital for a soft crumb. Allow this mixture to sit for exactly five minutes until it appears slightly curdled. This chemical change prepares the proteins to react with the leavening agents later in the process.
Step 2: Emulsifying the Wet Components
In a separate large vessel, whisk together the yogurt, sugar, oil, and vanilla essence with the prepared buttermilk. It is crucial to whisk until the sugar is fully dissolved and the oil is completely emulsified into the liquid. A patchy emulsion will lead to an uneven texture and oil pockets in the finished sponge. The goal is a smooth, homogenous liquid that looks slightly glossy.
Step 3: Sifting and Incorporating Dry Elements
Sift the maida, baking powder, and baking soda directly over the wet ingredients to remove any lumps. Use a spatula to fold the dry ingredients in using the J-fold method, which preserves the air bubbles formed during the initial mixing. Stop immediately once no streaks of flour remain to avoid overworking the gluten. Over-mixing at this stage will result in a tough, bread-like cake rather than a tender sponge.
Step 4: Baking the Strawberry Vanilla Cake Base
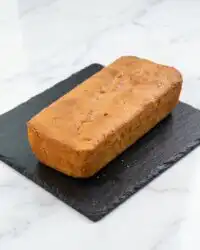
Transfer the batter into a lined 5-inch baking tin and place it in the center of a preheated 180°C oven. Bake for 20 to 25 minutes, monitoring for a golden-brown surface and a slight retraction from the edges of the tin. Use a probe thermometer or a skewer to verify that the internal temperature has reached the point where the structure is set. Remove from the oven and allow it to cool in the tin for ten minutes to stabilize.
Step 5: Thermal Management and Layer Preparation
Once the cake has reached room temperature, carefully remove it from the tin and place it on a wire rack. Use a serrated knife or a cake leveler to slice the sponge horizontally into three equal layers. Ensure the cake is completely cold before attempting this, as warm cake is too fragile and will crumble under the blade. Precision in these cuts ensures that the final cake stands straight and level.
Step 6: Fruit Preparation and Maceration
Select firm, ripe strawberries and slice them into uniform 3mm pieces for the internal layers. If the fruit lacks natural sweetness, toss the pieces with a light dusting of powdered sugar to draw out the juices. This process, known as maceration, softens the fruit slightly and creates a natural syrup. Set aside a few whole berries for the final decorative finish on the top layer.
Step 7: Managing the Whipping Cream Structure
Pour the chilled whipping cream into a cold bowl and use an electric hand mixer to beat it to stiff peaks. Once the cream holds its shape, gently fold in the strawberry jam to create a marbled, flavored frosting. The jam adds both color and a concentrated fruit profile without the thinning effect of fresh puree. Keep the cream refrigerated until the exact moment of assembly to maintain its structural integrity.
Step 8: Final Assembly and Structural Stacking
Place the base layer on a turntable and apply the sugar syrup using a pastry brush to ensure even hydration. Spread a thin layer of the strawberry cream followed by a single layer of sliced fruit. Repeat this for the second layer, then finish with the final sponge and a generous coating of cream on the top and sides. Garnish with the remaining fresh strawberries and refrigerate for at least one hour before slicing.
Precision Notes

Temperature is the most critical variable when working with stabilized dairy. Always chill your mixing bowl and beaters in the freezer for fifteen minutes before whipping the cream. This prevents the friction of the motor from warming the fat globules, which can cause the cream to deflate or turn grainy. A colder environment results in a tighter, more stable foam that can support the weight of the cake layers.
When applying the sugar syrup, focus on the edges of the cake which tend to dry out faster than the center. Use a light touch to avoid over-saturating the sponge, as too much liquid will compromise the structural skin of the cake. The goal is a damp crumb that still holds its shape when cut with a fork. You can find more details on how to stabilize whipped cream to ensure your frosting remains firm during assembly.
If your cream begins to look curdled or grainy during the whipping process, it is likely over-beaten. To fix this, add a tablespoon of fresh, un-whipped cream and fold it in gently with a spatula to smooth out the texture. If it has already turned to butter, you must start over with fresh cream. Always stop whipping the moment you see stiff peaks that stand upright when the beaters are lifted.
Avoid using frozen strawberries for the filling as they release too much moisture upon thawing. The excess liquid will bleed into the cream and the sponge, leading to a purple, messy interior and a loss of structural integrity. Fresh, firm berries provide the necessary resistance when biting through the layers. For a different flavor profile, you might consider how the strawberry cake method utilizes different fruit textures.
Weighing your dry ingredients is significantly more accurate than using volume-based cups. A cup of flour can vary by as much as thirty grams depending on how it is packed, which drastically changes the hydration of the batter. A digital scale removes this margin of error and ensures your cake is light and airy every time. Consistency in measurement is the foundation of professional-grade pastry work.
Frequently Asked Questions
How do you get a natural, strong strawberry flavor in the cake?
The strongest flavor comes from a combination of fresh macerated fruit and high-quality strawberry jam folded into the cream. By soaking the layers in a light syrup, you also ensure that the fruit flavors penetrate the sponge itself. Avoid artificial extracts which can leave a medicinal aftertaste in such a delicate bake.
Should I use fresh strawberries in the cake batter?
It is better to keep the fruit in the filling rather than the batter for this specific recipe. Fresh berries in the batter can sink to the bottom and create wet, gummy pockets that prevent the cake from rising evenly. Placing them between the baked layers preserves their texture and color.
What is the best frosting for a strawberry vanilla cake?
A stabilized whipped cream flavored with jam provides the lightest mouthfeel that doesn’t overwhelm the fruit. While buttercream offers more stability for warm weather, the dairy notes of whipped cream better highlight the vanilla sponge. Ensure the cream has at least 35% fat content for the best results.
Does vanilla or strawberry cake stay more moist?
A vanilla cake soaked in syrup typically stays moist longer because the sponge is designed to hold onto added hydration. Strawberry-flavored sponges can sometimes become dense if too much fruit puree is added to the batter. The layering method used here provides the best of both worlds regarding texture.
Can I substitute cake flour with all-purpose flour?
This recipe specifically calls for all-purpose flour (maida) to provide enough structural protein for the layers. If you use cake flour, the sponge may be too tender to support the weight of the fresh fruit and cream. The yogurt and oil already work to soften the all-purpose flour’s texture.
How long does a fresh strawberry cake last?
Because it contains fresh fruit and dairy, this cake should be consumed within 48 hours for optimal flavor and safety. Store it in an airtight container in the refrigerator to prevent the cream from absorbing other food odors. The texture is best after the first hour of chilling when the layers have set.
Considered Adjustments
For a deeper aromatic profile, you can substitute the vanilla essence with the seeds of a whole vanilla bean. The small black specks provide a visual cue of quality and a more complex, floral flavor that complements the strawberries. This adjustment does not change the chemistry of the batter but significantly improves the sensory experience of the final strawberry vanilla cake.
If you prefer a different fruit base, this vanilla sponge acts as a perfect neutral canvas for a pineapple variation. Simply replace the strawberry jam with a thick pineapple reduction and use sliced tinned or fresh pineapple between the layers. Ensure the fruit is thoroughly patted dry before placement to prevent the cream from slipping during the stacking process.
For those who enjoy a more toasted flavor, you can replace ten percent of the all-purpose flour with finely ground almond flour. This change adds a nutty undertone and a slightly more delicate crumb structure, though it may make the cake more fragile. When using nut flours, ensure they are sifted multiple times to prevent clumps that could disrupt the emulsion of the wet and dry ingredients.
Finishing & Plating
Serve this dessert chilled on a tempered glass or ceramic plate to maintain the temperature of the cream. A sharp, non-serrated knife dipped in hot water and wiped dry between each cut will yield the cleanest slices. This prevents the cream from dragging across the face of the sponge, showing off the distinct red and white layers. For a complete presentation, consider pairing a slice with a glass of light sparkling cider or a mild Earl Grey tea.
When plating for a formal occasion, place a single fresh mint leaf next to the cake to provide a color contrast against the white cream and red berries. You might also find inspiration in the strawberry vanilla cake 2 presentation styles for modern aesthetics. Avoid heavy chocolate drizzles or thick sauces that could mask the clean, crisp flavors of the vanilla and strawberry.
The cake is best presented as a whole before slicing to show the height and symmetry of the three layers. If you are serving this outdoors, keep the cake on a chilled marble slab or inside a cooler until the moment of service. The structure is robust but the cream will eventually soften if exposed to direct sunlight or high ambient temperatures for more than twenty minutes.

What the Technique Gives You
Mastering this eggless sponge technique opens a wide range of possibilities for your pastry bench. By understanding how to balance acidity and leavening, you can create a cake that is light yet strong enough to support generous fillings. The precision of the 5-minute buttermilk rest and the temperature-controlled whipping process ensures that your final product is both beautiful and structurally sound. This method proves that structure is what makes the melt possible in high-quality bakes.
I encourage you to try this fresh strawberry cake approach and observe how the texture develops after a short rest in the refrigerator. Sharing your results with other bakers helps refine the collective knowledge of our community. Precision in baking is a journey of constant adjustment and observation, leading to better results with every attempt.
For more technical tips and visual guides on pastry structure, visit our social channels:

