Dense, greasy crumbs and bleeding sprinkle dyes are the primary failure modes that compromise a celebratory slice, yet they are entirely preventable with the correct emulsification technique.

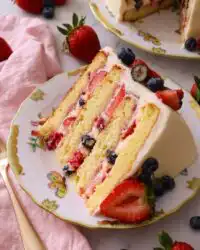
Achieving the ideal Funfetti Birthday Layer Cake requires a specific understanding of structural balance and moisture retention. By combining high-protein cake flour with a controlled fat-to-sugar ratio, we create a crumb that is simultaneously light and resilient. This method ensures that the rainbow additions remain suspended in the batter rather than sinking to the base of the pan during the baking process. Every gram of ingredient and every second of mixing serves to build a foundation for a superior festive dessert.
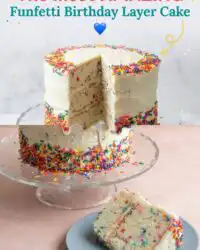
What Makes the Funfetti Birthday Layer Cake Texture Right
Prep: 45 min · Serves: 14 · Difficulty: Medium
- Balanced crumb structure prevents festive sagging
- High-ratio fat distribution ensures maximum moisture
- Controlled sugar levels avoid cloying sweetness
- Technical creaming method creates airy lightness
- Stable frosting holds its decorative shape
Precision in temperature and timing ensures this cake for birthday provides the professional mouthfeel your guests expect from a technical bake.
Get The Full Cake Recipe
Print
Funfetti Birthday Layer Cake
- Total Time: 1 hour 13 mins
- Yield: 14 servings
Description
This professional-grade Funfetti Birthday Layer Cake utilizes precise emulsification techniques to ensure a tender, velvety crumb that holds colorful sprinkles perfectly. Learn the technical secrets to creating a bakery-quality celebration cake with structural integrity and a melt-away texture.
Ingredients
- 443g cake flour
- Baking powder
- Baking soda
- Salt
- Unsalted butter, softened
- Granulated sugar
- Vegetable oil
- Eggs
- Egg whites
- Pure vanilla extract
- Buttermilk
- Rainbow sprinkles (jimmies)
Instructions
- Prepare oven and pans. Preheat your oven to 350°F (177°C), grease three 8-inch or 9-inch round pans, and line the bases with parchment paper.
- Sift dry ingredients. Whisk the cake flour, baking powder, baking soda, and salt together in a large bowl to ensure even dispersion.
- Cream butter and sugar. Beat the softened butter and granulated sugar on high speed for 5 minutes until pale and aerated.
- Build the emulsion. Add vegetable oil and beat for 60 seconds, then incorporate the eggs, extra egg whites, and vanilla extract until smooth.
- Combine wet and dry. Alternately add the dry ingredients and buttermilk in several batches, mixing just until the streaks disappear.
- Fold in sprinkles. Gently fold the rainbow sprinkles into the batter with a silicone spatula without over-mixing.
- Portion and bake. Divide the batter evenly into the prepared pans and bake for 25 to 28 minutes or until the internal temperature reaches 205°F.
- Cool and level. Rest the cakes in pans for 20 minutes before inverting onto a wire rack to cool completely, then trim the domes before stacking.
Notes
- Ensure all dairy and egg components are at room temperature to prevent the batter from curdling during the mixing process.
- Use a digital scale to weigh your flour rather than measuring by volume to avoid packing too much flour and creating a dry crumb.
- Tent the cake pans with aluminum foil halfway through baking to prevent the edges from browning before the center is set.
- Chill the cake layers after applying a thin crumb coat to provide a stable, smooth foundation for the final frosting application.
- Prep Time: 45 mins
- Cook Time: 28 mins
- Category: Dessert
- Method: Baking
- Cuisine: American
The Working Components

Selecting the correct ingredients is the first step toward a successful bake, as each component performs a specific chemical function within the batter. We use room temperature items to ensure a stable emulsion, which is the uniform mixture of fat and water that determines the final crumb density.
- Cake Flour: This low-protein flour (443g) reduces gluten development, resulting in a tender and velvety interior structure.
- Unsalted Butter: Softened to room temperature, it provides the primary fat source for a rich flavor profile.
- Vegetable Oil: This liquid fat remains fluid at lower temperatures, ensuring the cake stays soft even after refrigeration.
- Buttermilk: The acidity reacts with the leavening agents to produce a fine, even rise and a subtle tang.
- Rainbow Sprinkles: These must be high-quality jimmies to prevent the colors from bleeding into the white batter.
- Egg Whites: Two additional whites provide structural lift and a lighter color to the finished layers.
| Ingredient | Why It Matters |
|---|---|
| Cake Flour | Provides low protein for a soft, professional crumb |
| Buttermilk | Adds acidity to activate leavening and tenderize proteins |
| Vegetable Oil | Keeps the cake moist even when served at room temperature |
| Pure Vanilla | Offers the deep, aromatic base essential for festive bakes |
The Tested Procedure

Step 1: Preparing the Bench and Pans
Preheat your oven to 350°F (177°C) to ensure the thermal environment is stable before the batter enters the chamber. Grease three 8-inch or 9-inch round pans thoroughly, then line the bases with parchment paper rounds to ensure a seamless release. Grease the parchment again, as this double-layer protection prevents the delicate crust from sticking to the metal surface.
Step 2: Sifting and Whisking Dry Materials
Measure 443g of cake flour using a digital scale to ensure accuracy, as volume measurements can vary by up to 20 percent. Whisk the flour with the baking powder, baking soda, and salt in a large bowl until the leavening agents are evenly dispersed throughout the starch. This step prevents uneven rising and ensures the chemical reactions occur uniformly across the entire cake layer.
Step 3: Mastering the Creaming Process
Place the softened butter and granulated sugar into the bowl of a stand mixer fitted with the paddle attachment. Beat on high speed for a full 5 minutes until the mixture reaches a pale, aerated state that resembles whipped cream. This mechanical aeration is vital, as the sugar crystals cut tiny air pockets into the fat, which will later expand in the heat of the oven.
Step 4: Building the Emulsion for the Funfetti Birthday Layer Cake
Add the vegetable oil and beat for exactly 60 seconds to integrate the liquid fats with the creamed butter. Introduce the eggs, egg whites, and vanilla extract one at a time, mixing on medium-high speed until the batter looks smooth and glossy. If the mixture appears curdled, the temperature of your eggs was likely too low; continue mixing until the emulsion is restored and the batter is unified.
Step 5: Alternating the Wet and Dry Additions
Lower the mixer speed and add the dry ingredients in three parts, alternating with two additions of the buttermilk. Start and finish with the flour mixture, mixing only until the white streaks disappear to avoid over-working the gluten. The resulting batter should be velvety and thick, holding enough structure to support the weight of the decorative sprinkles.
Step 6: The Final Fold and Portioning
Gently fold in the rainbow sprinkles using a silicone spatula, using a circular motion to distribute them without over-mixing. Divide the batter equally between your prepared pans, using a scale to ensure each layer is the same weight for even baking. Smooth the tops with an offset palette knife to ensure the finished cakes have a flat, professional profile.
Step 7: Baking to Structural Set
Place the pans in the center of the oven and bake for 25 to 28 minutes, depending on the pan size used. At the 15-minute mark, tent the pans with foil to protect the edges from over-browning while the center continues to cook. The cakes are finished when a probe thermometer registers an internal temperature of 205°F or a toothpick comes out clean from the center.
Step 8: Cooling and Surface Preparation
Allow the cakes to rest in their pans on a wire rack for 20 minutes to allow the internal structure to firm up. Run a thin knife around the perimeter and invert the cakes onto the racks to cool completely to room temperature. Once cold, use a large serrated knife to remove the domed tops, creating perfectly flat surfaces that will stack without sliding.
Technique Refinements

Temperature control is the most frequent point of failure in high-ratio cakes. Ensure your eggs, buttermilk, and butter are all between 65°F and 70°F before starting the mixing process. If the ingredients are too cold, the fat will seize and fail to trap the air necessary for a light rise. Using classic vanilla cake principles, we know that a broken emulsion leads to a rubbery texture.
Selecting the right sprinkles determines whether your cake looks professional or messy. Choose thick jimmies or confetti quins rather than nonpareils, as the small balls dissolve quickly and create streaks of grey or muddy colors in the batter. This precision for the sake of mouthfeel ensures the decorative elements provide a slight crunch rather than a gritty dissolve.
If your cake layers are shrinking significantly from the sides of the pan, you have likely over-baked them by several minutes. This moisture loss causes the protein structure to contract too tightly. To prevent this, check the cakes 3 minutes before the timer ends and remove them the moment the center feels springy to the touch. You can find more professional techniques for a rainbow sprinkle cake to refine your timing.
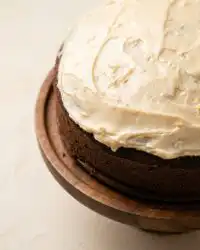
Always apply a crumb coat before the final decorative layer of frosting. This thin initial layer of buttercream acts as a structural skin that traps loose crumbs and levels any minor gaps between the layers. Chill the cake for 30 minutes after the crumb coat to ensure a firm foundation for the final finish.
Weigh your ingredients rather than using cups for every single bake. A cup of flour can vary in weight depending on how it was packed, leading to inconsistent results every time. A digital scale is the only way to ensure the ratio of starch to fat remains constant across different batches.
If the frosting feels too soft to hold its shape, the butter was likely too warm when beaten. Place the entire mixing bowl in the refrigerator for 10 minutes, then beat the frosting again on high speed for 2 minutes. This cold shock helps the fat crystals realign, providing the stiffness needed for clean piping and sharp edges.
Frequently Asked Questions
Why did my sprinkles bleed into the cake batter?
This usually occurs if you use nonpareils or if the batter is over-mixed after adding the sprinkles. The moisture in the batter begins to dissolve the sugar coating of the sprinkles immediately. Use thick jimmies and fold them in gently at the very last second before pouring the batter into the pans.
Can I use all-purpose flour instead of cake flour?
All-purpose flour has a higher protein content, which will result in a tougher, bread-like texture. If you must substitute, remove 2 tablespoons of flour from every cup and replace it with cornstarch to lower the overall protein level. However, for the most precise crumb structure, true cake flour is required.
How do I prevent the cake from being too dry?
Dryness is typically caused by over-baking or inaccurate flour measurement. Ensure you are using the vegetable oil as specified, as it provides a different type of moisture than butter alone. Always test for doneness 5 minutes before the recommended time to avoid excessive evaporation.
Why is my frosting grainy or too sweet?
Graininess happens when the confectioners’ sugar is not sifted or the butter is not beaten long enough. If the frosting is too sweet, add an extra pinch of salt or a teaspoon of lemon juice to cut through the sugar. Beating the frosting on high speed for at least 2 minutes at the end also helps dissolve any remaining sugar crystals.
How should I store the finished layer cake?
The frosted cake can stay at room temperature in a carrier for up to 4 hours. For longer storage, refrigerate it for up to 5 days, but ensure it is covered to prevent the refrigerator from pulling moisture out of the sponge. Always allow the cake to sit at room temperature for 30 minutes before serving to soften the butter in the frosting.
Can I make the cake layers in advance?
Yes, the layers can be baked, cooled, and wrapped tightly in plastic wrap for up to 2 days at room temperature. For longer storage, you may freeze the wrapped layers for up to 3 months. Thaw them in the refrigerator overnight while still wrapped to prevent condensation from making the crust soggy.
Considered Adjustments
For those who prefer a more traditional finish, a white chocolate ganache can be used as a filling between the layers. Melt high-quality white chocolate with heavy cream at a 2:1 ratio and allow it to set until it reaches a spreadable consistency. This provides a firmer structural layer than buttercream and adds a rich, milky depth that complements the vanilla base. This is a common technique used for a birthday cake 2 when extra height is required.
Citrus notes can be introduced to balance the sweetness of the vanilla frosting. Replace the vanilla extract in the batter with a combination of lemon zest and a small amount of fresh lemon juice. This acidity further tenderizes the flour proteins, resulting in a crumb that feels even softer on the palate. Ensure the zest is finely grated to avoid interrupting the smooth texture of the crumb.
Finishing & Plating
When serving a multi-layer dessert, the temperature is the most critical factor for the best mouthfeel. Serve the cake at a cool room temperature, approximately 70°F, where the butter in the crumb is soft and the frosting has a creamy, melt-away quality. If the cake is served directly from the refrigerator, the fats will be hard, making the texture seem dense and dry. Using a cake birthday boy as a centerpiece requires a stable presentation that can withstand the warmth of a room.
For a professional appearance, use a long, thin serrated knife dipped in hot water and wiped dry between every slice. This heat melts the frosting slightly as the blade passes through, resulting in clean, sharp edges that showcase the internal layers and the distribution of the sprinkles. Plate each slice with a small dollop of lightly sweetened whipped cream to provide a temperature and texture contrast to the rich buttercream.

What the Technique Gives You
Mastering the Funfetti Birthday Layer Cake is less about the celebratory colors and more about the mechanical precision of the batter construction. By respecting the creaming time and the temperature of the ingredients, you create a structure that is robust enough to hold its shape but delicate enough to melt on the tongue. This balance is the hallmark of professional British and French pastry work, adapted for a modern festive classic. Structure is what makes the melt possible, and these steps ensure that success is repeatable in your own kitchen.
Once you have achieved the perfect crumb, you can apply these principles to any funfetti cake or flavored layer cake in your repertoire. We encourage you to share your results and technical bakes with our community. Follow our progress and share your own kitchen successes on Pinterest, Facebook, or Telegram. We look forward to seeing your precision in action.


