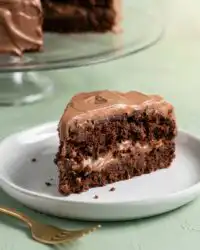
In Mediterranean baking, we know luxury lies in the gentlest touch of a fork, a soft crumb that melts on the tongue, much like this decadent cookies and cream cake.

There is a quiet joy in watching a cake come together with patience, where the ingredients are allowed to breathe and merge. This recipe brings that slow-baked tenderness to a modern classic, turning familiar chocolate sandwich cookies into a sensory experience. The crumb is extraordinarily soft, balanced by a cloud of silky buttercream that feels light on the palate. It is a dessert designed for celebration, demanding that we pause and savor every sweet, lingering bite.
What Makes the Cookies and Cream Birthday Cake Texture Sing
Prep: 15 min · Serves: 12 · Difficulty: Medium
- Extremely soft crumbs that melt in your mouth.
- Silky Oreo buttercream that tastes remarkably light.
- Balanced sweetness that never turns cloying.
- Generous crunch from hand-crushed cookie pieces.
- Stays wonderfully moist for several days.
We have spent years mastering this beloved cookies and cream cake to achieve the ideal balance of softness and deep flavor. This quiet masterpiece will redefine how you view celebration cakes.
Get The Full Cake Recipe
Print
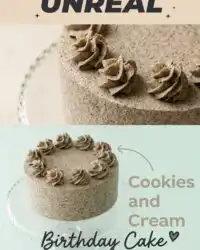
Cookies and Cream Birthday Cake
- Total Time: 1 hour 50 mins
- Yield: 12 servings
Description
This elegant cookies and cream birthday cake features an incredibly tender, melt-in-your-mouth sponge layered with a silky, Oreo-speckled buttercream. It is a sophisticated celebration cake that balances deep chocolate notes with a cloud-like texture.
Ingredients
- 2 1/2 cups all-purpose flour
- 1/2 cup cornstarch
- 1 1/2 tsp baking soda
- 1 tsp baking powder
- 1/2 tsp salt
- 1 cup unsalted butter, softened
- 1/2 cup vegetable oil
- 1 3/4 cups white granulated sugar
- 4 large eggs, room temperature
- 2 tsp vanilla extract
- 1 tbsp white vinegar
- 1 1/2 cups buttermilk
- 28 chocolate sandwich cookies, divided
- 3 cups icing sugar
- 2 tbsp milk
Instructions
- Prep the oven. Preheat your oven to 160°C (320°F) with fan, and line two eight-inch cake tins with parchment paper.
- Chop the cookies. Roughly chop fourteen chocolate sandwich cookies into rustic chunks and set them aside.
- Whisk dry ingredients. Sift and whisk together the flour, cornstarch, baking soda, baking powder, and salt in a spacious mixing bowl.
- Cream fats and sugar. Cream the softened butter, vegetable oil, and granulated sugar together for two minutes until pale and fluffy.
- Incorporate liquids. Add eggs one at a time, followed by the vanilla, vinegar, and half a cup of buttermilk, mixing until emulsified.
- Fold the batter. Alternately fold in the dry mixture and remaining buttermilk by hand until just combined.
- Bake the layers. Gently fold in the chopped cookies, divide batter between tins, and bake for thirty-three minutes.
- Prepare the frosting. Process fourteen cookies into fine crumbs and whip with butter, icing sugar, vanilla, and milk until light and airy.
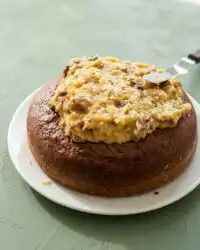
- Assemble the cake. Fill and frost the cooled layers, adding extra crushed cookies in the center for texture.
- Rest and decorate. Pipe swirls on top, garnish with whole cookies, and let the finished cake rest for one hour before serving.
Notes
- Use a digital scale to measure your dry ingredients in grams for the most consistent, soft crumb.
- Ensure all cold ingredients are at room temperature to prevent the batter from curdling or the buttercream from breaking.
- Avoid overmixing once the flour is added to ensure the cake retains its signature light and tender texture.
- Allow the assembled cake to rest for at least an hour to let the buttercream moisture settle into the sponge.
- Prep Time: 15 mins
- Cook Time: 35 mins
- Category: Dessert
- Method: Baking
- Cuisine: Modern Mediterranean
From the Mediterranean Pantry
Baking is a conversation between fat, flour, and liquid, where each element must be weighed with absolute precision. In our kitchen, we measure in grams to guarantee the delicate balance of this tender crumb remains beautiful every time. These few careful selections work in harmony to create a soft, melt-in-your-mouth foundation.
- Unflavoured vegetable oil: Provides unmatched moisture and ensures the crumb remains exceptionally tender even after chilling.
- Buttermilk: The gentle acidity softens the gluten strands, yielding a texture that feels remarkably light.
- Cornstarch: Mimics the properties of fine cake flour when combined with all-purpose flour, creating a velvety structure.
- White vinegar: Reacts quietly with the baking soda to lift the heavy batter, ensuring a loftier bake.
- Unsalted butter: Brought to room temperature to cream beautifully, offering that classic, rich flavor we crave.
- Finely blended Oreos: Suspended throughout the buttercream to create a speckled, cloud-like frosting that glides effortlessly.
| Ingredient | Why It Matters |
|---|---|
| Buttermilk | Softens gluten strands for a tender, melting texture. |
| Vegetable Oil | Keeps the layers exceptionally moist and soft over time. |
| Cornstarch | Lowers the protein content of flour to mimic cake flour. |
| White Vinegar | Provides the necessary acid-base reaction for rise. |
| Crushed Oreos | Adds textural contrast and authentic chocolate flavor. |
From Bowl to Soak
Step 1: Prep Your Oven and Cake Tins
Begin by preheating your oven to 160°C (320°F) with the fan option turned on to distribute the gentle heat evenly. Take two eight-inch cake tins and line them carefully with parchment paper or a light coating of homemade cake release. If your oven lacks a fan function, remember to adjust the temperature to 175°C (347°F) so the layers bake at the correct rate. Taking these quiet moments to prepare your workspace guarantees a smooth transition once the batter is mixed and ready for the oven.
Step 2: Roughly Chop the Cookies
Count out fourteen chocolate sandwich cookies and chop them gently on a clean cutting board with a sharp knife. You are looking for distinct, rustic pieces rather than a fine powder, as these chunks will provide wonderful pockets of texture. Avoid cutting them too small, as they will dissolve into the batter and turn the crumb a dull, uniform grey. Set these chopped cookies aside in a small bowl while you turn your unhurried attention to mixing the dry ingredients.
Step 3: Whisk the Dry Ingredients
In a spacious mixing bowl, sift together the all-purpose flour, cornstarch, baking soda, baking powder, and a touch of salt. Use a wire whisk to stir the mixture with circular, unhurried strokes until the ingredients are completely integrated and light. This sifting process is crucial because it aerates the flour, preventing any pockets of baking soda from clustering together. Set this bowl aside, knowing this light, dry mixture is ready to join the rich fats and create our structure.
Step 4: Cream the Fats and Sugar
Combine your softened unsalted butter, vegetable oil, and white granulated sugar in a separate large bowl. Using an electric hand mixer or stand mixer, cream these ingredients together on medium speed for a full two minutes. Watch as the granular sugar begins to dissolve into the smooth fats, transforming into a pale, creamy paste. This step builds the air pockets that will expand in the oven, giving your layers their initial lift and making sure they rise beautifully.
Step 5: Incorporate the Eggs and Aromatics
Add your large, room-temperature eggs to the creamed mixture one at a time, mixing gently after each addition. Allow about fifteen seconds of mixing between each egg to make sure they fully emulsify into the batter without curdling the fats. Pour in the vanilla extract, white vinegar, and a half-cup portion of the rich buttermilk to start loosening the paste. Mix on low speed until the liquids are fully integrated, creating a glossy, fragrant base that smells of warm vanilla.
Step 6: Fold the Dry Ingredients and Buttermilk
Set your electric mixer aside, as we will complete the remaining steps by hand to protect the delicate crumb structure. Add half of your pre-mixed dry ingredients to the wet mixture, gently folding them in with a flexible spatula. Once the flour is mostly incorporated, pour in the remaining cup of buttermilk and fold again with slow, circular motions. Finally, add the rest of the dry ingredients, folding until the last streaks of flour disappear into a uniform, thick batter.
Step 7: Fold in the Chopped Cookies and Bake
Gently fold the chopped cookies into the finished batter using your spatula, taking care not to overmix the delicate combination. Overmixing at this stage activates the gluten, which would rob the cake of its signature soft and melting texture. Divide the batter evenly between your two prepared eight-inch tins, smoothing the tops with the back of a spoon. Bake for approximately thirty-three minutes, or until a wooden toothpick inserted into the center comes out clean and dry.
Step 8: Prepare the Fluffy Oreo Buttercream
While the layers cool on a wire rack, place fourteen cookies into a food processor and blend them until they form fine crumbs. In the bowl of your stand mixer, combine the icing sugar, softened butter, vanilla, and a splash of milk. Using the paddle attachment, mix on low for one minute, then increase the speed to medium-high and whip for a full ten minutes. Fold in the fine cookie crumbs, watching the frosting turn a beautiful speckled grey that resembles polished stone.
Step 9: Assemble Your Cookies and Cream Birthday Cake
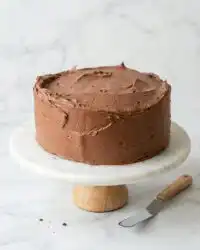
Place your first cooled layer onto a heavy serving stand and spread a thick, even layer of the speckled buttercream across the surface. Hand-crush three extra cookies and scatter them over the frosting, providing a wonderful textural contrast in the center. Carefully set the second layer on top, then coat the top and sides of the entire cake with the remaining buttercream. Smooth the edges with a scraper, leaving a small amount of frosting in your piping bag for final decorations.
Step 10: Final Decorative Touches and Rest
Using a piping bag fitted with a star tip, pipe elegant swirls around the top edge of your assembled masterpiece. Gently press a whole chocolate cookie into the top of each swirl, creating a beautiful crown around the border. If desired, press fine cookie crumbs against the bottom half of the cake sides using your hands. Let the cake rest for at least an hour before slicing, allowing the crumb to settle and absorb the moisture.
Mediterranean Baker’s Notes
The secret to an exceptionally soft bake is avoiding the temptation to overwork your batter during the final stages of mixing. When you switch from your electric mixer to a manual spatula, use a patient, folding motion that coaxes the ingredients together rather than beating them. Draw the spatula down through the center of the bowl, sweep it around the side, and fold the batter over itself. This preservation of delicate air pockets guarantees that the fork will glide through the finished cake like butter when it is finally sliced and served to your guests.
If your buttercream starts to separate or look curdled, the butter was likely too cold when you began mixing. To fix this common issue, you can take a warm, damp cloth and wrap it around the bottom of your mixing bowl while whipping on medium speed. The gentle warmth will bring the fats back into a smooth, velvety emulsion without melting the sugar or ruining the frosting. Alternatively, you can use a hairdryer on its lowest heat setting aimed at the side of the bowl for thirty seconds to restore that smooth glide.
Temperature harmony is equally vital for a layered sponge as it is for our beloved traditional syrup-soaked desserts. Always make sure your eggs, buttermilk, and butter are brought to true room temperature before you begin mixing. Cold ingredients will cause the fats to seize and separate, leading to a dense, uneven bake that lacks the airy lift we want. Set your ingredients on the counter at least two hours before baking to guarantee they combine smoothly and rise with ease.
For those seeking the softest oreo cookies cream cake possible, weighing your dry ingredients in grams is an absolute necessity. Flour measured by cup can vary by up to thirty percent depending on how tightly it is packed. A digital kitchen scale is the ultimate tool for achieving consistent, melt-in-your-mouth consistency every single time. It takes only a moment longer but guarantees the precise ratio needed to keep the crumb light and tender.
We recommend referencing authoritative baking science guides, such as this guide on chocolate sandwich cookie cake baking, to understand how fats interact with cocoa solids. Understanding these chemical relationships helps you maintain a moist crumb even when adding dry cookie pieces to your batter. Take your time, read the science, and watch your baking skills grow. By learning how starch and fat interact, you gain the confidence to create cakes that never turn dry or crumbly.
Do not skip the resting hour once your cake is completely assembled and frosted. This quiet period allows the moisture from the buttercream to migrate into the crumb, softening any slightly dry edges and locking in the texture. Patience is the secret that transforms a simple sweet treat into a truly unforgettable dessert experience. Place the cake under a dome in a cool spot and let it rest undisturbed, allowing the flavors to meld and deepen before the first cut.
Frequently Asked Questions
Can I make this cake ahead of time?
Yes, you can absolutely bake the layers a day in advance. Once they are completely cool, wrap them tightly in plastic wrap and store them at room temperature. Frost the cake the following day to keep the buttercream looking fresh and pristine.
Why did my cake layers sink in the middle?
A sunken center usually indicates that the oven door was opened too early during the baking process, letting cool air in. It can also happen if your leavening agents, like baking powder or baking soda, are past their prime. Always double-check the expiration dates of your pantry essentials before you begin mixing.
Can I use homemade buttermilk for this recipe?
We strongly recommend using store-bought buttermilk because it is thicker and more acidic than homemade versions. If you must use a homemade substitute, reduce the total amount to one and a quarter cups to prevent the batter from becoming too wet. The higher liquid ratio of homemade milk-and-acid mixtures can easily throw off the delicate balance of the crumb.
How should I store any leftover slices?
Keep the cake in an airtight container in the refrigerator to protect the delicate buttercream from absorbing other food odors. Before serving, let the slices sit on the counter for twenty minutes to allow the butter to soften. This straightforward step guarantees that the velvety texture melts on your tongue exactly as it did on the first day.
Can I freeze this cake for later?
You can freeze the unfrosted cake layers wrapped tightly in plastic wrap and foil for up to three months. When you are ready to assemble, thaw the layers overnight in the refrigerator while still wrapped. We recommend preparing the buttercream fresh on the day you plan to assemble and decorate the cake.
What can I do if my cake turned out dense?
A dense cake is usually the result of overmixing the flour once the buttermilk is added. When gluten is overworked, it creates a tough, bread-like structure rather than a soft, tender sponge. Next time, fold the dry ingredients by hand with a gentle touch, stopping as soon as the flour streaks disappear.
Can I substitute cake flour for the all-purpose flour?
Yes, you can substitute the combined all-purpose flour and cornstarch with an equal weight of cake flour. You will need three hundred and twenty-five grams of cake flour in total to achieve the same structural stability. This swap will yield an even finer, tighter crumb that feels incredibly soft on the palate.
Across the Mediterranean
While this recipe is built on classic chocolate sandwich cookies, you can easily introduce a touch of Mediterranean warmth to the layers. Try adding a half-teaspoon of ground cardamom or orange blossom water to the vanilla batter before folding in the cookies. This subtle aromatic lift pairs beautifully with the deep, cocoa notes of the dark cookie crumbs.
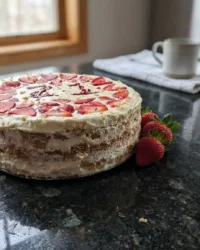
For a wonderfully refreshing alternative during the warmer summer months, you can transform these flavor profiles into a chilled dessert. Our elegant oreo icebox cake utilizes thin layers of cookies and sweetened whipped cream left to soften in the refrigerator overnight. It offers the same iconic taste but with a cool, melting texture that requires absolutely no oven time.
If you prefer a cake with a slightly nuttier undertone, replace the canola oil with a light, extra-virgin olive oil. The subtle, fruity notes of the olive oil complement the dark cocoa of the cookies beautifully, creating an adult dessert. It is sweet, never cloying, and pairs exceptionally well with a strong cup of black coffee.
Coffee & Cake Pairings
When it is time to serve this beautiful cake, set a slow and deliberate pace for your guests to enjoy. Slice the cake using a sharp, thin knife that has been dipped in warm water and wiped clean between each cut. This technique guarantees clean, beautiful slices where the dark cookie crumbs stand out against the pale vanilla buttercream.
We love to serve a generous slice of this decadent dessert alongside a small cup of strong Turkish coffee or espresso. The deep, roasted bitterness of the coffee cuts through the rich sweetness of the frosting, balancing the palate beautifully. This contrast makes each bite feel fresh, allowing the delicate chocolate notes of the cookies to truly shine.
For a festive gathering at sunset, arrange the slices on a simple wooden platter accompanied by fresh blackberries or raspberries. The gentle acidity of the fresh fruit provides a lovely counterpoint to the creamy frosting. If you are looking for another classic party option, our oreo cake also makes an exceptional centerpiece for family reunions and casual weekend gatherings.

Let It Rest, Then Slice
There is a quiet magic in the moments after a cake is finished, when the kitchen grows still and the sweet aroma of cocoa lingers. Taking the time to bake from scratch is a gift of patience, one that your guests will feel with every single bite. This cookies and cream creation is more than just a sweet dessert; it is an invitation to gather, share stories, and celebrate the simple joy of being together.
As you prepare for your next celebration, consider how this soft, melting sponge can bring people closer around the table. If you want to expand your baking repertoire with another classic, try our beautiful funfetti birthday layer cake recipe for your next event. Each recipe is crafted to bring a touch of slow, Mediterranean patience and rich, sensory pleasure to your home kitchen.
We invite you to share your baking journey with us and let us know how your beautiful cake turned out. Connect with our community on Pinterest or follow our updates on Facebook to find more inspiration. You can also watch our baking process on TikTok or join our conversation on Telegram for daily tips and warm kitchen moments.


