A dry crumb and a curdled emulsion represent the dual failures that ruin most attempts at a Classic Vanilla Layer Cake, but structural precision completely prevents both issues.

Achieving the ideal balance of tenderness and structural integrity is the defining challenge of the Classic Vanilla Layer Cake. Many home bakers struggle with layers that either sink in the center or turn out as dry as cardboard, often because they rely on volume measurements instead of weight. This methodical recipe uses a balanced hydration ratio, pairing room temperature egg whites with whole milk and oil to protect the crumb from drying out. By mastering the emulsification process, you build a stable network of tiny air pockets that rise evenly in the oven.
The Case for This Classic Vanilla Layer Cake Method
Prep: 45 min · Serves: 12 · Difficulty: Advanced
- Carefully balanced fat ratios produce supreme tenderness.
- Sturdy meringue bases preserve structural integrity easily.
- Sweetened condensed milk creates highly glossy buttercream.
- Rich egg yolk custard builds decadent interior contrast.
- Parchment lining guarantees flawless layer releases every time.
Before initiating this bake, understand that structural balance dictates mouthfeel. While a standard classic vanilla cake relies on basic creamed fats, this formula uses a dual-fat structure to maintain moistness. The balance of butter and oil prevents drying while maintaining a firm crumb. Weigh it, time it, trust it.
Get The Full Cake Recipe
Print
Classic Vanilla Layer Cake
- Total Time: 3 hours
- Yield: 12 servings
- Diet: Vegetarian
Description
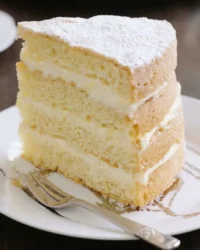
This professional-grade vanilla cake achieves a perfect balance of tenderness and structural integrity through precise ingredient ratios and meticulous emulsification. Featuring three delicate sponge layers filled with a rich custard and finished with a silky white chocolate buttercream, this recipe is a masterclass in modern patisserie.
Ingredients
- 450g All-Purpose Flour
- 285g Unsalted Butter (for cake)
- 245g Egg Whites
- 60g Vegetable Oil
- 305g Whole Milk
- 11g Vanilla Bean Paste
- 8g Baking Powder
- 4g Fine Sea Salt
- 4g Almond Extract
- 396g Granulated Sugar
- 460g Whole Milk (for custard)
- 235g Heavy Cream
- 7g Vanilla Bean Paste (for custard)
- 2g Sea Salt (for custard)
- 99g Granulated Sugar (for custard)
- 28g Cornstarch
- 140g Egg Yolks
- 28g Unsalted Butter (for custard)
- 454g Unsalted Butter (for buttercream)
- 7g Vanilla Bean Paste (for buttercream)
- 4g Fine Sea Salt (for buttercream)
- 397g Sweetened Condensed Milk
- 226g White Chocolate
Instructions
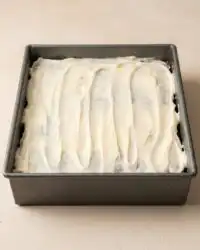
- Prepare pans. Preheat oven to 350°F, grease three 9-inch pans, and line with parchment paper.
- Combine dry base. Whisk flour, baking powder, and sea salt in a medium bowl until uniform.
- Cream butter. Beat 285g butter and sugar on medium speed for 5 minutes until pale and fluffy.
- Add aromatics and whites. Mix in extracts, then slowly add egg whites in four additions, scraping the bowl after each.
- Incorporate liquids. Alternating with the dry base, mix in milk and oil until smooth.
- Bake layers. Divide batter into pans and bake for 30–34 minutes until a toothpick comes out clean.
- Cool completely. Rest cakes in pans for 10 minutes before inverting onto a wire rack to cool.
- Simmer milk. Heat milk, cream, salt, and vanilla bean paste until a gentle simmer forms.
- Whisk yolks. Combine sugar, cornstarch, and yolks in a bowl until smooth and pale.
- Temper eggs. Gradually stream one-third of the hot milk into the yolk mixture while whisking.
- Thicken custard. Whisk custard over medium heat until thick bubbles burst at the surface.
- Strain and chill. Stir in butter, strain into a dish, cover with plastic wrap, and refrigerate for 2 hours.
- Whip buttercream. Beat 454g butter with vanilla and salt until airy and pale ivory.
- Add condensed milk. Gradually whip in sweetened condensed milk until the emulsion is silky.
- Melt white chocolate. Stream in warm, melted white chocolate while whipping until cohesive.
- Level cakes. Trim the tops of cooled cake layers with a serrated knife to ensure flat surfaces.
- Assemble cake. Pipe a border on the first layer, fill with custard, and repeat with remaining layers.
- Crumb coat. Apply a thin layer of buttercream over the cake and chill before final frosting.
Notes
- Ensure all dairy and egg components are at room temperature to prevent curdling during the emulsion process.
- Use a digital scale for every ingredient to guarantee the structural success of the sponge.
- Keep the white chocolate at precisely 95°F when adding it to the buttercream to maintain a smooth, silky texture.
- Always strain the finished custard through a fine-mesh sieve to remove any accidental cooked egg bits.
- Prep Time: 45 mins
- Cook Time: 35 mins
- Category: Dessert
- Method: Baking
- Cuisine: American
Ingredients & Their Role

Sponge architecture depends entirely on the chemical balance of your dry and wet components. We must treat every gram as a structural pillar rather than a mere flavor element. The following components have been selected and weighed to guarantee structural success.
- All-Purpose Flour (450g): Serves as the structural framework, providing the gluten network needed to support the rising batter without collapsing.
- Unsalted Butter (285g): Introduces air pockets during the creaming stage to establish a fine, even crumb.
- Egg Whites (245g): Builds a stable foam that lifts the cake while keeping the color of the layers a clean ivory white.
- Vegetable Oil (60g): Retains liquid moisture at room temperature, keeping the layers tender for several days.
- Whole Milk (305g): Hydrates the starches to trigger gelatinisation, which is the process where starch granules absorb liquid and swell when heated.
- Vanilla Bean Paste (11g total): Delivers concentrated aromatic seeds that remain visible throughout the baked layers and fillings.
- Cornstarch (28g): Softens the proteins in the custard filling to yield a smooth, pipeable consistency.
- Sweetened Condensed Milk (397g): Emulsifies the buttercream, creating a dense and silken structure without the graininess of powdered sugar.
| Ingredient | Weight / Volume | Primary Function |
|---|---|---|
| All-Purpose Flour | 450 g | Establishes the gluten structure |
| Unsalted Butter | 285 g | Creams with sugar to trap air |
| Egg Whites | 245 g | Provides moisture and clean rising lift |
| Vegetable Oil | 60 g | Retains crumb tenderness over time |
| Sweetened Condensed Milk | 397 g | Smooths and stabilizes the buttercream |
From Bench to Bake

Step 1: Prep the Oven and Pans
Preheat your oven to 350°F / 170°C with the rack positioned in the exact center. Lightly grease three 9-inch / 23 cm round cake pans with nonstick spray, and fit the bottom of each with a circular sheet of parchment paper. Apply a second thin layer of grease over the parchment to guarantee the baked layers release cleanly without tearing the structural skin.
Step 2: Combine the Dry Base
In a medium mixing bowl, whisk together 450 grams of all-purpose flour, 8 grams of baking powder, and 4 grams of fine sea salt. Use a fine-mesh whisk to disperse the leavening agent uniformly through the flour. The mixture should appear completely aerated and free of any compact flour pockets before you introduce it to the wet batter.
Step 3: Cream the Butter and Sugar
Place 285 grams of room temperature unsalted butter and 396 grams of granulated sugar into the bowl of your stand mixer fitted with the paddle attachment. Cream these components on medium speed for 4 to 5 minutes until the mixture turns pale ivory and expands in volume. The texture should look fluffy and light, indicating that thousands of tiny air pockets have been trapped to support the rising process.
Step 4: Incorporate the Aromatic Extracts and Egg Whites
Mix in 4 grams of vanilla bean paste and 1 gram of almond extract on low speed until combined, which takes about 1 minute. Slowly add 245 grams of room temperature egg whites in four separate additions, mixing on medium speed for 30 seconds after each pour. Scrape the bottom and sides of the bowl with a silicone spatula after each addition to maintain a stable emulsion, which is a stable mixture of two immiscible liquids held together by proteins.
Step 5: Bake the Classic Vanilla Layer Cake Layers
Whisk 305 grams of room temperature whole milk and 60 grams of vegetable oil together in a large liquid measuring cup until emulsified. Add one-third of your dry flour mixture to the creamed butter, mixing on low speed for 15 seconds, then stream in half of the milk mixture. Repeat this alternating pattern, finishing with the final third of the dry ingredients, and mix only until the batter runs smooth and shows no raw flour streaks.
Step 6: Portion and Bake the Layers
Divide the batter equally among the three prepared pans, using a digital scale to verify each pan contains approximately the same weight of batter. Smooth the surfaces with an offset palette knife, then place the pans on the center rack of your preheated oven. Bake for 30 to 34 minutes until a toothpick inserted into the center of each layer emerges dry or with a few tiny, moist crumbs clinging to it.
Step 7: Cool and Release the Cakes
Cool the cakes in their pans on a wire rack for exactly 10 minutes to allow the delicate sponge structure to set. Run a small offset spatula or butter knife around the inside edge of each pan to free the sides, then invert the layers onto a cooling rack. Peel away the parchment paper carefully and let the cakes cool completely to room temperature before attempting to assemble them.
Step 8: Begin the Vanilla Custard Filling
While the layers cool, pour 460 grams of whole milk and 235 grams of heavy cream into a medium saucepan, adding 2 grams of sea salt and 7 grams of vanilla bean paste. Heat the liquid over medium heat, stirring occasionally to prevent the sugars from scorching on the bottom of the pot. Bring the mixture to a gentle simmer, watching for tiny bubbles to form around the perimeter of the liquid.
Step 9: Whisk the Yolk and Starch Base
In a medium, heat-safe glass bowl, whisk together 99 grams of granulated sugar and 28 grams of cornstarch until the starch is free of lumps. Whisk in 140 grams of large egg yolks, which is roughly 7 yolks, until the mixture becomes pale yellow, thick, and smooth. The starch must be thoroughly integrated with the sugar to prevent it from clumping when the hot milk is added.
Step 10: Temper the Egg Yolks
Slowly drizzle roughly one-third of the hot milk mixture into the egg yolk mixture while whisking constantly to temper the eggs. This gradual introduction of heat prevents the yolks from scrambling as they warm up. Once the yolk mixture is warm to the touch, pour it back into the saucepan with the remaining hot milk, whisking vigorously.
Step 11: Thicken the Custard Base
Cook the custard over medium heat, whisking constantly as the starch begins to swell and thicken. Once the mixture starts to firm up, switch to a silicone spatula to scrape the bottom edges of the pot to prevent scorching. Stir continuously until large, thick bubbles burst at the surface, signaling that starch gelatinisation has occurred, which takes about 3 to 4 minutes.
Step 12: Finish and Strain the Custard
Remove the pot from the heat and stir in 28 grams of cold, unsalted butter until it is completely melted and incorporated. Pour the hot custard through a fine-mesh sieve into a shallow glass dish to trap any cooked egg fragments. Press a sheet of plastic wrap directly onto the surface of the custard to prevent a dry skin from forming, then refrigerate for at least 2 hours.
Step 13: Whip the Buttercream Base
Combine 454 grams of room temperature unsalted butter, 7 grams of vanilla bean paste, and 4 grams of fine sea salt in your mixer bowl. Using the whip attachment, beat the butter on high speed for 5 to 7 minutes until it becomes exceptionally light, airy, and pale ivory. The butter must be whipped thoroughly to remove its yellow cast and create a glossy, billowy foundation.
Step 14: Add the Sweetened Condensed Milk
Gradually pour 397 grams of sweetened condensed milk into the whipped butter in 5 to 6 separate additions. Keep the mixer on high speed, whipping for 30 seconds after each addition to incorporate the liquid sugar smoothly. Scrape down the sides of the bowl frequently to guarantee the fats and liquids form a uniform, silky emulsion.
Step 15: Stream in the Melted White Chocolate
Verify that 226 grams of finely chopped white chocolate is melted and slightly warm to the touch, around 95°F / 35°C. Stream this warm chocolate into the mixer on medium speed, whipping until the frosting thickens slightly and becomes uniformly cohesive. Transfer roughly one-third of this finished buttercream into a pastry bag fitted with a half-inch / 1 cm round tip.
Step 16: Level and Anchor the Layers
Trim the domed tops off your cooled cake layers using a long serrated knife to guarantee they are completely flat and level. Spread a small spoonful of buttercream in the center of a 9-inch / 23 cm cardboard round, then center your first cake layer on top. Press down lightly to anchor the sponge firmly to the cardboard, then place the assembly onto a revolving cake turntable.
Step 17: Build the Retaining Wall and Fill
Pipe a thick, continuous border of buttercream around the top perimeter of the anchored cake layer to serve as a retaining barrier. Spoon half of the chilled, whipped custard into the center of the ring, spreading it evenly with an offset palette knife. Place the second cake layer directly on top, centering it carefully, and press down gently to secure the structure.
Step 18: Apply the Crumb Coat and Finish
Repeat the piping and filling process with the second layer, then top with the final cake layer. Use the excess buttercream to patch any gaps along the sides, then apply a paper-thin crumb coat over the entire cake. Chill the cake for 15 to 30 minutes to firm up this structural skin before applying the final decorative layer of buttercream.
Pastry Bench Tips

If your white chocolate buttercream curdles or breaks during mixing, the temperature of your ingredients was too cold. To fix this, wrap a warm towel around the base of the mixing bowl or gently warm the bottom with a hair dryer for 10 seconds while whipping on low speed until the emulsion reforms.
To achieve a completely flat finish, chill your leveled cake layers in the freezer for 15 minutes before assembly. Firm, cold cake layers shed fewer crumbs and resist shifting when you apply the structural retaining wall of buttercream. You can find more advice on handling delicate layers in our guide to making mini vanilla layer cakes.
The temperature of your melted white chocolate is critical to the texture of the buttercream; it must be warm but not hot, specifically between 90°F and 95°F (32°C to 35°C). If the chocolate is too hot, it will melt the whipped butter, leaving you with a soup-like frosting that cannot support the weight of the layers.
When preparing the custard filling, make sure to whisk the egg yolks and sugar immediately after they come into contact. If sugar sits on top of egg yolks without being mixed, it draws moisture out of the yolks, creating hard, dehydrated yellow bits that cannot be dissolved.
For those seeking alternative mixing techniques, studying the reverse creaming method for sponge layers offers excellent insight into minimizing gluten development. This approach yields a tighter, velvety crumb that handles heavy fillings with absolute ease.
Frequently Asked Questions
What is the secret to a super moist vanilla cake?
The secret lies in balancing the water-binding capacities of both butter and vegetable oil. Butter provides unparalleled flavor and air-trapping capacity, while liquid vegetable oil remains fluid at room temperature, preventing the crumb from drying out. Maintaining a strict ratio of these two fats guarantees a crumb that stays exceptionally soft for days.
Is cake flour better than all-purpose flour for vanilla cake?
Cake flour produces a more delicate, tender crumb due to its lower protein content, but all-purpose flour is preferred here to support the heavy custard filling. The higher protein content in all-purpose flour creates a stronger gluten network that prevents the heavy layers from collapsing under their own weight. This structural strength is what allows the cake to hold its shape beautifully when sliced.
Why is my vanilla cake dry or dense?
A dry or dense cake is usually the result of over-mixing the batter or using volume measurements instead of a digital scale. Over-mixing over-develops the gluten proteins, trapping too much structure and resulting in a tough, bread-like texture. Always weigh your ingredients and stop mixing the moment the dry flour is fully incorporated into the wet ingredients.
What is the difference between white cake and vanilla cake?
A traditional white cake uses only egg whites to maintain a pale ivory color and a lighter texture, whereas a standard vanilla cake often includes whole eggs. The presence of egg yolks in standard cakes adds fat and color, producing a yellowish crumb. This recipe utilizes egg whites in the sponge layers to preserve the clean, bright white aesthetic of the classic dessert.
Should ingredients be at room temperature?
Yes, all liquid ingredients, including the milk, eggs, and butter, must be at room temperature (around 68°F / 20°C) before mixing. Cold ingredients will cause the creamed butter fat to seize, breaking the emulsion and preventing the batter from rising evenly in the oven. A proper emulsion is crucial for capturing the tiny air pockets that create a light crumb.
How can I safely freeze vanilla cake layers?
To freeze the layers, let them cool completely to room temperature, then wrap each layer tightly in two layers of plastic wrap followed by a layer of aluminum foil. Frozen layers can be stored for up to one month and are actually much easier to level and frost when partially thawed. Assemble the cake while the layers are still slightly cold to minimize crumbs.
Considered Adjustments
For a deeper, more aromatic profile, you can swap out the standard vanilla extract for authentic Tahitian or Madagascar vanilla beans. Split two whole pods lengthwise, scrape the seeds directly into the cake batter, and simmer the empty pods with the milk for your custard filling. If you appreciate these deep, natural aromatics, you will also love our highly detailed classic vanilla bean layer cake.
You can introduce a bright structural contrast by rubbing the zest of two fresh lemons into the sugar before creaming it with the butter. This releases the essential oils directly into the fat, diffusing a delicate citrus scent throughout the crumb without altering the pH balance of the batter. The resulting layers offer a subtle tang that balances the rich white chocolate buttercream beautifully.
Finishing & Plating
Plating a cake with this level of structural detail requires a clean, intentional presentation. Slice the cake while it is thoroughly chilled (around 38°F / 3°C) using a long, sharp chef’s knife dipped in hot water and wiped dry between each cut. This clean method ensures the white chocolate buttercream and the custard layers do not smear, revealing clean, distinct boundaries between the layers.
Serve each slice at room temperature to allow the fats in the sponge and buttercream to soften, releasing their full vanilla aroma. A warm cup of Earl Grey tea or black coffee provides the perfect bitter contrast to the sweetness of the white chocolate. For those who prefer a simpler, single-layer presentation without the custard filling, our classic vanilla butter cake offers a wonderful alternative that shines on any afternoon tea table.

What the Technique Gives You
Approaching this Classic Vanilla Layer Cake with a focus on structural precision transforms baking from a game of chance into a reliable science. When you weigh each component and respect the temperature of your fats, you are rewarded with layers that hold their shape and melt beautifully on the tongue. This methodical discipline is the core of great pastry work, proving that structure is what makes the melt possible.
If you are eager to expand your bench skills further, examine our foundational collection of recipes, starting with our foundational vanilla cake. Share your baking results and connect with our community of meticulous bakers on Pinterest, Facebook, and Telegram. We look forward to seeing your precise layers and hearing how your technique performed.


