Watch the dessert fork glide through a cloud of velvety buttercream and tender yellow cake, revealing a gorgeous rustic crumb decorated with rich autumn blossoms.

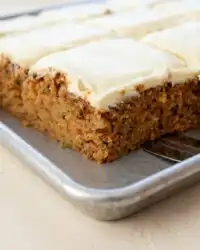
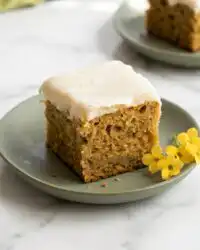
Creating a breathtaking centerpiece for your autumn gathering does not require hours of meticulous decorating or advanced pastry school techniques. This stunning Naked Cake with Fall Flowers brings together the ease of high-quality yellow cake mix and the rustic elegance of fresh seasonal blooms. By leaving the sides lightly frosted, you show off the beautiful contrast of the golden cake layers and rich vanilla buttercream. You get a show-stopping dessert that takes only thirty-two minutes from your mixer to your display table.
What Makes It Quick & Luscious: Naked Cake with Fall Flowers
Prep: 10 min · Serves: 10 · Difficulty: Easy
- Bakeries cannot match this simple weeknight speed.
- Boxed mix guarantees a reliable moist texture.
- Minimal frosting means effortless kitchen cleanup.
- Fresh pansies create instant seasonal beauty.
- Melted butter delivers rich home-style flavor.
We all have those moments when we need a spectacular dessert but have zero time to spend decorating. This recipe is designed exactly for those busy days when you want the beauty of a rustic bakery masterpiece without the stress of flawless piping. By leaning into the charm of a nude cake, you skip the tedious crumb coat and final smoothing stages entirely. The fast cleanup at the end of an indulgent night is a true blessing for busy bakers.
The golden layers bake up remarkably tender thanks to a few simple ingredient adjustments that make boxed cake mix taste completely homemade. You get that beloved bakery texture with a fraction of the measuring and cleaning. It is the ideal balance of convenience and elegance that fits right into a busy schedule.
Because the sides are only lightly scraped, there is no pressure to create flat surfaces or sharp corners. This forgiving style looks naturally beautiful, allowing the rustic warmth of the cake layers to shine through. You will love how easily this dessert comes together while looking like you spent hours in the kitchen.
I promise you will have a gorgeous centerpiece ready before your guests even finish their dinner.
Get The Full Cake Recipe
Print
Naked Cake with Fall Flowers
- Total Time: 32 mins
- Yield: 10 servings
Description
This stunning naked cake features tender yellow layers with a rustic finish, decorated with fresh seasonal blossoms for an effortless autumn centerpiece. It combines the convenience of a shortcut mix with a professional aesthetic, making it the perfect show-stopping dessert for busy schedules.
Ingredients
- 2 boxes yellow cake mix
- 1 cup melted salted butter
- 6 large eggs
- 2 cups water
- 3 cups vanilla buttercream frosting
- 1/2 cup fresh edible pansies
- 1/4 cup fresh mint leaves
Instructions
- Prep the oven. Preheat your oven to 350 degrees Fahrenheit and grease three nine-inch cake pans with butter or cooking spray.
- Clean the botanicals. Gently wash your fresh pansies and mint leaves in cold water, then pat them completely dry on paper towels.
- Mix the batter. Combine cake mixes, eggs, melted butter, and water in a mixer, beating on high speed for four minutes until smooth.
- Bake the layers. Divide batter evenly into the three pans and bake for twenty-two minutes, or until a toothpick inserted in the center comes out clean.
- Cool and assemble. Allow cakes to cool fully, then stack layers with generous applications of buttercream between each, leaving the outer sides lightly scraped.
- Add final decorations. Press the prepared pansies and mint leaves into the frosting on top and around the base for a rustic seasonal look.
Notes
- Ensure all eggs are at room temperature to prevent the melted butter from seizing during the mixing process.
- Chill the frosted cake for 15 minutes if the kitchen is warm to help the buttercream set firmly before decorating.
- Trim the domes off cooled cake layers with a serrated knife to ensure a perfectly flat, stable stack.
- Use organic, food-safe flowers to ensure your floral decoration is completely safe for consumption.
- Dip your knife in warm water and wipe it clean between every slice to achieve sharp, clean edges on the cake layers.
- Prep Time: 10 mins
- Cook Time: 22 mins
- Category: Dessert
- Method: Baking
- Cuisine: American
Shortcut-Friendly Pantry

Creating this stunning cake requires only a handful of reliable ingredients that you likely already have stored in your kitchen cabinets. We swap out the standard oil for rich melted butter and use whole eggs to guarantee a velvety, bakery-style texture. The magic of this dessert lies in combining these simple elements with gorgeous fresh flowers for a rustic finish.
- Yellow Cake Mix: This provides the perfect sweet foundation and guarantees a tender crumb every single time you bake.
- Salted Butter: Melted butter adds a rich, comforting flavor that makes boxed mix taste like it was made from scratch.
- Large Eggs: These provide structure and rise, helping the layers hold up beautifully when they are stacked.
- Vanilla Buttercream Frosting: Smooth frosting creates the rustic exterior and holds the delicate seasonal flowers securely in place.
- Pansies and Mint: Fresh edible blossoms and herbs offer a striking contrast against the warm golden hues of the layers.
| Ingredient | Why It Matters |
|---|---|
| Yellow Cake Mix | Provides a reliable, sweet structure and tender crumb. |
| Salted Butter | Adds rich flavor and ensures moisture throughout the cake layers. |
| Large Eggs | Create a light lift and keep the crumb sturdy enough for stacking. |
| Buttercream Frosting | Acts as a creamy filling and a rustic exterior coating. |
| Pansies and Mint | Deliver a beautiful, seasonal touch that mimics professional bakery designs. |
Choosing high-quality cake mixes is one of my favorite secrets for a stress-free dessert. Standard white or yellow mixes work equally well here, allowing you to customize the final flavor profile based on your personal preference. The addition of rich butter instead of vegetable oil is what truly transforms the texture into something luxurious.
For the floral decorations, safety is our primary focus when selecting blossoms from the garden or local store. You want to look for organic, pesticide-free options that are completely safe for food contact. Edible varieties like pansies and violas bring a natural charm that pairs beautifully with fresh green mint leaves.
The Quick Method

Step 1: Prep Your Oven and Cake Pans
Begin by preheating your oven to 350 degrees Fahrenheit so it reaches the proper baking temperature before your batter is ready. Thoroughly grease three nine-inch cake pans with butter or cooking spray to make sure the layers release cleanly later. You can line the bottoms with parchment paper circles for an extra layer of protection against sticking. As the oven warms, you will smell the faint, comforting scent of preheating metal and sweet butter.
Step 2: Wash and Dry Your Decorative Botanicals
Carefully wash your chosen flowers and fresh mint leaves in cold water to remove any garden dust or debris. Lay them out flat on dry paper towels and gently pat them to remove every drop of moisture. Allowing the botanicals to dry completely prevents any water from weeping into your smooth buttercream. You will notice the fresh, earthy aroma of mint filling your kitchen as they dry.
Step 3: Mix the Cake Batter
Empty both boxes of cake mix into a large mixing bowl or the bowl of your stand mixer. Pour in the eggs, melted salted butter, and water, then turn the mixer to high speed for four minutes. The batter will transform from a dry powder into thick, pale yellow ribbons that smell rich and sweet. Scraping the sides of the bowl with a flexible spatula guarantees that no dry pockets remain at the bottom.
Step 4: Bake the Golden Layers
Divide the thick batter evenly between your three prepared nine-inch pans to create uniform cake layers. Slide the pans onto the center rack of your oven and bake them for twenty-two minutes. You will know they are done when a wooden toothpick inserted into the center comes out clean with no wet crumbs. The kitchen will fill with a warm, sugary vanilla aroma as the cakes turn a light golden brown.
Step 5: Cool and Frost the Base
Let the baked layers cool completely in their pans for about ten minutes before turning them out onto wire racks. Stacking warm cakes will melt your frosting, so patience is key during this cooling step. Place your first layer on a serving platter and spread a generous layer of vanilla buttercream over the top. Repeat this process with the remaining layers, leaving the outer sides mostly bare with only a light scraping of frosting.
Step 6: Decorating Your Naked Cake with Fall Flowers
Gently press your clean, dry pansies and fresh mint leaves into the frosting on top of the cake. Place a few blossoms around the base to create a balanced, organic look that highlights the rich tones of autumn. The contrasting colors of dark purple petals and green leaves against the pale frosting look striking. Once decorated, your gorgeous cake is ready to be admired and sliced.
Quick-Texture Tricks

If your buttercream starts to slide off the cake because the kitchen is too warm, pop the frosted layers into the refrigerator for fifteen minutes before adding the decorations. This chilling time helps the frosting firm up, creating a more stable foundation for your fresh elements. It is a simple way to save your structure during warm weather.
Always use room temperature eggs when mixing your cake batter to achieve the loftiest texture possible. Cold eggs can cause the melted butter to seize up, leading to a lumpy batter that does not bake evenly. Letting your eggs sit on the counter for twenty minutes before baking makes a massive difference in the final crumb.
When selecting blossoms for your masterpiece, think about how different shapes and colors complement each other. Choosing various sizes of edible flowers creates a much more organic, natural look. You can read more about selecting safe blossoms in our guide on cake flowers to make your design stand out. Adding small sprigs of rosemary or thyme along with the mint leaves can also provide extra rustic texture.
For a beautifully stacked cake that does not lean, gently trim any high domes off the cooled layers with a serrated knife. Removing these rounded tops guarantees that each layer sits flat against the one beneath it. Save the trimmed crumbs for a quick snack while you decorate.
If your cake layers stick to the pans after cooling, do not panic or try to pry them out with a knife. Instead, place the bottom of the pan over a warm, damp towel for two minutes to release the butter grip. Gently tap the edges, and the layer should slide out onto your rack without tearing the delicate crumb.
To keep your fresh blossoms looking bright and hydrated, place their stems in tiny water picks hidden inside the cake layers. This trick is especially useful if your dessert will be sitting on display for several hours before serving. It keeps the petals from wilting under warm party lights.
Frequently Asked Questions
How do you put fresh flowers on a naked cake safely?
To place fresh flowers safely, always wrap the stems in floral tape or insert them into plastic straws before sliding them into the cake. This prevents any sap or moisture from the stems from directly contacting the edible cake layers. You should also make sure that the flowers have been thoroughly washed and dried beforehand to remove any lingering garden dust.
Are there toxic flowers I should avoid?
Yes, several common garden flowers are highly toxic and should never be placed on food. Avoid species like hydrangeas, lilies, poinsettias, and rhododendrons when decorating your desserts. Stick to certified edible varieties such as pansies, marigolds, and violas to guarantee the safety of your guests.
What is the difference between a “naked” cake and a “semi-naked” cake?
A true naked cake has completely bare sides with no frosting covering the outer edges of the layers. A semi-naked cake features a very thin layer of buttercream that is scraped smooth, allowing the cake crumb to peek through. Both styles offer a beautiful, rustic appearance that highlights the natural texture of the dessert.
What are the best fall flavor combinations for naked cakes?
Warm flavors like spiced apple, pumpkin, and rich maple pair beautifully with the rustic appearance of this dessert. You can use a classic yellow cake base and fill the layers with caramel buttercream or apple compote. These cozy combinations evoke the feeling of autumn while keeping the preparation delightfully simple.
How do you keep a stacked naked cake from collapsing?
Insert wooden dowels or thick plastic straws vertically into the bottom layers to support the weight of the upper cakes. Cut the dowels flush with the top of each frosted layer before stacking the next one on its own cardboard cake board. This structural support prevents the tender cake crumb from compressing or leaning over time.
How far in advance can you decorate a naked cake with flowers?
It is best to add fresh flowers within two hours of serving to keep the petals looking crisp and bright. If you must decorate earlier, store the assembled cake in the refrigerator to slow down any wilting. Avoid adding delicate blooms too far in advance, as they can lose their moisture and droop quickly.
Can I freeze the cake layers before assembling?
You can freeze the baked layers by wrapping them tightly in plastic wrap and aluminum foil for up to three months. This is a wonderful way to prep for a big gathering ahead of time. Allow the layers to thaw in the refrigerator overnight before you begin frosting and decorating.
Fast Flavor Swaps
For an autumn twist that embraces cozy flavors, replace the classic yellow cake mix with our favorite pumpkin spice cake 2 recipe base. This alternative brings warm cinnamon and nutmeg notes that pair beautifully with a cream cheese frosting instead of standard vanilla. The warm orange hue of the spiced cake layers looks gorgeous peeking through the rustic white frosting.
If you want to add a bright fruity contrast, fold fresh lemon zest into your white cake batter before baking. Layer the cakes with raspberry jam alongside the vanilla buttercream to create a beautiful berry swirl inside. This simple addition cuts through the sweetness of the frosting and pairs wonderfully with fresh pansies.
Chocolate lovers can easily transform this dessert by using rich devil’s food cake mix and adding a splash of espresso to the batter. Frost the layers with a light espresso-infused buttercream to highlight the deep, earthy tones of the cake. This combination is especially cozy for late autumn gatherings when the air turns crisp.
Bring It to the Table Fast
This rustic dessert makes a spectacular centerpiece for a cozy autumn dinner party or an elegant weekend brunch. Place the finished cake on a wooden pedestal stand to highlight its natural, earthy style. Surrounding the base with extra loose blossoms and fresh mint leaves creates a stunning table display that matches the beauty of a professional floral cake design.
When it comes to slicing, use a long, thin-bladed knife dipped in warm water and wiped clean between each cut. This technique guarantees clean slices that showcase the distinct layers of cake and frosting without smearing the bare edges. Offer your guests light accompaniments like a warm mug of spiced apple cider or hot tea to complement the sweet vanilla flavors.
If you have leftover slices, store them in an airtight container in the refrigerator to keep the exposed cake crumb from drying out. Because this style lacks a thick outer barrier of frosting, the cake can lose moisture more quickly than fully frosted designs. Bringing the slices back to room temperature for ten minutes before eating will restore that melt-in-the-mouth texture.

The Weeknight Wrap-Up
Baking a beautiful dessert should never feel like a chore, even when you want a show-stopping look for a special occasion. Leaning into rustic decorating styles allows you to achieve elegance without spending hours struggling with a piping bag. Whether you are baking for a festive autumn gathering or treating your family to a special weekend treat, this recipe delivers maximum visual appeal with minimal stress.
If you love working with botanical designs, you might also enjoy our guide on crafting a stunning rose cake for your next celebration. This method proves that express doesn’t mean dry and that beautiful results are achievable on any timeline. It is one of those twenty-minute desserts that taste like an hour’s work once everything is fully assembled.
Take a picture of your gorgeous creation and share it with us on social media so we can admire your handiwork. Follow our latest kitchen adventures on Pinterest and Facebook for more quick, luscious dessert inspiration. You can also find fun behind-the-scenes videos and baking tips on our TikTok channel.

