Sometimes you need a dessert that looks like a professional masterpiece but feels like a cozy, homemade hug. This photo cake is the ultimate express way to celebrate big moments without losing that melt-in-your-mouth texture we love. It is the perfect balance of a creamy, tangy filling and a buttery, crisp base that satisfies any weeknight craving.

While the edible topper makes it a showstopper, the real secret is the velvety cheesecake layer hidden underneath. This method makes sure you get a perfectly flat surface for your image while maintaining a lush, tender crumb that dissolves instantly. It’s a fast and luscious win for any busy baker looking to impress without the stress.
Quick Indulgence with a Personal Touch
You are going to love how this recipe delivers a professional look with a texture that is purely decadent. Most custom desserts take days of planning, but this express method focuses on a high-moisture base that stays tender for days. It is all about that creamy, gooey center that contrasts perfectly with the golden graham cracker crust.
We prioritize sensory satisfaction here. The addition of sour cream makes the filling incredibly moist, while the slow-cool method in the oven makes sure the top stays smooth and crack-free. It is the perfect canvas for your favorite memories, and the flavor is far superior to anything you would find at a standard grocery store bakery. This is proof that quick doesn’t mean dry; it means more time to enjoy the party.
Whether you are celebrating a birthday or a simple Tuesday win, this cake feels special. It has that signature Mediterranean-inspired richness that feels light yet satisfying. The crust has a distinct snap that gives way to a silken middle, creating a texture profile that is hard to beat. You get the visual wow factor and the internal ‘melt’ factor in one simple package.
Print
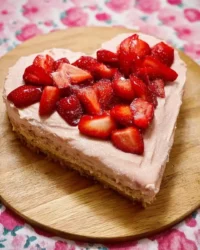
Photo Cake
- Total Time: 8 hours 40 mins
- Yield: 12 servings
- Diet: Vegetarian
Description
Create a stunning and personalized centerpiece with this creamy, velvety cheesecake that serves as the perfect smooth canvas for an edible photo. Featuring a buttery graham cracker crust and a lush sour cream filling, this dessert delivers professional results with a homemade touch.
Ingredients
- 1 1/2 cups crushed graham crackers
- 1/3 cup melted butter
- 24 oz full-fat cream cheese, softened
- 1 cup white sugar
- 1/4 cup milk
- 4 large eggs
- 1 cup sour cream
- 1 tablespoon vanilla extract
- 1/4 cup all-purpose flour
- 1 edible photo cake topper
Instructions
- Preheat your oven to 350°F (175°C) and prepare a 9-inch springform pan for easy removal.
- In a medium mixing bowl, blend the melted butter and crushed graham crackers until combined, then press the mixture firmly and evenly into the bottom of the pan.
- In a large bowl, beat the softened cream cheese and sugar until perfectly smooth and uniform.
- Incorporate the milk and eggs into the cream cheese mixture, then stir in the sour cream and sifted all-purpose flour until the batter is silken.
- Pour the filling over the graham cracker base and bake for 70 to 90 minutes, or until the edges are set but the center still jiggles slightly.
- Turn off the oven and let the cake cool inside for 5 to 6 hours with the door slightly cracked to ensure a smooth, crack-free surface.
- Chill the cake in the refrigerator for 1 to 2 hours, then apply your custom edible photo topper once the surface is completely cold and set.
Notes
To ensure a perfectly flat surface for your photo, avoid over-beating the eggs, which can introduce air bubbles that rise during baking. If you notice any condensation on the cake after refrigeration, gently pat it dry with a paper towel before applying the topper to prevent the edible ink from bleeding.
- Prep Time: 20 mins
- Cook Time: 1 hour 20 mins
- Category: Dessert
- Method: Baking
- Cuisine: American
The Express Ingredients

To get that signature lush texture fast, we use simple pantry staples that work hard. Each component is chosen to contribute to a tender, moist finish that supports the weight of an edible photo topper without becoming dense.
- Crushed Graham Crackers: This provides the essential sandy, buttery foundation. It gives a toasted honey flavor that balances the tang of the cream cheese.
- Melted Butter: The glue for our crust. It adds a rich, savory note that makes the base taste like it came from a high-end bakery.
- Cream Cheese: The star of the show. Use full-fat for the most luxurious, velvety mouthfeel.
- White Sugar: Adds sweetness without altering the pure white color of the cake, making your photo pop.
- Milk & Eggs: These provide the structure and liquid needed for a tender crumb. They bind everything into a smooth, pourable batter.
- Sour Cream: My secret for moisture. It adds a subtle tang and makes sure the cake never feels dry or crumbly.
- Vanilla Extract: A splash of warmth to round out the creaminess.
- All-Purpose Flour: Just a touch to help set the filling so it is sturdy enough for the designer topper.
The Quick Process
Step 1: Prep Your Space
First, set your oven’s temperature to 350 degrees Fahrenheit (175 degrees Celsius) so that your cake can be baked completely. A 9-inch springform pan is the next thing to look for, as this tool allows for easy removal without damaging the delicate sides of your dessert.
Step 2: Build the Foundation
Use a medium-sized mixing bowl and begin blending the melted butter and combined graham cracker crumbs. Start preparing the cake base by pressing this thoroughly combined mixture onto the bottom of the pan. Make sure it is packed tightly and evenly to create a sturdy, golden floor for your creamy filling.
Step 3: Create the Creamy Filling
Start mixing the cream cheese and sugar in a larger bowl and continue doing so until the mixture is uniform and smooth. Combine the ingredients thoroughly after adding the milk and eggs. Sift the all-purpose flour and sour cream together to create a smooth mixture, then pour it into the graham cracker base that has been ready and allowed to set.
Step 4: The Slow Bake
Start baking the cake once the ingredients have been poured into the pan, and bake it for 70 to 90 minutes. You are looking for a slight jiggle in the center but set edges. Once the cake has finished baking, kindly allow it to cool for 5 to 6 hours inside the oven. Do this inside the oven with the door slightly cracked, where the enclosed space will keep the cake from breaking or cracking.
Step 5: Chill and Decorate
When the cake passes the clean toothpick test, only then refrigerate it and let it chill for one to two hours. Lastly, the cake should only be removed and the edible photo printed thru the designer as a cake topper once it has cooled completely. This makes sure the image stays crisp and does not melt into the surface.
Meagan’s Quick Tips

To achieve that perfect molten-yet-set texture, always use room temperature cream cheese and eggs. Cold ingredients often lead to lumps, and we want this batter to be as smooth as silk. If you are in a rush, you can soften the cream cheese in the microwave for 15 seconds to speed things up. For more ideas on perfecting your bakes, check out our full recipe index for texture-focused guides.
Make sure you do not skip the oven-cooling phase. This step is vital for a photo cake because any cracks on the surface will make the photo look uneven. If you notice a small crack forming, don’t panic; the sour cream in the batter helps keep it moist enough that a little bit of frosting can easily bridge the gap before you apply the topper. For a deeper look at professional finishing, this guide on making an easy photo cake is a fantastic resource.
Easy Twists
If you want to change up the flavor profile while keeping that express speed, try swapping the graham crackers for crushed chocolate sandwich cookies. This creates a dark, crunchy contrast to the white filling. You can also add a teaspoon of almond extract or lemon zest to the batter to give it a bright, Mediterranean flair. If you love a darker profile, you might enjoy our old-fashioned chocolate cake which offers a similar melt-in-your-mouth experience.
Another great variation is to swirl a bit of fruit preserve into the batter before baking. Raspberry or strawberry works beautifully and adds a pop of color under the photo. Just make sure the top remains relatively flat so your edible image can lay flush against the surface. You can even use a gluten-free flour blend if needed, as the moisture from the sour cream keeps the texture tender regardless of the flour type.
Instant Enjoyment

When it is time to serve, use a hot, wet knife to get those clean, professional slices. This prevents the creamy filling from sticking to the blade and keeps your photo looking sharp on every plate. This cake is rich enough to stand on its own, but a dollop of lightly sweetened whipped cream on the side never hurts. For more celebratory inspiration, see our car cake tutorial for fun shapes.
I love serving this at room temperature to really let the cream cheese and vanilla flavors shine. If you are hosting a party, you can set out a small bowl of fresh berries to add a touch of acidity that cuts through the richness. This cake is designed for immediate enjoyment, so make sure to show off that photo before you start slicing into the gooey center.
The Sweet Truth
This photo cake proves that you can have a stunning, personalized dessert without spending all day in the kitchen. By focusing on high-moisture ingredients and a simple cooling method, we achieve a texture that is both sturdy and incredibly tender. If you enjoyed this express bake, you will definitely love our lemon rainbow cake for your next big event. Don’t forget to share your creations with us on Instagram, Facebook, Pinterest, and TikTok! Keep it quick and keep it luscious.


