Busy weeknights usually don’t leave much room for intricate decorating, but this Cake Draw method changes everything. You can create stunning, personalized sponge cakes with a molten-soft crumb in under an hour. It is the perfect way to bring a little Mediterranean-style texture magic to your table without the stress or the long wait.

These mini sponge cakes are remarkably light and airy, thanks to a specific folding technique that keeps the batter voluminous and tender. With a simple whipped cream filling, they offer a luscious, melt-in-your-mouth experience that looks far more complicated than it actually is to assemble.
Why You’ll Love This Cake Draw Technique
You will love how this technique allows for total creativity without sacrificing that signature moist sponge texture. Since we use a quick-bake method, these cakes stay tender and do not dry out in the oven. It is a fantastic way to make any Tuesday night feel like a special occasion with a custom design. Whether you are celebrating a small win or just want something beautiful, this express method delivers professional results fast.
Print
Cake Draw
- Total Time: 40 mins
- Yield: 12 mini cakes
- Diet: Vegetarian
Description
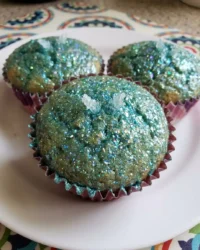
Elevate your dessert game with these charming mini sponge cakes that feature custom hand-drawn designs baked right into the crust. This express method produces a light, airy crumb paired with a luscious whipped cream filling, making it perfect for artistic bakers on a schedule.
Ingredients
- 4 Large eggs separated
- 1/2 cup Granulated sugar
- 3 tablespoons Vegetable oil
- 3 tablespoons Whole milk
- 1 teaspoon Vanilla extract
- 1/2 cup All-purpose flour
- 1 tablespoon Cornstarch
- 1/2 teaspoon White vinegar
- Gel food coloring
- 1 cup Heavy whipping cream
Instructions
- Line silicone molds with parchment circles featuring hand-drawn designs and set aside.
- Whisk egg yolks with sugar, vegetable oil, milk, and vanilla before folding in sifted flour and cornstarch.
- Beat egg whites with sugar and vinegar until stiff peaks form, then gently fold into the yolk batter.
- Color small portions of batter with gel dye and pipe designs onto the parchment, then chill for 5 minutes.
- Cover designs with remaining batter and bake at 375°F for 8 to 10 minutes until springy.
- Cool the sponges completely before peeling off the parchment to reveal the designs.
- Whip heavy cream until stiff and sandwich it between one plain sponge and one designed sponge.
Notes
To prevent the sponge from sticking to the parchment, ensure you peel it away only after the cake has completely cooled. If your designs are intricate, use a toothpick to drag the batter into fine points for better detail.
- Prep Time: 30 mins
- Cook Time: 10 mins
- Category: Dessert
- Method: Baking
- Cuisine: Mediterranean-style
The Express Ingredients for Success

This recipe relies on basic pantry staples to create a professional-grade sponge that is both flexible and soft. By separating the eggs and whipping them to perfection, we achieve a lift that is stable enough for intricate piping but still incredibly airy.
- Egg Yolks & Whites: The core of our sponge, providing both the structure and the light aeration needed for the Cake Draw process.
- Vegetable Oil: This is my secret for keeping the cake moist and tender, even if you make these a few hours ahead of time.
- Cornstarch: By adding a bit of cornstarch to the flour, we soften the proteins for a much more delicate, melt-in-your-mouth crumb.
- Gel Food Dye: It is crucial to use gel rather than liquid to keep the batter thick enough for detailed drawing.
- Heavy Whipping Cream: This creates a cloud-like filling that perfectly balances the sweetness of the sponge.
- White Vinegar: A tiny amount helps stabilize the egg whites, making sure they do not deflate while you are working on your designs.
The Quick Process
Step 1: Prep Your Design Station
Begin by tracing your 4-inch cake molds onto parchment paper and cutting out 24 circles to fit perfectly inside. On half of the circles, draw or trace your favorite designs using an edible marker. Lightly grease your silicone molds and set the parchment circles inside, placing them on a cookie sheet for stability.
Step 2: Create the Yolk Base
Separate the egg whites from the yolks, placing the whites in a stand mixer bowl and the yolks in a large mixing bowl. Whisk together the egg yolks, sugar, vegetable oil, milk, and vanilla until the mixture is smooth. Sift the flour and cornstarch directly into this yolk mixture and whisk until you have a thick, smooth batter.
Step 3: Whip the Meringue
In your stand mixer with the whisk attachment, beat the egg whites until they are frothy. Slowly add the sugar and white vinegar. Continue whisking until you reach stiff peaks—this means the peaks stand straight up when you lift the whisk. This step is vital for the airy texture we want.
Step 4: Fold and Color
Gently fold the stiff egg whites into the yolk mixture using a spatula. Be careful not to over-mix, as you want to keep the air inside. Scoop a few tablespoons of batter into small bowls to dye with your gel colors. Transfer each color into a tipless piping bag.
Step 5: Pipe the Designs
Cut a tiny tip off your piping bags and carefully trace the designs on the parchment paper inside the molds. Once finished, place the cookie sheet in the fridge for 3 to 5 minutes to let the designs firm up. This prevents the top layer of batter from smudging your artwork.
Step 6: Bake the Sponge
Pipe an even layer of the remaining uncolored batter over the chilled designs. Bake at 375°F (190°C) for 8-10 minutes. The cakes should have a slight bounce when tapped. Immediately run a butter knife along the edges and flip the cakes onto parchment paper to reveal your beautiful designs.
Step 7: Final Assembly
Whisk the heavy cream, sugar, and vanilla until stiff peaks form. Once the cakes are completely cool, place an undesigned cake layer down, pipe a generous amount of whipped cream on top, and crown it with your designed cake layer.
Express Texture Secrets

To make sure your designs stay sharp and vibrant, always choose gel food coloring over liquid versions. Liquid dye can thin out the batter, causing your lines to blur during the bake. For more help with achieving the perfect sponge consistency, take a look at our recipe-index. You should also check out this guide to mini designed sponge cakes for more advanced piping ideas. Always serve these cakes at room temperature to maintain that signature soft, melt-in-your-mouth feel.
Flavor Express Swaps
You can easily switch up the flavor profile of this Cake Draw recipe by changing the extracts. Swap vanilla for almond or even a bit of rum extract for a deeper taste. If you are a fan of fruity notes, adding some lemon zest to the yolk batter works wonders. For more inspiration on bright and airy desserts, see our lemon-rainbow-cake post. You can also fold a teaspoon of cocoa powder into a small portion of the batter to create chocolate-flavored design elements.
Instant Enjoyment

These mini cakes look incredible when served on a simple white platter that lets the designs stand out. I love pairing them with a side of fresh seasonal berries or a light dusting of powdered sugar. For those who want an extra touch of luxury, explore our velvet-crumb-collection for more pairing ideas. They are perfect for afternoon tea or as a quick weeknight treat that feels like a masterpiece.
The Sweet Truth
Mastering the Cake Draw technique is the fastest way to bring a professional, artistic touch to your home kitchen. It delivers that luscious, moist texture we focus on at Melt Cake without requiring hours of preparation. For more cocoa-based experiments and texture wins, check out our cocoa-dream-lab. Be sure to follow us and share your creations on Pinterest, Instagram, Facebook, and TikTok for more express baking inspiration!


