Tuesday night texture cravings don’t have to wait for the weekend to be satisfied. I recently found myself wanting a luscious, moist yellow cake that looked like it belonged in a high-end gallery but took minimal effort to assemble. This recipe delivers that exact dream, proving that a quick-soak texture can be achieved with smart pantry shortcuts and a little Mediterranean-inspired moisture logic.

This Aesthetic Cake uses a dual-fat method to guarantee a tender crumb that stays soft for days. By combining softened butter for flavor and canola oil for lasting moistness, you get a reliable base that stands up to heavy frosting without ever turning dry or crumbly. It is the ultimate express solution for bakers who value both speed and sensory satisfaction.
Quick Indulgence with a Melt-In-Your-Most Texture
You are going to love this recipe because it prioritizes the sensory experience of a soft, velvety crumb while respecting your busy schedule. Most yellow cakes can be notoriously dry or require complex reverse-creaming methods, but this version uses sour cream and whole milk to create an instant tenderizing effect. It is a foolproof way to get that professional bakery finish in your own kitchen without any hidden stress.
Another reason this cake is a total winner is its versatility for modern styling. Whether you are aiming for a vintage heart design or a minimalist coquette look, the structure of these layers is sturdy enough for elaborate piping but delicate enough to melt on your tongue. It is a fast-track to achieving those stunning social media results while knowing the flavor is just as good as the photography. We focus on the science of fat and acid to make sure every bite is as luscious as the first one.
Print
Aesthetic Cake
- Total Time: 55 mins
- Yield: 8 servings
- Diet: Vegetarian
Description
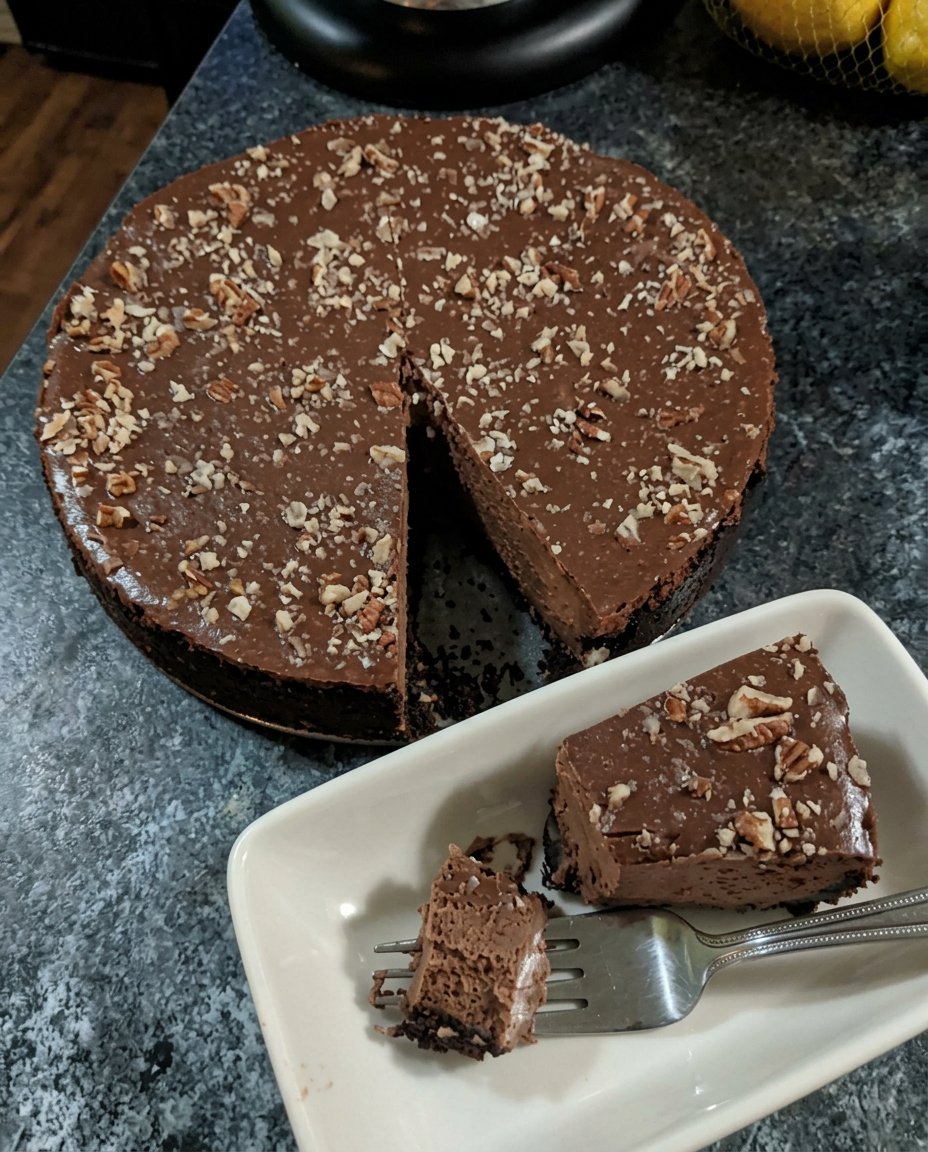
This Aesthetic Cake features a velvety, moist crumb achieved through a clever combination of butter, oil, and sour cream. It is the perfect reliable base for those seeking a professional bakery-style yellow cake that pairs beautifully with any decorative frosting.
Ingredients
- All-purpose flour
- Baking soda
- Baking powder
- Sea salt
- Softened butter
- Granulated sugar
- Eggs
- Pure vanilla extract
- Sour cream
- Whole milk
- Canola oil
- Chocolate buttercream
Instructions
- Preheat your oven to 350 degrees F (175 degrees C) and prepare two 6-inch round cake pans by lining the bottoms with parchment paper and greasing the sides.
- In a medium-sized bowl, whisk together the flour, baking soda, baking powder, and sea salt.
- In a stand mixer, beat the softened butter and granulated sugar for approximately two minutes until the mixture is light and fluffy.
- Add the eggs one at a time followed by the vanilla extract, then beat for an additional 60 seconds until pale and airy.
- Pour in the sour cream, whole milk, and canola oil, stirring on low speed until just combined.
- Add the dry ingredients to the wet mixture and stir until just combined, taking care not to overmix the batter.
- Divide the batter evenly between the prepared pans and bake for 30 to 35 minutes until the tops are golden and a toothpick comes out clean.
- Allow the cakes to cool in their pans for 30 minutes before transferring them to a wire rack to cool completely before frosting.
Notes
To ensure perfectly even layers for your aesthetic styling, use a digital kitchen scale to divide the batter between your pans. If you are in a rush to decorate, chilling the cake layers in the freezer for about 15 minutes makes them much firmer and easier to frost without catching crumbs.
- Prep Time: 20 mins
- Cook Time: 35 mins
- Category: Dessert
- Method: Baking
- Cuisine: American
The Express Ingredients for Maximum Moisture

To make this Aesthetic Cake, you will need a few key items that work together to create a superior texture. We use a blend of fats and proteins to make sure the cake is never tough. Here is the breakdown of what makes this recipe work so well:
- All-Purpose Flour: This provides the necessary structure. You can use cake flour if you want an even finer crumb, but all-purpose is perfect for a reliable, everyday win.
- Softened Butter and Canola Oil: Using both is the secret to a great yellow cake. Butter gives us that rich, nostalgic flavor, while oil keeps the crumb moist even when refrigerated.
- Sour Cream: This is my favorite shortcut for a tender cake. The high fat content and acidity break down gluten, resulting in a melt-in-your-mouth feel that is hard to beat.
- Whole Milk: We stick to full-fat milk to add richness. It provides the liquid needed to hydrate the dry ingredients without thinning out the flavor.
- Granulated Sugar: This not only sweetens the cake but also helps with the browning and moisture retention during the bake.
- Eggs: These provide the lift and structure. Make sure they are at room temperature so they incorporate into the batter smoothly without curdling the fats.
- Pure Vanilla Extract: A generous amount of vanilla is essential for that classic, warm aroma that defines a great yellow cake.
The Quick Process for Perfect Layers
Step 1: Prep and Heat
Start by preheating your oven to 350 degrees F (175 degrees C). Prepare two 6-inch round cake pans by lining the bottoms with parchment paper and greasing the sides well. This is a vital step to make sure your layers pop out perfectly clean for that sharp, professional look.
Step 2: Combine Dry Ingredients
In a medium-sized bowl, whisk together the flour, baking soda, baking powder, and sea salt. Aerating the dry ingredients helps prevent clumps and makes sure the leavening agents are distributed evenly for a consistent rise across both pans.
Step 3: Cream the Butter and Sugar
In your standing mixer, beat the softened butter and granulated sugar for about two minutes. You want the mixture to look light and fluffy. This process traps air, which contributes to the lightness of the cake, so do not rush this part.
Step 4: Add Eggs and Vanilla
Add the eggs one at a time, followed by the vanilla extract. Beat the mixture for another 60 seconds until it looks pale and airy. If the mixture looks slightly broken, don’t worry—the dry ingredients will pull it back together.
Step 5: Incorporate the Moisture
Pour in the sour cream, whole milk, and canola oil. Stir these in on a low speed until just combined. Using a spatula to scrape the bottom of the bowl is a good way to make sure no pockets of oil are hiding at the base.
Step 6: The Final Mix
Add the dry ingredients to the wet mixture. Stir until just combined, being careful not to overmix. Overmixing can lead to a tough, bready texture, and we want to keep this cake as tender as possible.
Step 7: Bake to Perfection
Divide the batter evenly between your prepared pans. Bake for 30 to 35 minutes. You will know they are ready when the tops are golden and a toothpick comes out with just a few moist crumbs. Let them cool in the pans for 30 minutes before moving them to a wire rack.
Step 8: Frost and Style
Once the cakes are completely cool, frost them with your favorite chocolate buttercream. For a true aesthetic look, apply a thin crumb coat first, chill for 15 minutes, and then finish with a thick, smooth layer of frosting.
Express Texture Secrets for the Busy Baker

To get the best results with your Aesthetic Cake, timing is everything. If you find yourself in a rush, you can cool your cakes in the freezer for 15 minutes to speed up the process before frosting. A cold cake is much easier to style and prevents the buttercream from sliding off. For more ways to achieve that soft, pillowy feel, check out our velvet-crumb-collection for more texture-focused tips.
Another secret is to use a metal pastry scraper for your final frosting pass. This creates the sharp edges and flat sides that define the modern aesthetic minimalist cake style. Also, remember to weigh your batter when dividing it between pans. Using a kitchen scale makes sure both layers are exactly the same height, which is a small detail that makes a massive difference in the final look.
Quick Swaps for Flavor Express
You can easily adapt this base recipe to fit different cravings. If you want a bright, citrusy twist, try adding two tablespoons of fresh lemon zest and a splash of lemon juice to the batter. This pairs beautifully with a berry-filled center, similar to our lemon-rainbow-cake.
For a deep, nutty flavor, you can swap the vanilla extract for almond extract or stir in a half-cup of toasted, finely ground hazelnuts. If you prefer a more decadent profile, marble the batter with a few swirls of Nutella or a quick chocolate ganache before baking. These small changes allow you to create a completely different dessert experience without having to learn a brand new method.
Instant Enjoyment and Presentation

When it comes to serving your Aesthetic Cake, presentation is just as important as the taste. Serve each slice on a clean, white ceramic plate to let the golden color of the cake and the rich chocolate frosting stand out. If you want to add a fresh element, consider pairing it with a side of macerated berries. Our succulent-fruit-fusion guide has some great ideas for fruit pairings that cut through the richness of the buttercream.
For the best texture, serve the cake at room temperature. If you have stored it in the fridge, let it sit out for at least 30 minutes before slicing. This allows the butter in the cake and frosting to soften, giving you that perfect melt-in-your-mouth experience that makes this recipe so special.
The Sweet Truth for Fast Results
Creating a stunning, moist cake doesn’t have to be a multi-day project. By focusing on high-fat ingredients and simple mixing methods, you can produce a professional-quality dessert even on a busy weeknight. If you are looking for more deep, rich flavors to add to your repertoire, don’t miss our cocoa-dream-lab for the ultimate chocolate inspiration. This recipe proves that you can have your cake and style it too, all within a few hours. Happy baking, and don’t forget to share your beautiful creations with us on Pinterest, Instagram, and Facebook.


