Gelatinisation dictates whether a liquid mirror coat transforms into a flawless reflecting surface or a collection of rubbery lumps.

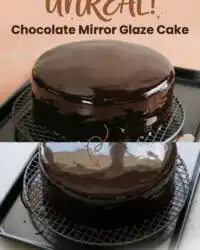
Achieving a glass-like sheen on a dessert requires strict adherence to temperature control and exact ingredient weights. This recipe guides you through the precise technique required to master a stable Chocolate Mirror Glaze Cake without relying on condensed milk. By understanding the role of protein hydration and emulsion, you will create a glaze that is thin, smooth, and highly stable. A digital scale and a probe thermometer will be your most valuable tools on the pastry bench today.
What Makes the Texture Right for a Chocolate Mirror Glaze Cake
Prep: 60 min · Serves: 12 · Difficulty: Advanced
- Glass-like reflectivity from pristine gel networks.
- Ultra-thin coat preserving delicate sponge structures.
- Pure chocolate flavor without heavy condensed milk.
- Balanced cocoa levels preventing oversweet finishes.
This method guarantees a smooth, glossy skin that conforms strictly to the contours of your dessert without sagging or dripping. Achieving this degree of control allows you to transform a standard chocolate layer cake into a professional masterpiece with absolute certainty. The thin protective skin protects the soft interior while delivering a clean melt-in-the-mouth sensation.
Weigh it, time it, trust it.
Get The Full Cake Recipe
Print
Chocolate Mirror Glaze Cake
- Total Time: 3 hours
- Yield: 12 servings
Description
Create a professional-grade dessert with a flawless, glass-like finish using this precise technical guide. This recipe ensures a stable, high-shine chocolate mirror glaze that provides a clean melt-in-the-mouth experience without the need for condensed milk.
Ingredients
- 4 teaspoons gelatine powder
- 2.5 tablespoons cold water
- 2/3 cup water
- 1 cup Dutch processed cocoa powder
- 2/3 cup heavy whipping cream
- 1 cup plus 2 tablespoons caster sugar
Instructions
- Level and chill sponge. Trim the dome off the sponge layers and refrigerate at 4°C for 60 minutes to create a stable, clean base.
- Apply ganache foundation. Spread a smooth, even layer of dark chocolate ganache over the cake and ensure there are no ridges or indentations.
- Chill the frosted cake. Return the cake to the refrigerator for at least 60 minutes until the ganache is firm to the touch.
- Bloom the gelatine. Sprinkle gelatine over cold water and let sit for 5 minutes to fully hydrate the protein matrix.
- Whisk cocoa paste. Combine water and sifted cocoa powder in a saucepan, whisking until a uniform, lump-free paste forms.
- Form the emulsion. Stir in the cream and caster sugar using a silicone spatula, using gentle circular motions to avoid incorporating air bubbles.
- Dissolve the gelatine. Heat the mixture to a boil, remove from heat, and stir in the hydrated gelatine until completely dissolved.
- Strain the glaze. Pass the warm liquid through a fine-mesh strainer into a bowl to remove air bubbles and undissolved particles.
- Monitor cooling temperature. Cover the surface with plastic wrap and let the glaze cool to exactly 30°C before applying to the cake.
- Pour the coating. Place the cold cake on a wire rack and pour the glaze in a continuous spiral motion to achieve an even, reflective finish.
Notes
- Always use a digital probe thermometer to ensure the glaze is at exactly 30°C before pouring to guarantee the correct consistency.
- Avoid using a whisk during the mixing stage to prevent air bubbles, which are the primary cause of imperfections in the final mirror finish.
- Ensure the cake is chilled thoroughly before glazing, as the temperature contrast is essential for the gelatin to set properly upon contact.
- Use a hot, clean knife wiped dry with a cloth between each slice to ensure the delicate glaze does not crack or smear during serving.
- Prep Time: 60 mins
- Cook Time: 20 mins
- Category: Dessert
- Method: Pour-over glazing
- Cuisine: Modern French Pastry
Weighed & Ready

To achieve a flawless glaze, every raw component must be selected for its physical and chemical properties. Standard supermarket options work, but selecting high-grade cocoa and gelatin yields a superior finish. We weigh everything in grams to verify that the gel strength and viscosity match our rigorous targets.
- Gelatine powder: Formulates the primary elastic protein structure that traps moisture and sets into a shiny, flexible pane.
- Dutch processed cocoa: Provides the deep chocolate color and fine suspension that eliminates graininess in the glaze.
- Pure whipping cream: Introduces the liquid fat globules necessary to build a stable emulsion that retains its shine.
- Caster sugar: Melts quickly during the boiling phase to prevent undissolved sugar crystals from ruining the surface.
- Dark chocolate ganache: Creates a firm, crumb-free foundation that prevents the glaze from being absorbed by the sponge cake.
| Ingredient | Why It Matters |
|---|---|
| Gelatine powder | Establishes the elastic protein matrix that traps moisture and produces the high-gloss shine. |
| Dutch processed cocoa | Offers a rich chocolate depth and a fine particulate suspension that prevents grit. |
| Heavy cream | Introduces milk fats that soften the gel texture, making it pleasant to slice and eat. |
| Caster sugar | Lowers water activity to preserve the shine while dissolving cleanly into the liquid base. |
From Bench to Bake

Step 1: Level and Chill the Sponge Layers
Trimming the dome off your chocolate sponge layers guarantees a flat, stable structure that will not tilt under the weight of the coating. Once leveled, place the sponge layers in the refrigerator at 4°C for exactly 60 minutes. Chilling the crumb prevents loose particles from mixing into the frosting, which would otherwise ruin the mirror finish later.
Step 2: Apply the Ganache Foundation
Prepare your dark chocolate ganache and use an offset palette knife to spread a flat, smooth layer over the entire cake surface. Any bumps, ridges, or indentations on the frost layer will be magnified by the reflective glaze, so take your time to make it flush. Work with steady strokes to seal the crumb completely, creating a protective barrier that keeps moisture locked inside.
Step 3: Chill the Frosted Cake to Set the Undercoat
Return the frosted cake to the refrigerator for at least 60 minutes until the ganache is hard to the touch. This low temperature is critical because it forces the chocolate fats to solidify, creating a firm structural skin. When the warm glaze is poured over this cold base, the sudden temperature drop helps the gelatine set quickly upon contact.
Step 4: Bloom the Gelatine Powder Matrix
Pour 2.5 tablespoons of cold tap water into a small bowl, then sprinkle 4 teaspoons of gelatine powder evenly across the surface. Let the mixture rest undisturbed for exactly 5 minutes, allowing the dry granules to absorb the water fully and expand. This hydration process is called blooming, and it prepares the proteins to dissolve cleanly without forming rubbery pockets.
Step 5: Whisk the Cocoa and Water Paste
Combine 2/3 cup of water and 1 cup of sifted Dutch processed cocoa powder in a medium saucepan. Whisk the two components together until they form a thick, uniform paste that is free of visible dry pockets. Pre-dispersing the cocoa solids in water before adding fat prevents the dry powder from clumping during the heating phase.
Step 6: Form the Sugar and Cream Emulsion
Stir a splash of your 2/3 cup of cream into the cocoa paste to loosen the mixture, then add the remaining cream and 1 cup plus 2 tablespoons of caster sugar. Switch to a silicone spatula and mix gently using slow, circular motions to combine the ingredients without folding in excess air. Do not use a whisk during this step, as introducing air bubbles will permanently damage the clarity of the final pour.
Step 7: Heat and Dissolve the Gelatine
Place the saucepan over medium-high heat and bring the liquid cocoa mixture briefly to a boil, then remove it from the heat source immediately. Slide the hydrated gelatine block into the hot mixture and stir gently for 60 seconds until the gelatine dissolves completely. The residual heat is sufficient to melt the gelatine proteins, creating a smooth, cohesive glaze without overheating.
Step 8: Pass the Glaze Through a Double Strainer
Position a fine mesh strainer directly inside a wide, shallow bowl, making sure the bottom of the strainer is as close to the bowl as possible. Slowly pour the warm glaze through the mesh, allowing it to glide gently down the sides of the bowl to minimize the distance it falls. This double straining removes any tiny undissolved particles and prevents air from getting trapped in the thick liquid.
Step 9: Monitor the Temperature of the Chocolate Mirror Glaze Cake
Press a sheet of plastic wrap directly onto the surface of the strained glaze to prevent a dry skin from forming as it cools. Insert a digital probe thermometer into the center of the glaze and monitor the temperature decline on your bench. Let the glaze cool slowly for about 2 hours until it reaches exactly 30°C (86°F), which is the precise thermal window for pouring.
Step 10: Pour and Set the Pristine Coating
Place the chilled, ganached cake on a wire rack over a clean baking sheet to catch any runoff glaze. Starting at the center, pour the glaze in a thick, continuous stream, moving outward in a steady spiral to drape the sides evenly. Let the excess glaze drip off undisturbed for 10 minutes before using a warm spatula to transfer the finished dessert to a platter.
Where Most Bakes Go Wrong

If your glaze slides off the cake, here is why and how to fix it: the pouring temperature was likely too high, or the undercoat was greasy. Cool the glaze down to 29°C (84°F) to increase its viscosity, and wipe the cold ganache surface with a clean paper towel to remove condensation before pouring.
Microscopic air bubbles can ruin the glass-like finish, but you can remove them easily before glazing. Gently pass a pastry blowtorch across the surface of the glaze while it is in the jug to pop the bubbles instantly, as explained in this guide on chocolate mirror glaze preparation.
Maintaining a stable temperature difference between the cake and the glaze is vital for structural success. A firm, cold undercoat such as a chocolate ganache cake will rapidly cool the falling glaze, stopping its movement and locking it into a flawless 3mm layer.
Leftover glaze can be stored in the refrigerator for up to 5 days or frozen for up to 3 months. When reheating, melt it in the microwave in 15-second intervals on medium power, stirring gently between bursts to avoid introducing new air pockets.
Slicing this dessert cleanly requires a hot, dry blade for every single cut. Dip a sharp chef’s knife into a tall jug of hot water, wipe it completely dry with a clean cloth, and slice down in one continuous motion without sawing.
Frequently Asked Questions
What is mirror glaze made of?
A classic mirror glaze is made from a precise combination of gelatine, water, sugar, cocoa powder, and heavy cream. Unlike modern versions that rely on sweet condensed milk, this recipe uses cream to build a clean emulsion. This provides a deep chocolate flavor and a more natural mouthfeel.
Does mirror glaze have to set in the freezer?
No, a mirror glaze does not require a freezer to set properly. The gelatine in the glaze sets efficiently at standard refrigeration temperatures of around 4°C (39°F). However, the cake undercoat itself must be thoroughly chilled before pouring to help the glaze grip.
How long does it take for a mirror glaze to set?
The glaze will begin to set within 10 minutes of pouring over a cold cake. It achieves its full structural stability after 2 hours in the refrigerator. During this setting window, do not touch the surface, as any marks will remain visible.
Why is my mirror glaze not shiny?
A lack of shine is usually caused by incorrect gelatine hydration or using low-fat cream alternatives. If the glaze is heated too vigorously or boiled after the gelatine is added, the protein structures degrade. Following the precise boiling and cooling temperatures in this recipe will guarantee a lasting high-gloss finish.
What is the ideal temperature for pouring mirror glaze?
The ideal temperature for pouring this specific cocoa-based glaze is exactly 30°C (86°F). At this thermal point, the viscosity is ideal, allowing the glaze to flow smoothly over the curves without running off too quickly. If the temperature drops below 28°C (82°F), the glaze will become too thick and leave visible lumps.
Why is my glaze sliding off the cake?
This issue occurs if the glaze is poured when it is too hot, or if the cake’s undercoat has a greasy surface. If the glaze is above 32°C (90°F), it will melt the ganache below and run off the sides. Always verify the temperature with a probe thermometer before committing to the pour.
Can I use corn syrup instead of glucose syrup?
While many mirror glaze recipes use glucose or corn syrup, this traditional French method relies on a precise balance of caster sugar and heavy cream instead. This approach avoids the sticky texture of syrups, delivering a cleaner bite and a thinner glaze. The resulting glaze is much easier to slice and more pleasant to eat.
How do you store a mirror glaze cake?
Store the glazed cake in the refrigerator, uncovered, where the cold air will keep the gelatine stable. The glaze acts as a natural seal, keeping the sponge moist for up to 4 days without needing plastic wrap. Keep the cake away from warm environments above 22°C (72°F) to prevent the glaze from melting.
Considered Adjustments
An espresso-infused glaze offers a refined bitterness that cuts through the rich sweetness of the chocolate. Replace 1/4 cup of the water in the glaze recipe with concentrated espresso before boiling, keeping the liquid volume identical. This subtle shift adds complex roasted notes to the glaze while maintaining the pristine gel structure.
Applying delicate gold leaf or edible metallic dust directly to the set glaze adds structural contrast without adding weight. These light accents highlight the reflective properties of the cake without distracting from the smooth finish of your chocolate cake decoration. Use a fine pair of tweezers to place the leaf gently onto the surface once the glaze has stopped dripping.
Adding 1/2 teaspoon of pure orange blossom water during the final cooling phase introduces a delicate floral aroma to the dessert. This addition should be incorporated when the glaze reaches 35°C (95°F) to preserve the volatile aromatics of the extract. The orange notes pair beautifully with the dark cocoa solids without disrupting the chemical properties of the gelatine.
Serving the Structure
Presenting this dessert requires clean plating to highlight the immaculate reflection of the glaze. Arrange each slice on a neutral, solid-colored plate to let the chocolate shine without visual distraction. A small cup of black tea or sugar-free espresso on the side provides a bitter contrast that cuts through the rich creaminess.
For a striking dessert display, pair this high-shine cake next to a matte velvet spray cake to create a beautiful texture contrast. The juxtaposition of the light-absorbing matte finish alongside the light-reflecting mirror surface showcases advanced pastry mastery. This pairing is excellent for formal occasions where texture and visual presentation are highly valued.
Allow the sliced cake to sit at room temperature for 10 minutes before serving to soften the ganache undercoat. This brief rest improves the mouthfeel, letting the rich chocolate melt smoothly upon contact. The structural skin remains intact, holding the shape of the slice until the spoon breaks the crust.

What the Technique Gives You
Mastering the mirror glaze is a milestone in any baker’s technical journey. This method proves that structure is what makes the melt possible, turning basic ingredients into an immaculate, glass-like finish. By focusing on temperature precision and proper gelatine hydration, you elevate your pastry skills to a professional standard.
Begin your next baking session by preparing a stable sponge using our foundational chocolate cake recipe. Once you have mastered the underlying structure, applying this glaze becomes a calm, predictable process. With patience and a digital scale on your bench, a flawless result is always within your reach.
We invite you to share your results with our community of ambitious home bakers. Post your reflective creations on our social channels and connect with other pastry enthusiasts. You can find more structural baking guides and technical inspiration on our Pinterest, Facebook, TikTok, and Telegram channels today.


