A dense, crumbly chocolate strawberry cake often results from improper fat emulsification or an imbalanced ratio of fruit moisture to sponge structure.

Achieving the right crumb requires more than just mixing; it demands a precise understanding of how hot liquids interact with cocoa solids. This chocolate strawberry cake recipe focuses on a stable, moist crumb that supports the weight of fresh fruit buttercream without becoming sodden. By controlling the temperature of your ingredients, you ensure a consistent bake every time. Structure is what makes the melt possible, allowing the delicate strawberry notes to shine through the deep chocolate base.
What Makes the Texture of This Chocolate Strawberry Cake Right
Prep: 20 min · Serves: 12 · Difficulty: Advanced
- Balanced crumb structure prevents collapse
- Controlled blooming enhances cocoa depth
- Stable buttercream resists fruit weeping
- Precise ganache ratios ensure adhesion
- Measured moisture prevents soggy layers
Precision for the sake of mouthfeel is why this strawberry cake technique succeeds where others fail.
Get The Full Cake Recipe
Print
Chocolate Strawberry Cake
- Total Time: 50 mins
- Yield: 12 servings
- Diet: Vegetarian
Description
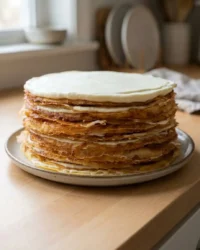
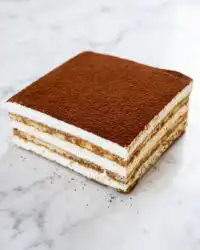
This decadent chocolate strawberry cake features a moist, tender crumb achieved through precise ingredient blooming and emulsion techniques. It is layered with a stable, fruit-infused buttercream and finished with a glossy ganache drip for a professional, bakery-quality presentation.
Ingredients
- 360 grams All-Purpose Flour
- Unsweetened Cocoa Powder
- Boiling Water or Coffee
- Granulated Sugar
- Baking Soda
- Baking Powder
- Salt
- Vegetable Oil
- Buttermilk
- Eggs
- Vanilla Extract
- Fresh Strawberries
- Unsalted Butter
- Confectioners’ Sugar
- Heavy Cream
- Semi-sweet Chocolate
Instructions
- Prepare the oven. Preheat the oven to 350F and line three 9-inch round pans with parchment paper, using damp fabric strips around the edges for even baking.
- Bloom cocoa solids. Sift cocoa powder into a bowl and whisk in boiling water or hot coffee; allow the mixture to cool for ten minutes before proceeding.
- Whisk dry ingredients. In a large bowl, combine flour, sugar, baking soda, baking powder, and salt, ensuring the mixture is completely free of lumps.
- Create liquid emulsion. Add oil, room-temperature buttermilk, eggs, and vanilla to the cooled cocoa mixture, whisking until the emulsion is smooth and stable.
- Incorporate the batter. Pour the liquid mixture into the dry ingredients and whisk until just combined, being careful not to overwork the gluten.
- Bake the layers. Divide the batter evenly into the prepared pans and bake for 30 minutes, rotating halfway through, then allow to cool completely in the pans.
- Aerate the frosting. Beat room-temperature butter with salt until fluffy, then gradually incorporate confectioners’ sugar and finely chopped fresh strawberries.
- Assemble the layers. Place the first cake layer on a stand, spread with a portion of the buttercream, and repeat for all layers, ensuring an even finish.
- Apply the ganache. Pour warm cream over chopped chocolate, let stand for five minutes, whisk until glossy, and carefully drizzle over the chilled, assembled cake.
Notes
- Ensure all dairy and egg components are at room temperature to prevent the cake emulsion from breaking.
- Always use a kitchen scale to measure flour and cocoa powder for the most consistent structural results.
- Chill the assembled cake thoroughly before adding the ganache to ensure the drips set into a perfect, professional finish.
- Use an offset palette knife to maintain a level surface, which prevents the layered cake from leaning or collapsing.
- Prep Time: 20 mins
- Cook Time: 30 mins
- Category: Dessert
- Method: Baking
- Cuisine: American
Weighed & Ready

Success in high-moisture cakes begins with the precise measurement of proteins and fats. Each component plays a specific role in maintaining the structural integrity of the crumb while allowing for a soft, tender mouthfeel.
- Unsweetened Cocoa Powder: This provides the deep chocolate base and requires blooming in hot liquid to release its full aromatic potential.
- All-Purpose Flour: The 360 grams of flour provide the gluten structure necessary to hold the weight of the strawberry buttercream layers.
- Boiling Water or Coffee: The temperature of this liquid initiates the gelatinisation of starch and dissolves the cocoa solids efficiently.
- Fresh Strawberries: These provide natural acidity and flavour, though their water content must be managed within the buttercream emulsion.
- Vegetable Oil: Unlike butter, oil remains liquid at room temperature, ensuring the cake feels moist even after refrigeration.
- Buttermilk: The acidity reacts with the leavening agents to create a fine, even crumb that is neither too dense nor too open.
| Ingredient | Why It Matters |
|---|---|
| Cocoa Powder | Provides flavour and inhibits gluten slightly |
| Boiling Coffee | Blooms cocoa and hydrates starch molecules |
| Baking Soda | Provides immediate lift upon contact with acid |
| Buttermilk | Tenderises gluten and activates the soda |
| Fresh Fruit | Adds acidity and natural berry sweetness |
The Method

Step 1: Preparing the Baking Environment
Preheat your oven to 350F and prepare three 9-inch round pans with parchment paper and grease. Using water-soaked fabric strips around the pans ensures even heat distribution, preventing the edges from setting before the middle rises. This technical step results in a flat top, which is essential for a stable three-layer stack.
Step 2: Blooming the Cocoa Solids
Sift the cocoa powder into a medium bowl and whisk in the boiling water or hot coffee until the mixture is uniform. This process, known as blooming, allows the cocoa fats to melt and the solids to disperse, deepening the chocolate profile significantly. Allow this mixture to cool for ten minutes to prevent premature activation of the leavening agents in the next stage.
Step 3: Whisking Dry Components for Your Chocolate Strawberry Cake
In a separate large vessel, combine the flour, granulated sugar, baking soda, baking powder, and salt with a whisk. Precise distribution of these leavening agents is vital for an even rise and to avoid large air pockets that could weaken the structure. Ensure the mixture is free of lumps to prevent dry spots in the finished crumb.
Step 4: Creating the Liquid Emulsion
To the cooled cocoa mixture, add the oil, room-temperature buttermilk, eggs, and vanilla extract, whisking until the fats and liquids are fully integrated. Ensuring these ingredients are at room temperature prevents the fats from seizing and helps form a stable emulsion. A broken emulsion at this stage will lead to a greasy cake with an uneven texture.
Step 5: Incorporating the Batter
Pour the liquid mixture into the dry ingredients and whisk until the batter is smooth and no streaks of flour remain. Avoid over-mixing, as excessive agitation develops the gluten, turning a tender crumb into a tough, bread-like texture. Divide the batter equally by weight among the three pans to ensure uniform baking times.
Step 6: Managing the Bake
Bake for 30 minutes, rotating the pans at the 20-minute mark to account for oven hot spots. The cakes are ready when they are springy to the touch and the edges have begun to pull away from the pan sides. Let the cakes cool completely in their pans to allow the delicate internal structure to set before moving them.
Step 7: Aerating the Strawberry Buttercream
Beat the room-temperature butter and salt for five minutes until it reaches a pale, fluffy state with significant air incorporation. Gradually add the confectioners’ sugar and the finely chopped strawberries, alternating to maintain the stability of the fat. The goal is a light, aerated frosting that carries the fruit without the water content causing the butter to separate.
Step 8: Assembling the Layers
Place the first layer on a plate and spread three-quarters of a cup of frosting evenly across the surface. Repeat this process for the subsequent layers, ensuring the stack is level and the frosting extends to the edges. A thin crumb coat followed by a final layer of frosting will provide the best surface for the ganache drip.
Step 9: Applying the Chocolate Ganache
Heat the heavy cream until it reaches a simmer, then pour it over the chopped chocolate and let it stand for five minutes. Whisk gently from the centre outward to create a glossy, stable ganache that holds its shape. Pour the ganache over the chilled cake, allowing the temperature difference to set the drips before they reach the base.
Precision Notes

To ensure the chocolate strawberry cake remains stable, always weigh your flour and cocoa on a digital scale rather than using cups. Measuring by volume is notoriously inaccurate and can lead to a dry, heavy cake that lacks the intended melt-in-the-mouth quality. Precision in measurement is the foundation of all successful pastry work.
Temperature control is the most frequent point of failure when working with fruit-based frostings. If your buttercream appears curdled or broken, it is likely because the strawberries were too cold or the butter was too warm. You can often fix a broken emulsion by gently warming the bottom of the bowl over a pot of simmering water for ten seconds, then re-beating at high speed.
When applying the ganache, the cake must be thoroughly chilled for at least one hour. If the cake is at room temperature, the ganache will flow too quickly and fail to create the characteristic thick drips on the side. This structural skin protects the soft interior and provides a professional finish.
Sifting the dry ingredients twice may seem redundant, but it ensures maximum aeration and an even crumb. This prevents the baking soda from clumping, which would result in bitter green spots and uneven rising during the baking process. Weigh it, time it, trust it for the best results.
Using a probe thermometer to check the cream for the ganache prevents overheating. If the cream exceeds 190F, it can scorch the chocolate and cause the fats to separate, leaving you with a grainy, dull finish instead of a mirror-like shine. For more technical advice, read about the chocolate strawberry cake method on our bench.
Always use an offset palette knife for the frosting to achieve a flat, level surface. Uneven frosting leads to a leaning cake, which increases the risk of structural failure once the weight of the third layer and ganache is added. Steady pressure and a rotating cake stand are your best tools here.
Frequently Asked Questions
How should I store this cake to keep the strawberry frosting stable?
The cake must be stored in the refrigerator due to the fresh fruit content in the buttercream and the dairy in the ganache. Use a cake dome or airtight container to prevent the sponge from absorbing other scents. Remove it from the fridge 30 minutes before serving to let the fats soften slightly for the best mouthfeel.
Can I use frozen strawberries for the buttercream frosting?
Frozen strawberries can be used if they are thawed completely and drained of all excess liquid before chopping. The high water content in frozen fruit can easily break the butter emulsion if not managed carefully. For the most stable results, fresh berries are always the preferred choice for this specific technique.
Why did my chocolate cake layers sink in the middle?
Sinking usually occurs if the leavening agents were expired or if the oven door was opened too early in the baking process. Opening the door causes a sudden temperature drop that can collapse the delicate air cells before the protein structure has set. Always wait until at least 25 minutes have passed before checking for doneness.
Is it possible to make this chocolate strawberry cake in advance?
You can bake the cake layers up to two days in advance, wrapping them tightly in plastic wrap once completely cool. This actually makes the cake easier to frost as the crumb settles and becomes less fragile. The fully assembled cake is best served within 24 hours but will remain delicious for up to five days.
What is the best way to get a clean ganache drip?
The secret to a clean drip is the 30-second window between the ganache being too thin and too thick. Test a single drip on the back of a chilled bowl; if it runs all the way down, wait another minute for it to cool. Use a squeeze bottle or a small spoon for the most control over the placement and length of the drips.
Can I substitute the vegetable oil with melted butter?
While butter adds flavour, oil provides a superior texture for cakes that require refrigeration. Butter contains water and milk solids that turn firm when cold, resulting in a dense, hard cake. Oil remains liquid, ensuring the chocolate sponge stays tender even when served straight from the cooler.
Considered Adjustments
For a variation that holds its structure in warmer climates, substitute the fresh strawberries in the frosting with a concentrated strawberry reduction. By simmering the berries until the liquid is reduced by half, you intensify the flavour while removing the excess water that threatens the stability of the buttercream. This adjustment is ideal for outdoor events where the strawberry chocolate cake 2 might otherwise soften too quickly.
If you prefer a darker profile, replace the semi-sweet chocolate in the ganache with a 70% dark chocolate bar. The higher cocoa butter content will require an additional tablespoon of heavy cream to maintain the same fluid viscosity for the drip. You can read more about balancing moisture in fruit-based cakes to understand how these fat ratios affect the final texture.
Finishing & Plating
When serving this cake, use a sharp knife dipped in hot water and wiped dry between each cut. This technique ensures clean slices that showcase the distinct layers of dark chocolate and pink buttercream without smearing the ganache. For a formal presentation, place each slice on a chilled plate to maintain the integrity of the frosting until it reaches the guest.
Pairing this dessert with a tart coulis or a side of lightly sweetened whipped cream provides a necessary contrast to the richness of the ganache. The crisp shell protects the creamy interior, so ensure the cake has set properly before moving it to a decorative stand. This chocolate layer cake serves as a substantial centerpiece for anniversaries or birthdays where texture is as important as taste.

What the Technique Gives You
Mastering this chocolate strawberry cake provides more than just a dessert; it offers a lesson in the delicate balance of moisture and structure. By following the precise blooming and emulsification steps, you create a cake that is as structurally sound as it is indulgent. The thirty seconds you spend checking the ganache temperature or the care taken in sifting ensures a result that far exceeds standard bakes.
Continue practicing your pastry discipline by exploring our other recipes, such as the strawberry chocolate cake 3 for further technical insights. We invite you to share your results and tag us in your baking journey. Structure is what makes the melt possible, and your commitment to these details will be evident in every bite.


