Exactly fifty minutes at 175 degrees Celsius determines whether the spiced pumpkin custard sets into a velvet emulsion or remains a liquid mess beneath its crust.

Baking a Classic Pumpkin Dump Cake requires an understanding of how distinct layers interact under heat without manual stirring. While traditional pastry demands hours of whisking and tempering, this method relies on the thermal transfer of melted butter permeating dry cake mix to form a crisp, protective top crust. As the pumpkin puree beneath undergoes gelatinisation, it forms a custard-like structure that balances the rich crunch of pecans on top. It is a refined exercise in effortless precision, delivering a textured dessert that is structurally sound and deeply satisfying. By understanding the role of fat and moisture, any home baker can achieve a dessert that slices cleanly and melts beautifully.
The Case for This Method of Classic Pumpkin Dump Cake
Prep: 10 min · Serves: 12 · Difficulty: Easy
- Creamy spiced custard sets with uniform precision.
- Melted butter creates a crisp protective top shell.
- Pecans provide an essential textural crunch.
- Evaporated milk provides structural moisture that lasts.
- Minimal preparation yields consistent, bakery-level results.
This method guarantees the base sets beautifully while the dry topping transforms. By understanding the interaction of ingredients, much like formulating a robust pumpkin spice cake, you guarantee a dessert that retains its structural integrity. Structure is what makes the melt possible. When you control the distribution of fats and starch, you eliminate the unpredictable variables that often ruin casual bakes. This is the recipe my kitchen relies on for consistent textural contrast.
Get The Full Cake Recipe
Print
Classic Pumpkin Dump Cake
- Total Time: 1 hour 10 mins
- Yield: 12 servings
- Diet: Vegetarian
Description
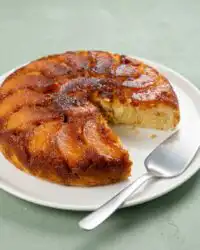
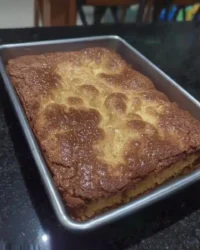
This classic pumpkin dump cake features a rich, spiced pumpkin custard base topped with a perfectly crisp, buttery spice cake layer. It is a foolproof, structurally sound dessert that balances creamy texture with a satisfying, crunchy pecan finish.
Ingredients
- 29 ounces pumpkin puree
- 12 fluid ounces evaporated milk
- 3 large eggs
- 1/2 cup packed brown sugar
- 1/2 cup white sugar
- 1 teaspoon ground cinnamon
- 1/2 teaspoon ground ginger
- 1/4 teaspoon ground cloves
- 1/2 teaspoon salt
- 15.25 ounces spice cake mix
- 1/2 cup coarsely chopped pecans
- 1/2 cup unsalted butter, melted
Instructions
- Prepare the oven. Preheat your oven to 175 degrees Celsius and grease a 9×13-inch baking pan with butter or non-stick spray.
- Whisk custard base. In a large bowl, whisk together the pumpkin puree, evaporated milk, and eggs until a completely uniform emulsion forms.
- Add sugar and spices. Incorporate the brown sugar, white sugar, cinnamon, ginger, cloves, and salt, whisking until the sugars are fully dissolved.
- Layer the ingredients. Pour the custard mixture into the prepared pan, then distribute the spice cake mix evenly over the top, smoothing it with an offset spatula.
- Add final layers. Scatter the chopped pecans over the dry cake mix and drizzle the melted butter evenly across the surface.
- Bake the cake. Place in the center of the oven and bake for 50 to 60 minutes until the top is golden-brown and the custard has set.
- Cool before serving. Transfer the pan to a wire rack and allow the cake to cool for at least 30 minutes to ensure the custard sets for clean slicing.
Notes
- Ensure all liquid ingredients are at room temperature to prevent the melted butter from seizing during assembly.
- Use a digital scale to measure your ingredients for the most consistent texture and flavor profile.
- If you notice dry flour spots after baking, gently tap them with a pastry brush dipped in a tiny bit of melted butter.
- For the cleanest slices, refrigerate the finished cake completely before serving at room temperature.
- A metal probe thermometer inserted in the center should read 82-85 degrees Celsius when the custard is perfectly set.
- Prep Time: 10 mins
- Cook Time: 60 mins
- Category: Dessert
- Method: Baking
- Cuisine: American
The Working Components

Success on the pastry bench begins with understanding how raw ingredients interact under heat. This recipe relies on specific chemical reactions to build a stable custard underneath a crisp, crumbly topping. Each element must be carefully measured to verify the correct moisture-to-starch ratio is achieved. By using a digital scale to verify your ingredient weights, you guarantee that the delicate balance of fats, liquid proteins, and dry flour is maintained.
- Pumpkin Puree: This provides the structural foundation and essential moisture, using pure squash without added sugars to maintain complete control over the final sweetness.
- Evaporated Milk: The reduced water content in this milk promotes a highly concentrated dairy protein structure, which aids in the gelatinisation of the pumpkin custard.
- Large Eggs: These act as the primary binding agent, providing the protein network necessary to set the custard layer into a sliceable yet tender consistency.
- Melted Butter: This fat saturates the dry cake mix during the bake, initiating the crisping of the flour without needing a cohesive batter.
- Spice Cake Mix: This engineered dry component provides both the structure-building flour and the balanced autumn spices that flavor the entire upper crust.
- Coarsely Chopped Pecans: These nuts introduce a crucial textural contrast, toast during baking, and release natural oils that enhance the richness of the topping.
| Ingredient | Why It Matters |
|---|---|
| Pumpkin Puree | Stabilizes the custard base |
| Evaporated Milk | Adds rich dairy proteins |
| Large Eggs | Binds the custard layer |
| Melted Butter | Hydrates and crisps topping |
| Spice Cake Mix | Forms the structural crust |
| Chopped Pecans | Provides textural crunch |
The Tested Procedure

Step 1: Prepare the Baking Vessel and Oven
Preheat your oven to 175 degrees Celsius and grease a 9×13-inch baking pan with unsalted butter or non-stick spray. Confirming the oven reaches the precise temperature before baking is critical for the uniform heat distribution needed to set the custard. The greased pan prevents the sugars in the pumpkin from caramelizing too quickly and sticking to the sides of the dish. This initial step guarantees that the bottom layer of your dessert releases cleanly upon slicing.
Step 2: Whisk the Liquid Custard Base
In a spacious mixing bowl, combine the 29-ounce can of pumpkin puree, 12 fluid ounces of evaporated milk, and three large eggs. Whisk these components until they form a completely uniform liquid emulsion with no remaining streaks of egg yellow. This emulsion serves as the foundational structure, which will set cleanly during baking due to the even distribution of egg proteins. Taking your time during this step prevents pockets of unblended egg from cooking separately.
Step 3: Integrate the Sugars and Spices
Add the half cup of packed brown sugar, half cup of white sugar, cinnamon, ginger, salt, and ground cloves to the wet mixture. Whisk vigorously until the sugars dissolve entirely and the spices are evenly suspended throughout the liquid. You will notice the mixture darken slightly and release a warm, aromatic scent as the spices hydrate. Complete dissolution of the sugar crystals is essential to prevent a grainy mouthfeel in the finished custard.
Step 4: Layer the Dry Components evenly
Pour the spiced pumpkin liquid into your prepared 9×13-inch pan, making sure the surface is level and flat. Sprinkle the 15.25-ounce package of spice cake mix evenly across the liquid, taking care to cover every spot of wet batter. Use your offset palette knife to gently distribute any mounds of dry flour, creating a flat, uniform layer of starch. An even layer of flour is vital to guarantee that the drizzled butter hydrates the topping consistently without leaving dry patches.
Step 5: Bake the Classic Pumpkin Dump Cake to Gold Finish
Scatter the half cup of coarsely chopped pecans evenly over the dry flour layer, then drizzle the half cup of melted butter across the top. Place the pan in the center of the preheated oven and bake for 50 to 60 minutes. The top is correct when the butter has fully hydrated the flour, forming a bubbling, golden-brown crust that yields slightly to the touch. This high-temperature baking period allows the starch to crisp while the custard underneath solidifies gently.
Step 6: Cool to Set the Custard Structure
Remove the cake from the oven and place it on a wire cooling rack at room temperature. The dessert will appear slightly puffy when hot, but it will settle and firm up as the starch and egg proteins fully cool. Allow at least thirty minutes of cooling time so the interior custard layers solidify sufficiently for clean slicing. Slicing too early will result in a messy presentation, as the warm custard requires this resting period to hold its shape.
Pastry Bench Tips

If dry, powdery flour patches remain on the surface after baking, it means the melted butter was not distributed evenly enough to hydrate the cake mix starch. To prevent this, confirm your melted butter is drizzled in a fine, cross-hatch pattern, or use a pastry brush to gently dab any stubborn dry spots before placing the pan into the oven heat. Taking this precaution guarantees a completely unified crust that bites cleanly without chalkiness.
Using melted butter rather than cold butter pats drives immediate capillary action, drawing the liquid fat deep into the dry flour particles. Cold butter pats melt slowly and can leave dry, un-hydrated pockets, whereas warm liquid butter quickly initiates a cohesive, shortbread-like texture across the entire surface. This liquid-fat approach is the secret to achieving a uniform crispness that mirrors professional pastry work.
When selecting your ingredients, understand that the starch density in different mixes can affect how the liquid rises during the bake. If you enjoy the structural balance of a 3 ingredient peach cobbler dump cake, you will appreciate how this pumpkin version employs spice cake mix to build a sturdier crumb. This knowledge allows you to manipulate the recipe to suit different seasons and ingredient availability.
Always use eggs and evaporated milk at room temperature to prevent the melted butter from seizing when it comes into contact with the layers. If the liquid base is too cold, it will rapidly chill the drizzled butter above it, halting the necessary butter-flour emulsion and resulting in a greasy, uneven topping. Maintaining ingredient temperature uniformity is a foundational rule of pastry that prevents textural separation.
To verify that the custard layer has set correctly without breaking the golden crust, gently insert a metal probe thermometer into the center of the pan. The temperature should read between 82 and 85 degrees Celsius, indicating that the egg proteins have fully coagulated without curdling. This precise measurement removes any guesswork and guarantees a velvety smooth mouthfeel every single time.
Weighing the butter and sugars down to the gram guarantees that the fat-to-sugar ratio remains in precise balance, preserving the contrast between the soft bottom and the crisp top. For the most consistent results on the baking bench, use a digital scale to weigh your ingredients rather than relying on volume measurements. This habit is what separates casual home cooks from precision-oriented pastry chefs.
Additionally, pay attention to the humidity in your kitchen, as dry flour can absorb liquid butter faster than flour stored in humid conditions. Adjusting your baking time by only a minute or two can make a massive difference in how the crust sets. Remember that observation of visual cues is just as important as trusting your digital timer.
Frequently Asked Questions
Can I use pumpkin pie filling instead of canned pumpkin?
No, you should avoid pumpkin pie filling because it already contains added sugars, milk solids, and spices. Using it would alter the liquid balance and make the custard layer excessively sweet and structurally unstable. Stick to pure canned pumpkin to maintain complete control over the chemical balance of your dessert. This choice guarantees that your starch-to-sugar ratio remains in precise alignment.
Do I need to stir the cake mix and butter?
Stirring is not required and will actually ruin the layered structure of this dessert. The melted butter should be drizzled evenly over the dry cake mix so it hydrates the flour from the top down. This layered separation is what allows the custard to set cleanly below while the top forms a crisp, shortbread-like shell. Stirring would create a heavy, dense paste that fails to bake through properly.
What kind of cake mix works best?
A standard spice cake mix works best because its flavor profile naturally complements the pumpkin puree. However, yellow cake mix or white cake mix can also be used if you add an extra teaspoon of ground cinnamon and ginger to the dry mixture. Ensure the package size is approximately 15.25 ounces to maintain the correct starch ratio. Changing the mix type allows you to experiment with different flavor balances.
Does pumpkin dump cake need to be refrigerated?
Yes, because the bottom layer is an egg-and-dairy-based custard, the cake must be stored in the refrigerator. Once the cake has cooled completely to room temperature, cover the baking pan tightly with plastic wrap or foil. It will keep well in the refrigerator for up to four days, and the custard will actually become firmer and easier to slice. Serving it cold also changes the texture slightly, making it denser and more fudge-like.
Why did my dump cake have dry powdery spots on top?
Dry powdery spots occur when the melted butter was not distributed evenly over the cake mix, leaving areas of dry starch un-hydrated. If this happens during the bake, you can spoon a small amount of extra melted butter directly onto the dry patches to help them integrate. Always ensure the butter is drizzled in a thorough, uniform pattern before baking. Taking care during the drizzle stage prevents this common visual and textural defect.
Can I make this dessert gluten-free?
Yes, you can easily adapt this recipe by using a certified gluten-free yellow or spice cake mix. Because gluten-free flours absorb moisture differently, you may need to add an extra tablespoon of melted butter to ensure complete hydration of the topping. The overall baking time and temperature will remain exactly the same. The texture of the set pumpkin base will remain completely unaffected by this substitution.
Can I freeze this cake after baking?
Yes, this cake freezes remarkably well once it has been fully baked and cooled. Slice the cooled cake into individual portions, wrap each portion tightly in plastic wrap, and store them in an airtight container for up to three months. Thaw individual slices in the refrigerator overnight before warming them gently in the oven. This freezing technique preserves both the integrity of the custard and the crunch of the pecans.
Considered Adjustments
For those with nut sensitivities, you can easily substitute the chopped pecans with toasted pepitas or rolled oats. This adjustment maintains the necessary crunchy bite while preventing any loss of physical contrast. The oats or pepitas will toast under the oven heat in the exact same manner as the pecans, leaving you with a delicious toasted finish.
Another elegant modification is substituting the spice cake mix with a gingerbread or molasses cake mix to deepen the spiced undertones. If you have previously prepared an easy peach pie filling dump cake, you know how changing the cake mix base can entirely redefine the dessert’s character while preserving its fundamental structure. This variation is particularly suited for winter gatherings when a deeper, more robust spice profile is desired.
To introduce an extra layer of sweetness, you can drizzle a simple maple glaze over the finished cake once it has cooled to room temperature. Whisk together powdered sugar, maple syrup, and a splash of heavy cream to form a thick, satin glaze, then use an offset spatula to spread it in thin decorative lines. This addition provides a beautiful visual detail while introducing a complementary autumn flavor that highlights the pumpkin.
Serving the Structure
Plating this dessert at the proper temperature is key to showcasing its contrast of textures. Serving it warm, approximately fifteen minutes out of the oven, emphasizes the soft, melting quality of the custard base against the crisp nut topping. If you prefer clean, elegant slices, chill the cake completely in the refrigerator before cutting, then warm the individual portions gently in a low oven. This temperature control highlights the meticulous design of the layers.
To complement the rich spices of the pumpkin, serve each slice with a dollop of unsweetened whipped cream or a scoop of high-quality vanilla bean ice cream. The cold dairy melting into the warm spiced cake creates an exceptional mouthfeel, much like pairing a scoop of cream with a warm classic peach cobbler dump cake. For a more formal presentation, dust the plate with a light sifting of ground cinnamon or nutmeg. This simple touch adds an elegant finish to the plated dessert.
This dessert is highly suited for autumn gatherings, Thanksgiving feasts, or quiet Sunday afternoon teas. Its reliable structure means it can travel well in the baking pan, making it an excellent choice for potlucks and family dinners. Pair it with a strong black tea or an espresso to balance the natural sweetness of the spiced squash custard. The bitter notes of the coffee or tea cut through the rich butter topping beautifully.

What the Technique Gives You
Embracing this methodical approach to baking transforms a simple dump cake into a reliable demonstration of pastry physics. By respecting the layers and confirming the melted butter is distributed with precision, you achieve a reliable contrast between a tender custard base and a crisp, spiced topping. It proves that even the most straightforward recipes benefit from careful attention to temperature, measurement, and structure. Understanding these principles makes you a more confident baker.
Whether you are preparing this for a festive holiday table or a cozy weekend treat, you can count on this recipe to deliver consistent results every time. If you find joy in the clean layers of this pumpkin bake, you might also enjoy discovering the fruit-forward profile of our classic peach dump cake. We encourage you to weigh your ingredients carefully, time your bake precisely, and trust the process. These small habits are what lift home baking to a culinary discipline.
We would love to see your successful bakes and hear how your crust set on the pastry bench. Share your creations with our community of ambitious home bakers and let us know your thoughts on this structured method. You can follow our journey and find more precise pastry guides by joining us on Pinterest, Facebook, and TikTok.


