I remember the late afternoon light hitting the copper pans in my family’s kitchen as the scent of cocoa began to swirl through the air. This red velvet cake is a recipe I hold close to my heart because it captures the essence of Mediterranean hospitality—rich, beautiful, and deeply satisfying. It is a dessert that demands a moment of stillness, ideally enjoyed with a glass of water and a warm conversation as the sun begins to set.

In our bakery, we believe that texture is the soul of a dessert, and this cake is the ultimate expression of that philosophy. The crumb is incredibly fine, almost like silk, thanks to the chemistry between buttermilk and a touch of vinegar. It is a vibrant, crimson treasure that brings a sense of occasion to any table, proving that beauty and taste can coexist in every moist bite.
Melt-in-Your-Mouth Perfection
The allure of a true red velvet cake lies in its impossible softness. Unlike a traditional chocolate cake that can sometimes feel heavy, this version is light, airy, and possesses a delicate moisture that lasts for days. You will love how the fork glides through the layers with almost no resistance, meeting the tangy embrace of the cream cheese frosting in a perfect harmony of flavors.
There is a specific joy in the contrast between the deep red sponge and the snowy white frosting. It creates a visual spectacle that feels both traditional and spectacular. The flavor profile is sophisticated; it is not overly sugary, but rather a gentle balance where the cocoa acts as a background note to the rich buttermilk. This cake does not just sit on a plate; it invites you to slow down and savor the craftsmanship of a well-leavened crumb.
Every slice tells a story of patience. By using oil instead of butter in the batter, we guarantee a texture that remains supple even when chilled. This is a cake built for memories, whether you are celebrating a milestone or simply making a Tuesday afternoon feel like a grand event. It is the kind of dessert that people remember long after the last crumb has vanished, a true treasure in any baker’s repertoire.
Print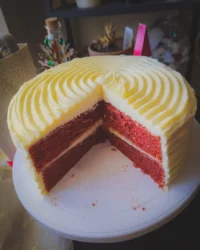
Red Velvet Cake
- Total Time: 1 hour 10 mins
- Yield: 12 servings
- Diet: Vegetarian
Description
A stunning three-layer masterpiece featuring a remarkably tender crumb and a rich, crimson hue. This elegant cake is paired with a cloud-like cream cheese frosting, making it the perfect centerpiece for celebrations and sophisticated dessert tables.
Ingredients
- 2 ½ cups all-purpose flour
- 1 ½ cups granulated sugar
- 1 ¼ teaspoons baking soda
- 2 tablespoons cocoa powder
- 1 teaspoon salt
- 1 ½ cups vegetable oil
- 2 large eggs, room temperature
- 1 cup buttermilk
- 2 teaspoons vanilla extract
- 1 teaspoon white vinegar
- 1 tablespoon red gel food coloring
- 2 cups unsalted butter, room temperature
- 8 ounces cream cheese, room temperature
- 7 cups powdered sugar
- 1 teaspoon vanilla extract (for frosting)
- 1 pinch salt (for frosting)
Instructions
- Preheat your oven to 350°F (177°C) and prepare three 7-inch round cake pans by coating with nonstick spray and lining with parchment paper circles.
- In a large mixing bowl, sift together the all-purpose flour, granulated sugar, baking soda, cocoa powder, and salt.
- In a separate vessel, whisk together the vegetable oil, room-temperature eggs, buttermilk, vanilla extract, white vinegar, and red gel food coloring until glossy.
- Slowly pour the wet ingredients into the dry bowl and whisk gently until the batter is smooth and no streaks of flour remain.
- Divide the batter evenly among the three prepared pans and bake for 30 minutes until the tops spring back and a skewer comes out clean.
- Allow the cakes to rest in their pans for 15 to 20 minutes before transferring them to a wire rack to cool completely to room temperature.
- In a stand mixer, whip the room-temperature butter and cream cheese on medium-high speed for 2 minutes, then gradually beat in the powdered sugar, vanilla, and salt until light and fluffy.
- Level the cake layers with a serrated knife, stack with frosting between each layer, apply a thin crumb coat to the exterior, chill for 20 minutes, and then apply the final smooth layer of frosting.
Notes
For the most consistent results, weigh your batter using a kitchen scale to ensure each layer is exactly the same size. If your frosting feels too soft to work with, chill it in the refrigerator for 10-15 minutes to firm up the butter before finishing your final coat. Always ensure the cake layers are completely cold before assembling to prevent the frosting from melting.
- Prep Time: 40 mins
- Cook Time: 30 mins
- Category: Dessert
- Method: Baking
- Cuisine: American
The Mediterranean Pantry Foundation

To achieve the perfect red velvet cake, every ingredient must play its part in the symphony of texture. We start with high-quality all-purpose flour to provide the structure, but the real magic happens when it meets the acidic elements of our pantry. These ingredients are chosen not just for taste, but for the way they transform the mouthfeel of the final bake.
- Buttermilk: This is the secret to the tender crumb. Its acidity breaks down the gluten, making the cake feel like velvet rather than bread.
- Vegetable Oil: We use oil to provide a consistent moisture that butter simply cannot match in this specific style of cake. It keeps the sponge vibrant and juicy.
- Cocoa Powder: We use a modest amount of regular cocoa. It provides a hint of chocolate flavor without overpowering the delicate tang of the cake.
- Red Gel Food Coloring: For that iconic crimson hue, gel is superior to liquid as it provides deep color without thinning the batter.
- White Vinegar and Baking Soda: This classic reaction provides the lift and reinforces the bright red color, creating a light, airy structure.
- Cream Cheese and Unsalted Butter: For the frosting, these must be at room temperature to create a finish that is as smooth as satin.
Each of these components works together to create a cake that is moist, vibrant, and structurally sound enough to hold three beautiful layers. When you gather these items on your counter, you are preparing to create something truly exquisite.
The Method of the Perfect Soak
Step 1: Prep Your Space and Pans
Before you begin the alchemy of mixing, preheat your oven to 350°F (177°C). Take three 7-inch round cake pans and coat them with nonstick spray, then line the bottoms with parchment paper circles. This step is vital to making sure your layers release cleanly, preserving the smooth sides we desire for a professional look.
Step 2: Whisk the Dry Ingredients
In a large mixing bowl, sift together 2 ½ cups of all-purpose flour, 1 ½ cups of granulated sugar, 1 ¼ teaspoons of baking soda, 2 tablespoons of cocoa powder, and 1 teaspoon of salt. Sifting is a quiet act of devotion that removes lumps and aerates the mixture, contributing to that signature velvet texture we are chasing.
Step 3: Combine the Wet Elements
In a separate vessel, whisk together 1 ½ cups of vegetable oil, 2 room-temperature eggs, 1 cup of buttermilk, 2 teaspoons of vanilla extract, 1 teaspoon of white vinegar, and 1 tablespoon of red gel food coloring. Watch as the oil and buttermilk swirl together into a vivid, glossy liquid that looks like molten rubies.
Step 4: The Final Batter Mix
Slowly pour the wet ingredients into the dry bowl. Use a whisk or a spatula to combine them with gentle, purposeful strokes. You want to stop as soon as the batter is smooth and no streaks of white flour remain. Over-mixing is the enemy of tenderness; treat the batter with a light hand to keep the crumb delicate.
Step 5: Portioning and Baking
Divide the batter evenly among your three prepared pans. I suggest using a kitchen scale for precision, as equal layers bake more consistently. Place them in the oven for about 30 minutes. You will know they are done when the tops spring back like a soft cushion when touched, and a wooden skewer comes out with just a few moist crumbs clinging to it.
Step 6: The Cooling Ritual
Allow the cakes to rest in their pans for 15 to 20 minutes. This patience allows the structure to set before you transfer them to a wire rack. Cooling them completely to room temperature is essential; if the cake is even slightly warm, the luxurious cream cheese frosting will lose its body and slide away.
Step 7: Crafting the Cream Cheese Frosting
While the layers cool, whip 2 cups of room-temperature butter and 8 ounces of cream cheese in a stand mixer. Beat them on medium-high speed for 2 minutes until the mixture looks pale and fluffy. Gradually add 7 cups of powdered sugar, followed by vanilla and salt, whipping until it is light, airy, and perfectly spreadable.
Step 8: Assembly and the Crumb Coat
Level your cake layers with a serrated knife to remove any domes. Place the first layer on a board, spread a generous amount of frosting, and repeat. Apply a very thin layer of frosting—the crumb coat—over the entire exterior and chill for 20 minutes. This step locks in the crumbs, allowing your final layer of frosting to be pristine and smooth as polished marble.
Mehmet’s Secrets for Texture Mastery

To achieve the most luxurious finish, I always recommend using room temperature ingredients. When your eggs and buttermilk are not cold, they emulsify more effectively with the oil, resulting in a batter that is perfectly uniform. If you find your cake layers are slightly fragile, you can wrap the cooled layers in plastic wrap and chill them for an hour before leveling; this makes the crumb more stable for the knife.
Another secret for the velvet crumb collection is to avoid over-baking even by a minute. Because of the red color, it can be hard to see the golden edges, so rely on the touch test. For more guidance on achieving a professional finish, you might look into this classic red velvet guide for additional visual cues. Always remember that the frosting should be whipped until it feels like a cloud; this lightness provides the perfect counterpoint to the dense, moist cake.
Regional Variations and Flavor Twists
While the classic red velvet is a treasure, you can introduce Mediterranean influences to make it your own. I often like to add a teaspoon of rose water to the frosting for a floral aroma that reminds me of the gardens in Antalya. You could also fold finely crushed pistachios into the batter for a surprising crunch that breaks up the softness of the sponge.
If you prefer a deeper cocoa profile, you might look into our devils food cake techniques, where we bloom the cocoa in hot water before adding it to the mix. Some bakers in my circle also experiment with replacing the white vinegar with a splash of pomegranate juice to add a subtle tartness that complements the red hue beautifully. Whether you stick to tradition or try a twist, the goal is always a cake that melts on the tongue.
At the Table: Mediterranean Traditions
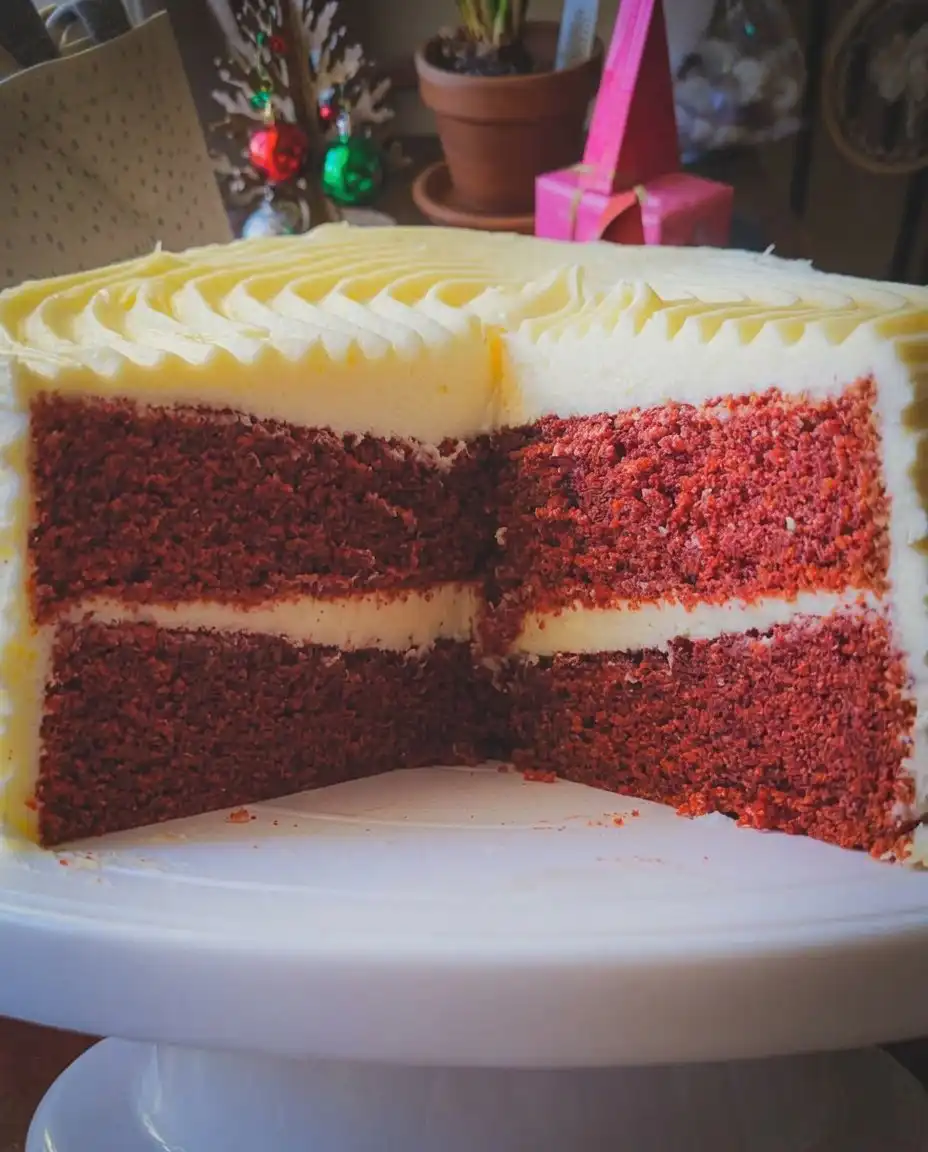
In our culture, a cake of this beauty is never served in haste. Place each slice on a small, elegant plate and serve it alongside a steaming cup of strong Turkish coffee or a fragrant black tea. The bitterness of the coffee cuts through the sweetness of the cream cheese frosting, creating a balanced sensory experience that is truly uplifting.
For a truly festive look, I recommend saving the cake scraps from the leveling process and crumbling them over the top of the frosting. This adds a vibrant pop of color and a soft, pillowy texture to the presentation. If you are preparing this for a romantic occasion, perhaps as a valentines day cake, garnish the plate with a few fresh raspberries or a single red rose petal to celebrate the theme of love and gratitude.
The Sweet Truth of the Crimson Soak
Baking this red velvet cake is an act of love that rewards you with every tender bite. It is a dessert that brings people together, reminding us that the best things in life require a little bit of patience and a lot of heart. Once you master the soak and the stack, this recipe will surely become a staple in your own kitchen tradition. For more inspiration on vibrant bakes, check out our red cake archives and share your creations with our community.
I would love to see your beautiful layers and hear about the memories you create around your table. Please join our family of bakers on Pinterest and Instagram to share your photos. Let us keep the tradition of Mediterranean sweetness alive, one moist slice at a time.