A single bite of this buttery crumb melting into sweet, rich frosting makes every busy weekday feel a lot more decadent.

You deserve a tender, melt-in-your-mouth crumb without spending hours in the kitchen after a long day. This Two-Layer Buttermilk Cake delivers that luscious texture in a fast weeknight timeline. By using real buttermilk and cake flour, we get a tender structure that feels deeply indulgent. Pull a slice onto your plate tonight and let the quick frosting work its magic.
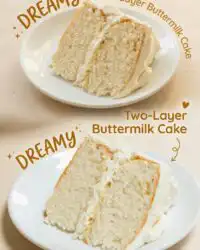
What Makes It Quick & Luscious: Our Two-Layer Buttermilk Cake
Prep: 40 min · Serves: 12 · Difficulty: Easy
- Tender crumb that melts in your mouth.
- Basic pantry ingredients create rich flavor.
- Quick baking process saves precious time.
- Fussy but rewarding sweet buttercream frosting.
This is the fast and luscious dessert you deserve.
We all know those evenings when the craving for something sweet hits hard after dinner. You want a homemade dessert that feels special, yet you do not want to wash bowls until midnight. This recipe delivers a classic bakery feel without the exhausting process that usually comes with scratch baking.
Baking a beautiful layered dessert does not require professional training or a whole weekend of preparation. Our quick technique focuses on maximizing moisture through buttermilk while keeping the active mixing time down to minutes. You get to enjoy the therapeutic process of baking and the immediate reward of a tender slice.
Let us look at why this recipe fits into your busy routine so well. If you love a good classic vanilla cake, this buttermilk version will quickly become your new standard. It is reliable, fast on the clock, and delivers consistent results every time.
Get The Full Cake Recipe
Print
Two-Layer Buttermilk Cake
- Total Time: 1 hour 13 mins
- Yield: 12 servings
- Diet: Vegetarian
Description
This classic, melt-in-your-mouth buttermilk cake features a delicate, airy crumb and a rich buttercream frosting. It is the perfect quick-bake dessert for busy weeknights when you need something indulgent without the hours of preparation.
Ingredients
- 2 cups cake flour
- 1/2 teaspoon kosher salt
- 2 teaspoons baking powder
- 1/4 teaspoon baking soda
- 3/4 cup unsalted butter, softened
- 1 1/2 cups granulated sugar
- 3 large eggs, room temperature
- 1 cup buttermilk, room temperature
- 1 teaspoon vanilla extract
- 1 cup unsalted butter, softened (for frosting)
- 3 cups powdered sugar
- 2 tablespoons milk
- 1 teaspoon vanilla extract (for frosting)
Instructions
- Prepare the pans. Grease two 9-inch cake pans, line with parchment paper, grease and flour the paper, and preheat oven to 350°F.
- Whisk dry ingredients. Sift the cake flour twice, then whisk together with salt, baking powder, and baking soda in a bowl.
- Cream butter mixture. Beat softened butter and sugar on medium for two minutes, then add eggs one at a time, beating for one minute after each addition.
- Combine the batter. Alternately add the dry mixture and buttermilk in three additions on low speed, finishing by stirring in the vanilla extract.
- Bake the layers. Divide batter into pans and bake for 30 to 33 minutes until a toothpick inserted into the center comes out clean.
- Cool the cake. Allow cakes to rest in pans for 20 minutes, then invert onto a wire rack to cool completely before frosting.
- Whip the frosting. Beat softened butter, salt, powdered sugar, milk, and vanilla until thick and creamy, adding more milk or sugar as needed for consistency.
- Assemble and frost. Place one cake layer on a plate, spread with buttercream, top with the second layer, and frost the top and sides with the remaining frosting.
Notes
- Ensure all dairy and egg ingredients are at room temperature to prevent the batter from curdling.
- Measure your flour by fluffing it with a spoon and leveling it off to avoid packing the cup and creating a dense crumb.
- Use a digital kitchen scale to divide your batter evenly between the two pans for uniform layer thickness.
- Keep the prepared buttercream covered with a damp paper towel to prevent a dry crust from forming while you assemble the cake.
- Prep Time: 40 mins
- Cook Time: 33 mins
- Category: Dessert
- Method: Baking
- Cuisine: American
Quick-Bake Lineup

Having the right elements ready makes the baking process smooth and enjoyable. We rely on basic kitchen staples that work together to create an incredibly tender structure. Bringing your dairy and eggs to room temperature helps this quick batter emulsify beautifully.
- Cake Flour: Sifting this flour twice creates a light and airy base. It keeps the crumb delicate and soft, which is exactly what we want in a layer cake.
- Buttermilk: The acidity in buttermilk breaks down gluten, resulting in a velvety texture. It also adds a subtle tang that balances the sweetness of the frosting.
- Unsalted Butter: Creaming softened butter with sugar builds the foundational air pockets. This gives the cake its classic buttery richness and sturdy yet light structure.
- Granulated Sugar: Sugar does more than sweeten the batter. It locks in moisture during baking, making sure your layers do not dry out in the oven.
- Leavening Agents: Using both baking powder and baking soda guarantees a reliable rise. They react with the acidic buttermilk to lift the layers beautifully.
- Powdered Sugar: This forms the base of our sweet buttercream frosting. It dissolves easily into the butter, creating a silky spread that holds its shape.
- Whole Eggs: Eggs provide structure and moisture to the batter. Bringing them to room temperature prevents the creamed butter from curdling.
| Ingredient | Why It Matters |
|---|---|
| Cake Flour | Creates an remarkably light and delicate crumb structure. |
| Buttermilk | Acid tenderizes gluten and adds a rich, subtle tang. |
| Butter | Adds deep flavor and creates essential air pockets during creaming. |
| Granulated Sugar | Sweetens the crumb and retains crucial moisture while baking. |
| Powdered Sugar | Dissolves easily to build a smooth, spreadable buttercream frosting. |
From Bowl to Spoon

Step 1: Prepare Your Pans and Preheat
Start by greasing two nine-inch cake pans thoroughly with butter or non-stick spray. Line the bottom of each pan with a round of parchment paper, grease the paper, and dust the entire interior with flour. Tap out any excess flour over the sink to prevent a thick, dry crust from forming on your baked layers. Preheat your conventional oven to 350 degrees, feeling the gentle warmth as the kitchen begins to heat up.
Step 2: Sift and Whisk Dry Ingredients
Measure your cake flour after sifting it twice through a fine-mesh strainer into a large bowl. Add the kosher salt, baking powder, and baking soda to the flour mixture. Use a fork or a small whisk to stir the dry ingredients together until they are evenly distributed. You should see a uniform, powdery mixture that feels light and ready for the wet ingredients.
Step 3: Cream Butter and Sugar
Place your softened butter and granulated sugar into the bowl of a stand mixer fitted with the paddle attachment. Turn the mixer to medium speed and let it run for two full minutes until the mixture looks pale, fluffy, and resembles soft sand. Add the room-temperature eggs one at a time, beating for one minute after each addition to build a strong emulsion. By the end of five minutes, the batter will look smooth, pale yellow, and significantly increased in volume.
Step 4: Alternate Flour and Buttermilk
Set your stand mixer to its lowest stir speed to avoid overworking the delicate gluten. Add the flour mixture and the room-temperature buttermilk alternately in three separate additions, starting and ending with the flour. Watch as the thick batter absorbs the liquid, turning into a smooth, ribbon-like consistency. Stir in the vanilla extract last, releasing a sweet aroma that fills your entire kitchen workspace.
Step 5: Bake Your Two-Layer Buttermilk Cake
Divide the smooth batter evenly between your two prepared pans, smoothing the tops with a spatula. Slide the pans onto the middle rack of your preheated oven and bake for thirty to thirty-three minutes. You will know they are ready when the edges shrink slightly from the sides of the pans and a toothpick inserted into the center comes out clean. The kitchen will smell rich and buttery, signaling that your delicious layers are fully baked.
Step 6: Cool the Cake Layers
Cool the cakes in their pans on a wire cooling rack and let them rest undisturbed for twenty minutes. You will notice the cakes firming up slightly as they cool, making them easier to handle without breaking. Carefully run a thin knife around the edges, invert the pans to release the cakes, and peel away the parchment paper. Let the layers cool completely on the rack so the frosting does not melt when applied.
Step 7: Whip the Fussy Frosting
Combine your softened butter, kosher salt, powdered sugar, milk, and vanilla extract in the clean bowl of your stand mixer. Start on low speed to keep the sugar from splashing, then increase to medium until the mixture becomes thick and creamy. If the frosting feels too stiff to spread easily, add a few drops of milk, or throw in a tablespoon of sugar if it seems too runny. The ideal consistency should look like thick silk that holds soft peaks when you lift the paddle.
Step 8: Position and Frost Your Creation
Position your first cooled layer onto a beautiful cake plate, centering it carefully. Spread a generous layer of buttercream over the top using an offset spatula, pushing it gently to the edges. Place the second layer directly on top, pressing down very lightly to secure it in place. Frost the sides and top of the assembled cake with the remaining buttercream, creating rustic swirls that look inviting and home-style.
Keep It Luscious

Measuring flour correctly is the secret to keeping your crumb remarkably light. Always fluff your flour with a spoon, scoop it gently into the measuring cup, and level it off with a flat knife. If you scoop directly from the bag with your measuring cup, you will pack too much flour into the recipe, leading to a dry texture. Take your time with this step to set yourself up for baking success.
Temperature control is crucial when working with dairy and eggs in this recipe. Cold ingredients will not emulsify properly with the creamed butter, causing the batter to curdle and bake interior dense spots. Set your buttermilk, butter, and eggs on the counter at least an hour before you plan to start baking. This simple preparation makes a massive difference in the final texture.
If your cake turns out dense, here is why and how to fix it. This frustrating outcome usually happens when the butter and sugar are not creamed long enough, or if you overmixed the flour after adding the liquid. To fix this next time, make sure you beat the butter and sugar for a full two minutes on medium speed, and only stir the dry ingredients until they are barely combined. Paying attention to these mixer speeds will rescue your next dessert.
Invest in high-quality parchment paper rounds to make sure your cakes release completely every single time. While greasing and flouring the pans helps, the paper lining is your ultimate insurance policy against sticking. If you want to compare this method with other classics, check out our yellow cake recipe for more baking inspiration. It is a fantastic resource for learning different pan preparation techniques.
Weighing your cake pans on a digital kitchen scale is the easiest way to guarantee even layers. Pour the batter into each pan and check the weight, adjusting as needed so they match exactly. This guarantees that both layers will bake at the exact same rate in your oven. It also prevents one layer from being overly thick while the other is too thin.
Keep your frosting covered with a damp paper towel if you are not using it immediately. The sugar in buttercream quickly forms a dry crust when exposed to air, which can ruin your smooth finish. A quick whip with a spatula will restore its creamy texture if it has been sitting for a while. Taking this extra precaution keeps your frosting silky and easy to spread.
Frequently Asked Questions
Why is my buttermilk cake dry?
This usually happens if the flour was measured incorrectly or the cake was baked for too long. To prevent dryness, always use the spoon-and-level method for measuring flour and start checking the layers for doneness at the thirty-minute mark. Overbaking moisture out of the crumb is the most common cause of dry cakes.
Can I substitute buttermilk in a cake?
Yes, you can make a quick substitute by adding one tablespoon of lemon juice or white vinegar to a cup of whole milk. Let the mixture sit for five minutes until it curdles slightly before using. While this works in a pinch, real buttermilk provides the absolute best texture and rise.
What does buttermilk do to a cake?
Buttermilk acts as a natural tenderizer by breaking down gluten strands in the flour. It also reacts with the baking soda to create carbon dioxide bubbles, which helps the cake rise. This results in a much softer, more velvety crumb than regular milk can produce.
Should buttermilk cake be served warm or cold?
This dessert is best served at room temperature to allow the buttery flavors to shine. Cold temperatures can make the butter in the cake and frosting feel firm and dense. If you store the cake in the fridge, let it sit on the counter for about thirty minutes before serving.
How many people does a two-layer cake feed?
A standard nine-inch two-layer cake will easily feed twelve to sixteen people depending on how you slice it. If you cut the slices into modest wedges, you can stretch it to feed a larger crowd. It is the perfect size for family gatherings or casual celebrations.
Can a buttermilk cake be frozen?
You can freeze the unfrosted baked layers by wrapping them tightly in plastic wrap and aluminum foil for up to three months. Thaw the layers overnight in the refrigerator before assembling and frosting. This is a fantastic way to prep ahead of time for a busy weeknight.
How do you keep a two-layer cake moist?
Store the frosted cake under a cake dome or in an airtight container at room temperature for up to twelve hours. For longer storage, keep it in the refrigerator to protect the dairy in the frosting. Always cover any cut edges with plastic wrap to prevent the air from drying out the interior crumb.
Can this recipe be used for cupcakes?
Yes, you can easily adapt this batter to make delicious cupcakes. Divide the batter into lined muffin tins, filling each cup about two-thirds full. Bake them at 350 degrees for eighteen to twenty minutes, or until a toothpick inserted in the center comes out clean.
Quick Variations
While the classic vanilla version is always a crowd-pleaser, you can easily customize this recipe to suit different occasions. Adding a bright citrus note is as simple as folding fresh lemon or orange zest into the dry ingredients before mixing. The citrus oils release during baking, giving the tender crumb a refreshing flavor that cuts through the sweet frosting. It is a wonderful option for warm spring afternoons or summer gatherings.
If you are craving a richer flavor profile, you can swap the vanilla frosting for a classic cocoa-infused buttercream. For a different twist on a traditional layered dessert, try our classic two layer yellow cake chocolate frosting which offers a wonderfully decadent option. You can also sprinkle toasted chopped pecans or walnuts between the layers to add a satisfying crunch. These small additions completely transform the flavor profile without adding extra preparation time.
For a fruit-forward option, spread a thin layer of high-quality raspberry or strawberry jam on top of the first frosted layer. The tartness of the fruit jam contrasts beautifully with the sweet buttercream and rich buttermilk crumb. This variation looks stunning when sliced, revealing a colorful ribbon of fruit running through the middle. You can compare our recipe with other classic takes like this traditional buttermilk layer cake with buttercream frosting to see how various ingredients affect the final texture.
Spoon It While It’s Warm
Serving this dessert at the ideal temperature makes a world of difference in its overall texture. We love to present this beautiful creation on a raised glass stand to show off the rustic swirls of buttercream. If you appreciate the simplicity of a traditional bake, you might also enjoy reading about our classic vanilla butter cake for your next gathering. A simple cake dome keeps the dessert looking pristine while protecting its delicate moisture.
Pairing a slice of this rich dessert with the right beverage complements the overall eating experience. A cup of strong, dark roast coffee or a hot cup of earl grey tea balances the sweetness of the buttercream beautifully. For a special treat on a warm evening, serve each slice alongside a scoop of vanilla bean ice cream. The cold, creamy ice cream melting into the soft cake layers is pure heaven.
This dessert is wonderful for casual weeknight celebrations or cozy family dinners. You do not need a grand holiday to enjoy a homemade dessert from scratch. Its comforting flavor and soft crumb bring a sense of warmth to any ordinary evening. Slice, serve, and watch your loved ones enjoy every single bite.

Bake It Tonight
Baking a delicious homemade dessert does not have to be a stressful or time-consuming project. With this straightforward method, you can easily create a beautiful centerpiece that everyone will love. If you enjoy experimenting with different layer variations, don’t miss our guide on the classic vanilla bean layer cake for your collection. It is another wonderful recipe that delivers exceptional flavor and texture.
We hope this recipe brings a little extra sweetness and comfort to your kitchen this week. Gathering around the table to share a homemade slice is one of life’s simplest pleasures. Let us know how your dessert turns out and what variations you decided to try. We love seeing your baking creations and hearing about your kitchen adventures.
Please share this recipe with your fellow bakers and friends who love a quick, delicious dessert. You can connect with our community and find more sweet inspiration on Pinterest, Facebook, and TikTok. Happy baking, and we hope your next kitchen creation is truly wonderful!


