Baking at exactly 170°C for thirty minutes stabilizes the delicate protein walls of this Italian sponge, deciding whether your layered dessert holds its shape or collapses under the mascarpone.

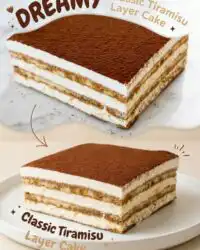
This Classic Tiramisu Layer Cake translates the classic Italian dessert into a clean, sliceable masterpiece that remains structural yet delicate. Rather than relying on store-bought ladyfingers that dissolve into mush, we bake an authentic genoise-style sponge that acts as a porous sponge for strong espresso. The egg yolks are beaten for fifteen minutes to establish a robust ribbon stage, creating a dense network of micro-bubbles that trap moisture without sacrificing support. Coupled with a stable egg-and-mascarpone emulsion, this cake delivers the signature rich creaminess of the traditional sweet while standing proudly on a dessert stand.
Why Precision Pays Off Here for a Classic Tiramisu Layer Cake
Prep: 30 min · Serves: 12 · Difficulty: Advanced
- Structural integrity guarantees neat, sliceable dessert portions.
- Aerated Italian sponge absorbs coffee without collapsing.
- Emulsified mascarpone filling provides luxurious mouthfeel.
- Balanced espresso saturation prevents soggy cake bases.
- Precise baking parameters yield uniform crumb texture.
Our structured tiramisu cake technique guarantees every element remains flawlessly balanced from bench to plate. Weigh it, time it, trust it.
Get The Full Cake Recipe
Print
Classic Tiramisu Layer Cake
- Total Time: 4 hours 10 mins
- Yield: 12 servings
Description
This elevated take on a classic Italian dessert replaces ladyfingers with a structured, airy genoise sponge. Perfectly balanced with strong espresso and a stable mascarpone cream, this layered masterpiece offers professional results with clean, sliceable precision.
Ingredients
- Cake flour
- Granulated sugar
- Whole eggs
- Mascarpone cheese
- Heavy whipping cream
- Strong espresso or coffee
- Dark cocoa powder
- Salt
- Baking powder
Instructions
- Sift dry ingredients. Whisk and sift the cake flour, salt, and baking powder together three times to ensure an aerated, lump-free mixture.
- Whip egg components. Beat egg whites to stiff peaks in one bowl, and separately whisk egg yolks with sugar for fifteen minutes until they reach the pale ribbon stage.
- Bake the sponge. Fold dry ingredients and whites into the yolk mixture, then bake in a greased eight-inch springform pan at 170°C for thirty to forty minutes.
- Prepare the soak. Slice the cooled cake into three even layers and spoon cooled espresso evenly over each surface until the crumb is saturated.
- Make the filling. Whip the mascarpone, heavy cream, sugar, and whole egg until thick, then spread one-third of the mixture between each of the three sponge layers.
- Chill the cake. Refrigerate the assembled dessert for at least three to four hours to allow the structure to set before dusting with a layer of cocoa powder.
Notes
- Ensure all dairy ingredients are at room temperature before mixing to prevent the mascarpone emulsion from breaking.
- Always use a digital scale to measure flour by weight rather than volume to maintain the cake’s structural integrity.
- Dip your knife in hot water and wipe it dry between slices to achieve clean, professional-looking portions.
- Store the finished cake in a sealed dome container to prevent the absorption of odors from other foods in the refrigerator.
- Prep Time: 30 mins
- Cook Time: 40 mins
- Category: Dessert
- Method: Baking
- Cuisine: Italian
The Working Components

Every component in this recipe must be weighed with precision to establish the correct structural tension between the fat and protein. The interplay of aerated eggs and low-gluten cake flour dictates how much liquid the baked structure can safely imbibe without leaking or collapsing under its own weight. By understanding the thermodynamic and chemical roles of each working part, we transform a simple set of ingredients into an architectural marvel on the dessert table.
- Cake Flour: Sifting this low-protein starch guarantees minimal gluten formation, yielding an exceptionally tender crumb that easily absorbs liquid. Standard all-purpose flour has too much gluten, which would make the soaked layers unpleasantly rubbery and tough rather than meltingly soft.
- Granulated Sugar: This component tenderizes the crumb by drawing water away from gluten-forming proteins while stabilizing the egg white foam during whipping. It acts as a moisture binder that prevents the sponge from drying out during the baking cycle.
- Mascarpone Cheese: High butterfat content provides the structural weight and creamy mouthfeel needed to support the delicate sponge layers without weeping. This heavy dairy component serves as the anchor of the filling, keeping the layers separate and defined.
- Whipping Cream: Sourced at 36% butterfat, this ingredient introduces stable air bubbles that lighten the dense cheese, creating a spoonable emulsion. The fat globules form a network that suspends the moisture, ensuring the frosting remains airy yet sturdy.
- Whole Eggs: The yolk provides lecithin for a stable fat emulsion, while the whipped white supplies the protein structure that traps leavening gases. This combination gives the sponge its springy resilience, enabling it to carry the weight of the coffee syrup.
- Strong Coffee or Espresso: Rich in volatile oils, this liquid infuses the sponge with intense flavor without introducing excess moisture that might degrade the structural crumb. It must be completely cooled before application to prevent dissolving the delicate starches.
| Ingredient | Why It Matters |
|---|---|
| Cake Flour | Low gluten potential ensures tender texture |
| Egg Whites | Whipped to stiff peaks for structural lift |
| Mascarpone | High fat content sets the filling structure |
| Espresso | Delivers concentrated flavor without excess water |
| Granulated Sugar | Hydrophilic properties lock in essential moisture |
Step-by-Step Technique

Step 1: Prepare and Sift the Dry Ingredients
Weighing on a digital scale guarantees absolute accuracy before we begin our aeration process. Sift the cake flour, salt, and baking powder together three times through a fine-mesh sieve to aerate the dry elements and prevent clumping. This thorough sifting breaks up any dense flour pockets, allowing for an even distribution of the raising agent. The combined powders should look like a fine, weightless drift of snow at the bottom of your mixing bowl.
Step 2: Beat the Egg Components to High Volume
In your stand mixer bowl, whip the room-temperature egg whites until they form stiff peaks that stand straight when the whisk is lifted. In a separate large bowl, beat the egg yolks and granulated sugar for exactly fifteen minutes until the mixture reaches the pale ribbon stage. This stage is correct when the yellow batter falls from your spatula in thick, distinct folds that sit on the surface for several seconds before slowly melting back into the bowl. This prolonged whipping introduces tiny air bubbles that provide the cake’s primary structure.
Step 3: Bake the Italian Sponge Base
Gently fold the dry ingredients and the whipped egg whites into the yolk mixture in alternating additions, taking care not to deflate the trapped air. Transfer the batter immediately to an eight-inch springform pan that has been lightly greased and lined with parchment paper. Bake at exactly 170°C for thirty to forty minutes until a clean toothpick inserted in the center comes out free of wet batter. The sponge should feel springy, bounce back when lightly pressed, and gently pull away from the warm sides of the pan.
Step 4: Assemble and Build Your Classic Tiramisu Layer Cake
Slice your cooled sponge horizontally into three uniform layers using a long, serrated knife. Lay the first sponge slice on a flat serving plate and evenly spoon one-third of the strong espresso over the porous surface. Confirm the liquid saturates the crumb uniformly, turning it a deep amber hue without leaving any dry patches or dripping off the edges of the plate. This precise saturation creates a moist foundation that can support the heavy mascarpone layers above.
Step 5: Whip and Spread the Mascarpone Filling
Beat the mascarpone, heavy cream, sugar, and whole egg until the mixture transforms into a thick, spreadable cream that holds its shape. Spread one-third of this velvet cream smoothly over the espresso-soaked sponge layer using an offset palette knife. Repeat this process for the remaining two sponge layers, piling them straight and level so the cake remains structurally sound. The final layer should be frosted smoothly on the top and sides, creating a clean, professional finish.
Step 6: Chill and Finish with Cocoa Powder
Place the assembled cake in the refrigerator to chill for at least three to four hours, or ideally overnight, to let the flavors marry. This chilling time allows the fats in the mascarpone to solidify and the liquid in the sponge to distribute evenly. Right before serving, sift a generous, uniform blanket of dark cocoa powder across the top of the cake. The cocoa should create a matte, velvet skin that hides the rich cream beneath until sliced.
Step 7: Trim and Level the Sponge Layers
Before assembly, check that each of the three sliced sponge layers is completely flat and level. Use an offset palette knife or a cake leveler to shave off any domed parts of the baked sponge. Saving these trimmings allows you to test the texture and guarantee the crumb is airy, open, and ready to absorb the espresso soak.
Step 8: Final Stabilization and Storage Prep
Once the cake is fully assembled and iced, place a cake dome or a large inverted bowl over it to prevent refrigerator odors from invading the delicate mascarpone fat. Keep the cake in a level, cold zone of your refrigerator where the temperature remains steady between two and four degrees Celsius. This static cold environment is essential for the proteins and lipids to form a permanent structural bond before the cake is sliced.
Pastry Bench Tips

To avoid over-whipping your mascarpone filling, keep your mixing speed on low to medium. High speeds introduce large air bubbles that can break the delicate fat emulsion, causing the cheese to separate into a grainy, wet mess. If you notice the cream losing its smooth gloss, immediately stop whipping and stir in a tablespoon of cold cream by hand.
If your cream is soupy and refuses to hold its shape during whipping, here is why and how to fix it. This issue usually occurs because the mascarpone or cream was too warm, preventing the fat molecules from crystallizing and trapping air. Place the entire bowl and whisk in the freezer for ten minutes, then beat on low speed to gently restore the emulsion.
Use a clean serrated bread knife with a long blade to portion the cake cleanly. Dip the blade in hot water and wipe it completely dry between each slice to guarantee the dark espresso layers do not smear into the white cream filling. This thermal barrier prevents the mascarpone from sticking to the metal.
For those looking to build advanced multi-layered desserts, understanding the role of fat in structured cakes is vital. Much like constructing a multi-layered opera cake, maintaining cold ingredient temperatures prevents your creams from weeping under weight. Be sure to chill your serving plate beforehand to slow down the melting process.
We recommend brewing espresso rather than regular drip coffee for the soak. This is because espresso contains concentrated emulsified oils that provide a deeper roasted aroma, which cuts through the heavy fat of the mascarpone cheese. For more information, read this guide on authentically balancing espresso and mascarpone fillings to master the coffee intensity.
When measuring flour without a scale, always spoon it into the measuring cup and level it off. Scooping directly with the cup packs the flour down, adding extra starch that makes the baked sponge too dense to absorb the liquid properly. A dense sponge cannot trap the espresso, causing the liquid to leak out and pool at the base of your cake.
Frequently Asked Questions
What is the best cake base for a tiramisu layer cake?
A classic Italian sponge cake is the ideal base because it has a dry, open crumb that acts like a sponge. Unlike rich butter cakes, this fatless sponge relies on whipped egg whites to absorb the coffee soaking syrup without dissolving into mush. It provides the necessary structural support to carry the heavy layers of mascarpone frosting.
How do you make the coffee soaking syrup?
Brew a strong espresso and let it cool completely to room temperature before applying it to the sponge. If you prefer a sweeter soak, dissolve one tablespoon of granulated sugar into the warm coffee before cooling. Avoid using hot coffee, as it will melt the fats in the mascarpone filling.
Can I make a tiramisu cake without raw eggs?
Yes, you can substitute the whole egg in the filling with pasteurized egg yolks or eliminate it completely. If you choose to leave the egg out, whip the mascarpone and heavy cream with powdered sugar until thick, stable peaks form. This guarantees a food-safe cream that still retains its velvety, spreadable texture.
What can I use if I don’t have mascarpone cheese?
While there is no perfect structural duplicate, you can combine full-fat cream cheese with heavy cream and sour cream. Beat eight ounces of cream cheese with one-quarter cup of heavy cream and two tablespoons of sour cream to mimic the texture. Note that this substitution will introduce a tangier flavor profile than authentic Italian cheese.
Is it possible to make a tiramisu cake alcohol-free?
Yes, this recipe is naturally alcohol-free as written. You can enjoy the full espresso flavor without any liqueurs, or add a teaspoon of high-quality vanilla extract to the soaking liquid to boost the aroma. This makes the dessert suitable for family gatherings and sensitive palates.
Which technique prevents the cake layers from getting soggy?
Spoon the espresso over the sponge evenly rather than pouring it all at once. Allowing the sponge to cool completely before soaking ensures the starch network is set and can hold the liquid without collapsing. Always chill the cake for several hours to let the moisture distribute evenly throughout the crumb.
How long does a tiramisu cake need to chill before serving?
The cake requires a minimum of three to four hours of chilling in the refrigerator to stabilize. This chilling window allows the starches to firm up and the fats in the mascarpone to set, yielding clean slices. For the best structural results, we recommend chilling the assembled cake overnight.
What is the correct way to store leftovers?
Leftover cake should be kept in the refrigerator in an airtight container or well covered with plastic wrap to prevent the cream from absorbing fridge odors. It will keep for two to three days in the refrigerator. To freeze, wrap individual slices tightly in plastic wrap and aluminum foil, then store in a freezer bag for up to two weeks.
Considered Adjustments
For a lighter, seasonal profile, you can swap the heavy espresso soak for a fruit infusion. A structured peach tiramisu incorporates white peach purée and sweet marsala, offering a bright acidity that contrasts beautifully with the rich, buttery mascarpone cream. This adjustment is ideal for spring and summer gatherings where a refreshing fruit finish is preferred.
If you prefer an alcohol-infused profile, whisk two tablespoons of dark rum, brandy, or Marsala wine into your espresso before soaking the sponge. This addition deepens the complexity of the soak and helps preserve the sponge crumb over several days. The alcohol also acts as a subtle solvent, carrying the coffee aromas further across the palate.
To create a mocha variation, whisk two tablespoons of Dutch-processed cocoa powder directly into the hot water of the sponge batter. This adjustment alters the protein structure slightly but delivers a deep chocolate background that complements the coffee soak. Ensure the cocoa is fully dissolved to prevent dry pockets in your baked cake.
Serving the Structure
Plating this dessert requires temperature precision. Bring the cake out of the refrigerator exactly thirty minutes before you plan to slice and serve it. This short window allows the firm mascarpone fats to soften slightly, producing a luscious melt-in-the-mouth texture while the sponge layers maintain their structural integrity. Slicing the cake while it is still slightly cold yields the cleanest cuts.
Accompany each slice with a hot cup of unsweetened espresso or a delicate black tea on the side. The heat of the beverage contrasts beautifully with the cool cream, enhancing the volatile cocoa aromas. For those looking to master another elegant cream-filled dessert, studying our chantilly cake recipe will refine your understanding of whipping stable creams to support layered sponge bases.

What the Technique Gives You
Mastering the balance of a structured Italian sponge cake and a delicate mascarpone cream is a milestone in any baker’s journey. With the correct aeration, precise temperature control, and patience during the chilling phase, you create a dessert that is both visually stunning and technically sound. If you are eager to continue exploring the limits of cake structure, test your skills next on our moist devils food layer cake to see how chocolate fats alter crumb behavior.
We invite you to share your baking results and showcase your beautifully structured cake layers with our community. Connect with us on Pinterest, Facebook, and TikTok to exchange tips and join our ongoing pastry discussions.


