Baking at exactly 177 degrees Celsius decides whether your cake layers develop a tender, uniform crumb or dry out into a sawdust texture.

To execute a flawless Vanilla Naked Cake, one must understand that structure is what makes the melt possible. A naked cake lacks the protective plaster of heavy outer frosting, leaving the crumb exposed to the atmosphere. We must rely on a precise balance of fat, liquid, and protein to retain moisture without sacrificing structural integrity. By mastering the emulsion of butter and sugar, we build a cake that stands proud on the pedestal while remaining delicate on the tongue. This delicate equilibrium prevents the crumb from drying out while maintaining the cake’s physical integrity.
Why Precision Pays Off Here for a Vanilla Naked Cake
Prep: 45 min · Serves: 12 · Difficulty: Advanced
- Achieves a uniform, velvety crumb structure.
- Maintains stability without excess outer frosting.
- Balances sweetness through precise salt ratios.
- Saves time with reliable ahead preparation.
- Releases cleanly from pans every time.
By focusing on the chemistry of the batter, we bypass the need for heavy decoration. This method guarantees your cake remains moist and structurally sound. We plan our steps with care, using our recipe index to build a solid baking foundation. Precision for the sake of mouthfeel is our guiding principle here.
Get The Full Cake Recipe
Print
Vanilla Naked Cake
- Total Time: 6 hours
- Yield: 12 servings
- Diet: Vegetarian
Description
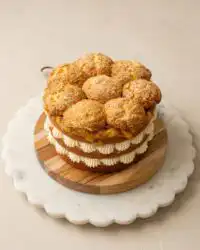
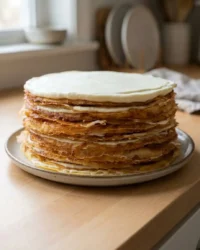
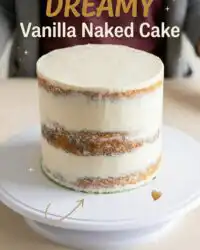
A beautifully structured three-layer vanilla naked cake featuring a tender crumb, rich velvet buttercream, and fresh raspberries. Perfect for ambitious home bakers seeking a professional, rustic aesthetic.
Ingredients
- 3 and 3/4 cups (443g) sifted all-purpose flour
- 2 teaspoons baking powder
- 3/4 teaspoon baking soda
- 1 teaspoon salt
- 1 and 1/2 cups (340g) unsalted butter, softened to room temperature
- 2 cups (400g) granulated sugar
- 5 large eggs, at room temperature
- 1 Tablespoon pure vanilla extract
- 1 and 3/4 cups (420ml) buttermilk, at room temperature
- 1–2 cups (120–250g) fresh raspberries
- Vanilla Buttercream:
- 1 and 1/2 cups (340g) unsalted butter, softened to room temperature
- 5.5–6 cups (660–720g) confectioners’ sugar
- 5–6 Tablespoons (75–90ml) heavy cream
- 1 teaspoon pure vanilla extract
- 1/4 teaspoon salt
Instructions
- Prep Oven and Pans: Preheat oven to 350°F (177°C). Grease three 9-inch round cake pans, line with parchment paper, and grease the paper.
- Whisk Dry Ingredients: In a large bowl, whisk together the sifted flour, baking powder, baking soda, and salt. Set aside.
- Cream Butter and Sugar: Beat the butter and sugar on medium-high speed for 3 minutes until smooth and aerated.
- Add Eggs: Incorporate eggs one at a time on medium speed, beating well after each addition. Mix in the vanilla extract.
- Combine Batter: Alternately add the dry ingredients and buttermilk in three additions, starting and ending with the flour. Do not over-mix.
- Portion and Bake: Divide batter evenly among the three pans (about 600g per pan). Bake for 25–26 minutes until a toothpick inserted in the center comes out clean. Cool completely.
- Make Frosting: Beat the butter on medium speed for 2 minutes. On low speed, gradually add the sugar, heavy cream, vanilla, and salt. Whip on high speed for 3 minutes.
- Assemble Cake: Level the cake tops with a serrated knife. Layer cake, buttercream, and raspberries, repeating for all three layers. Smooth the sides with a bench scraper. Chilled for 2–3 hours before serving.
Notes
- Temperature Control: Ensure all cold ingredients are at room temperature to prevent the batter from splitting.
- Accurate Weighing: Use a digital kitchen scale to portion the batter evenly among the pans for uniform baking.
- Make Ahead: Cake layers can be baked, wrapped, and stored overnight at room temperature before assembly.
- Prep Time: 45 mins
- Cook Time: 25 mins
- Category: Dessert
- Method: Baking
- Cuisine: American
The Working Components

Every ingredient in this formula serves a distinct structural purpose. We do not add components for mere volume; we select them for their chemical contributions to the crumb. Weighing these items on a digital scale makes certain that our ratios remain exact.
- Sifted all-purpose flour: At 443 grams, this provides the gluten frame that supports the rising cake without becoming dense. Sifting before measuring is critical to prevent packing.
- Unsalted butter: Softened to room temperature, this fat traps air during the creaming stage to yield a light, aerated crumb. It coats starch molecules to inhibit excess gluten development.
- Buttermilk: At 420 grams, its acidity tenderizes the gluten and activates the baking soda for a uniform rise. This produces a delicate, velvety texture in the baked layers.
- Large eggs: These act as emulsifiers, binding the fats and liquids together to prevent the batter from splitting. They provide structural lift and rich moisture to the crumb.
- Pure vanilla extract: A full tablespoon provides a deep, rounded flavor that cuts through the richness of the dairy. It anchors the vanilla profile across the entire cake structure.
- Baking powder and soda: These leaveners work in tandem to create tiny, regular air pockets throughout the baking process. They require precise measurement to avoid a metallic aftertaste.
| Ingredient | Why It Matters |
|---|---|
| Sifted All-Purpose Flour | Provides the structural framework for the layers. |
| Unsalted Butter | Creates a tender texture by coating starch molecules. |
| Buttermilk | Delivers acidity to tenderize gluten and add moisture. |
| Large Eggs | Emulsify the batter and provide structural lift. |
The Tested Procedure

Step 1: Preparing the Oven and Pans
Preheat your oven to 177°C (350°F) to establish the correct thermal environment before the batter enters. Grease three 9-inch round cake pans, line them with custom-cut parchment paper rounds, and grease the paper to guarantee a clean release. This double-greasing technique prevents the delicate edges of the cake from tearing during unmolding. A torn edge will ruin the clean profile required for a naked presentation.
Step 2: Creaming the Butter and Sugar
Place 340 grams of softened unsalted butter and 400 grams of granulated sugar into the bowl of your mixer. Fit the machine with the paddle attachment and run it on medium-high speed for exactly three minutes. You are looking for a pale, aerated paste that has expanded in volume. Scrape the bowl frequently with a flexible silicone spatula to make sure every gram of fat is evenly aerated.
Step 3: Integrating Eggs for Structure
Incorporate five large room-temperature eggs one at a time, running the mixer on medium speed. Allow each egg to disappear completely into the batter before adding the next to maintain a stable emulsion. Adding eggs too quickly will cause the fat to separate from the water, resulting in a curdled batter and a heavy, dense baked crumb. Pour in the tablespoon of vanilla extract during the final seconds of this step.
Step 4: Alternating Dry Ingredients and Buttermilk
Sift your flour, baking powder, baking soda, and salt together into a clean bowl. With the mixer running on its lowest speed, add the dry ingredients in three additions, alternating with the room-temperature buttermilk. Begin and end with the flour mixture, stirring only until the dry patches vanish. Over-mixing at this stage develops excess gluten, which turns a tender crumb tough and rubbery.
Step 5: Baking the Vanilla Naked Cake Layers
Place your prepared cake pans on a digital scale to make certain of absolute uniformity across all three layers. Divide the thick, velvety batter evenly, aiming for approximately 600 grams of batter per pan. Smooth the surfaces with an offset palette knife to prevent uneven baking or doming. Equal weight guarantees that all three layers bake at the identical rate, preventing dry edges.
Step 6: Preparing the Vanilla Buttercream
Beat 340 grams of softened butter on medium speed for two minutes until it is smooth and pale. Gradually add 660 grams of confectioners’ sugar, 75 grams of heavy cream, the vanilla, and salt on low speed. Once incorporated, increase the speed to high and whip for three minutes to incorporate air. If the frosting appears too soft, add a small amount of sugar; if too stiff, add a splash of cream.
Step 7: Slicing and Leveling the Layers
Slice the domed tops off the cooled cakes using a long serrated knife to create flat surfaces. Place your first layer on a turntable, spread 360 grams of buttercream over the top, and press fresh berries into the cream. Stack the second layer, repeat the filling, and top with the final cake layer. Use a bench scraper to smooth a thin layer of buttercream around the sides, leaving the cake layers visible.
Step 8: Final Decorating and Chilling
Adorn the top of the cake with your chosen garnishes, placing them carefully to maintain balance. Refrigerate the assembled cake for at least two to three hours to let the buttercream set and stabilize the structure. If chilling for longer, cover the cake loosely with plastic wrap after the first hour of cooling. Bring the cake to room temperature for thirty minutes before slicing.
Precision Notes

Temperature control is the absolute foundation of successful cake baking. If your eggs or buttermilk are cold, they will seize the creamed butter and break the emulsion. If this happens, warm the mixing bowl gently over a water bath for thirty seconds to restore the proper temperature before continuing to mix.
Weighing your ingredients on a digital scale is far more accurate than using volume cups. Flour can pack down in a cup, leading to an excess of up to fifty grams per cup, which dries out the crumb. For a beautifully structured cake, we recommend reviewing our guide on white velvet cake to understand how flour weights affect crumb density.
When leveling your cake layers, keep your serrated knife perfectly horizontal. Rest your hand on the top of the cake and spin the turntable slowly, letting the blade do the cutting rather than forcing it through the crumb. This technique prevents tearing and makes certain that your final assembled cake does not lean.
To prevent your fresh berries from bleeding juice into the white buttercream, dry them thoroughly after washing. Wet berries will create unsightly red streaks on the exterior of your naked cake. For more advanced assembly techniques, you can read the original formula details on Sally’s Baking Addiction to refine your presentation.
If your buttercream appears grainy, the confectioners’ sugar may not have been sifted, or the butter was too cold. To fix a split or grainy frosting, take a half-cup of the mixture, melt it in the microwave for ten seconds, and whip it back into the main bowl. This small amount of melted fat will help re-emulsify the remaining frosting.
Frequently Asked Questions
What is the difference between a “naked” cake and a “semi-naked” cake?
A fully naked cake has virtually no frosting on its outer sides, leaving the golden-brown crust of the layers completely exposed. A semi-naked cake features a very thin layer of buttercream scraped around the exterior, which fills in the gaps and creates a translucent, rustic finish. Both styles rely on flat, level layers to achieve a clean and professional appearance.
What frosting works best for a naked cake?
A stable, crusting buttercream is ideal because it holds its shape and seals in the moisture of the exposed cake layers. Swiss meringue buttercream and American buttercream both work exceptionally well due to their high fat content. Avoid using whipped cream or soft cream cheese frostings, as they lack the structural strength to support multiple layers.
How do you assemble a naked cake without it collapsing?
To prevent collapsing, ensure your cake layers are completely cold before you begin assembly. If you are adding fresh berries between the layers, press them firmly into the buttercream so they do not slide. You can also insert wooden dowels or thick paper straws through the center of the cake to anchor the layers in place.
What are the best decorations for a vanilla naked cake?
Fresh, dry berries, edible flowers, and fresh herbs like rosemary or thyme provide a natural and elegant decoration. Avoid heavy, wet fruits that might leak juice down the sides of the exposed cake. If you use fresh flowers, ensure they are organic, pesticide-free, and wrapped at the stems before insertion.
Can I make the cake layers in advance?
Yes, you can bake and cool the cake layers up to two days in advance. Wrap each layer tightly in plastic wrap and store them at room temperature, or freeze them for up to three months. Assembling the cake with cold or slightly chilled layers actually makes the frosting process much easier.
How do I prevent the exposed cake layers from drying out?
Because a naked cake lacks a thick protective barrier of frosting, the exposed sides can dry out quickly when exposed to air. Keep the cake loosely wrapped in plastic wrap or stored in a sealed cake carrier until you are ready to serve. Applying a very thin layer of simple syrup to the sides of the layers can also help retain moisture.
Considered Adjustments
For an autumn aesthetic, you can adapt this recipe by incorporating warm spices and dried decorative elements. Replacing the fresh berries with a spiced apple compote and decorating the exterior with dried foliage creates a beautiful centerpiece. If you wish to pursue this styling direction, read our detailed guide on the naked cake fall flowers technique.
A citrus variation offers a bright contrast to the sweet vanilla buttercream. You can fold the finely grated zest of two lemons into the cake batter during the final mixing stage. Soak the baked layers with a light lemon syrup to preserve moisture and add a sharp, clean flavor profile.
A chocolate and raspberry alternative provides a deeper, richer flavor profile for formal events. You can substitute fifty grams of the flour with Dutch-process cocoa powder to create a rich chocolate base. This variation pairs beautifully with a dark chocolate ganache drip down the exposed sides of the cake layers.
Serving the Structure
When serving this elegant dessert, presentation is just as important as the baking process. Use a sharp, thin-bladed knife dipped in hot water and wiped dry between each slice to make certain of clean cuts through the cake and berries. This clean slicing technique prevents the buttercream from smearing across the exposed cake layers.
Pair each slice with a hot cup of black tea or a pour-over coffee to balance the rich sweetness of the buttercream. If you are hosting a formal gathering, consider serving this alongside our white chocolate raspberry anniversary cake to offer guests a variety of textures and flavors. A simple dusting of confectioners’ sugar over the top layer right before serving adds a delicate, professional finish.

What the Technique Gives You
Mastering the assembly of a naked cake proves that structure is what makes the melt possible. By focusing on ingredient temperatures, precise weights, and gentle mixing, you create a dessert that is both visually stunning and delicious. The contrast between the soft vanilla crumb and the rich buttercream rewards your attention to detail.
We invite you to share your baking journey and showcase your structural creations. If you want to study more multi-layered desserts, try our three layer coconut cream cake for your next baking project. Connect with our community of passionate bakers on Pinterest or follow our updates on Facebook to share your results.


