If you have got a sweet craving and twenty minutes of active prep to spare before letting the fridge do the heavy lifting, this cake is your answer.

We all want that velvety, luxurious bite when celebrating a milestone, but nobody wants to spend their entire anniversary scrubbing flour out of every corner of the kitchen. This White Chocolate Raspberry Anniversary Cake brings together the tart brightness of real berries with the creamy richness of cold-whipped ganache, all on a quick weeknight timeline. You get that delicate, bakery-style crumb and a luscious fruit-swirled finish without sacrificing your evening. It is a showpiece dessert made for sharing with a spoon directly from the plate after a quiet dinner.
What Makes This White Chocolate Raspberry Anniversary Cake Quick & Luscious
Prep: 25 min · Serves: 10 · Difficulty: Medium
- Tart raspberries cut through rich white chocolate sweetness.
- Soft sour cream batter yields guaranteed velvet crumb.
- Silky whipped ganache requires only two basic ingredients.
- Simple prep lets the oven do the work.
- Easy assembly cuts down your kitchen cleanup time.
You will get a bakery-level dessert without losing your entire night to the kitchen.
If you love celebrating with beautiful layers but want to keep prep simple, this recipe is as satisfying as our classic neapolitan anniversary cake but with a fruitier twist.
Get The Full Cake Recipe
Print
White Chocolate Raspberry Anniversary Cake
- Total Time: 3 hours
- Yield: 10 servings
Description
This decadent anniversary cake features soft, sour cream-enriched layers filled with a tart raspberry reduction and finished with a velvety white chocolate whipped ganache. It is a perfect balance of luxury and efficiency, designed for celebration without the exhaustive kitchen cleanup.
Ingredients
- 2 cups fresh raspberries
- 2 cups all-purpose flour
- 2 tsp baking powder
- 1/2 tsp baking soda
- 1/4 tsp fine salt
- 1/2 cup unsalted butter, softened
- 1/4 cup sunflower oil
- 1 1/2 cups granulated sugar
- 1 tsp pure vanilla extract
- 1 large egg
- 2 large egg whites
- 1/2 cup sour cream
- 1/2 cup whole milk
- 12 oz high-quality white chocolate, finely chopped
- 1 1/2 cups heavy cream, divided
- Vanilla bean seeds
Instructions
- Reduce raspberry filling. Simmer raspberries in a saucepan until thickened, then cover and refrigerate until completely cooled.
- Prepare cake pans. Preheat oven to 350°F and line two 8-inch round pans with parchment paper circles.
- Sift dry ingredients. Whisk and sift together the flour, baking powder, baking soda, and salt in a medium bowl.
- Cream base ingredients. Beat butter, oil, sugar, and vanilla until pale, then incorporate the egg and egg whites one at a time.
- Combine batter. Alternately mix in the dry ingredients and milk, then fold in the fresh raspberries and pour into prepared pans.
- Bake the layers. Bake for 25-30 minutes until golden, then cool completely on a wire rack before assembly.
- Prepare the ganache. Pour hot cream over chopped white chocolate and vanilla seeds, stir until smooth, then chill before whipping to fluffy peaks.
- Assemble the cake. Pipe a ganache border to contain the raspberry filling, stack the layers, and frost the exterior with the remaining whipped ganache.
Notes
- Ensure all dairy and egg components are at room temperature to achieve a smooth, emulsified batter.
- Always use high-quality white chocolate bars rather than chips to ensure the ganache melts and whips into a smooth texture.
- Wait for the raspberry filling to be fully chilled before assembly to prevent it from bleeding into the delicate ganache.
- For the cleanest cake slices, chill the finished dessert for thirty minutes before cutting with a warmed, thin-bladed knife.
- Prep Time: 25 mins
- Cook Time: 30 mins
- Category: Dessert
- Method: Baking
- Cuisine: American
Shortcut-Friendly Pantry

Baking a stunning dessert does not require a massive shopping list or rare ingredients. Most of these elements are already sitting in your refrigerator or cupboard, ready to be whipped into something spectacular.
- Fresh Raspberries: They bring a natural tartness that balances the sweet base of the cake layers.
- Full-Fat Sour Cream: This ingredient provides essential fat and acidity to guarantee a tender crumb.
- White Chocolate: It forms the luxurious base for the whipped ganache frosting, offering a velvety texture.
- Heavy Cream: This is essential for melting and then whipping the ganache to fluffy perfection.
- Egg Whites: They add structure and lightness to the batter, preventing a heavy or dense cake.
- Sunflower Oil: This keeps the cake soft and moist even after refrigeration.
| Ingredient | Why It Matters |
|---|---|
| Fresh Raspberries | Offer tart balance to sweet batter |
| Sour Cream | Adds moisture and tenderness |
| White Chocolate | Creates rich, whipped ganache base |
| Sunflower Oil | Keeps crumb soft when chilled |
| Egg Whites | Provide structure and airy lift |
From Bowl to Spoon

Step 1: Prepare and Cool the Raspberry Filling
First, you want to cook down your berries to create a thick, glossy filling that will not seep through your cake layers. Simmer the fruit gently until it reduces and thickens, then let it cool completely in the refrigerator for at least thirty minutes before using. This step can easily be done a day or two in advance to save time on your busy celebration night. Make sure you stir the mixture frequently so that it does not scorch on the bottom of your saucepan. Once the sauce is thick enough to coat the back of a spoon, transfer it to a heatproof glass bowl. Cover it tightly with plastic wrap pressed directly against the surface to prevent a skin from forming, then slide it into the back of your refrigerator.
Step 2: Set Up Your Baking Pans and Oven
Preheat your oven to 350°F to make sure it reaches the proper temperature before your batter is ready to go. Line the bottoms of two eight-inch round cake pans with circles of parchment paper, which makes releasing the baked layers exceptionally smooth. There is no need to grease the sides of the pans, as this allows the batter to cling to the metal and rise higher as it bakes. This little baker trick results in flatter, taller layers that require very little trimming before assembly. If you prefer to grease your pans, do so very lightly with a small amount of neutral oil or baking spray. Make sure your oven racks are positioned in the center of the oven for even heat distribution. Preparing your pans ahead guarantees that your batter can go straight into the oven the moment it is mixed, keeping the leavening agents active and powerful.
Step 3: Whisk the Dry Base Together
Grab a medium bowl and sift together your all-purpose flour, baking powder, baking soda, and fine salt to remove any lumps. Whisking these dry ingredients thoroughly guarantees that the baking powder and soda are distributed evenly throughout the flour. This prevents any large pockets of leavening from forming, which could cause your cake to rise unevenly or collapse. Set this bowl aside while you focus on the wet ingredients. Taking thirty seconds to sift your dry ingredients makes a massive difference in the final texture of your dessert. You want a light, airy crumb that melts in your mouth, and sifting helps aerate the flour before it ever touches the wet ingredients. Whisking also guarantees that the salt is not concentrated in one bite, providing a balanced flavor profile across the entire layer.
Step 4: Cream the Butter and Sugar
In a large mixing bowl, combine your softened unsalted butter, neutral sunflower oil, granulated sugar, and pure vanilla extract. Use an electric hand mixer on medium speed to beat these ingredients together for about two minutes until the mixture looks pale and fluffy. This process incorporates air into the butter, which acts as a starting point for a light and tender crumb. Next, add your room temperature egg and egg whites one at a time, beating well after each addition until the batter is smooth and emulsified. Do not rush this step, as creaming the butter and sugar is where you build the structural foundation of your cake. When the butter is whipped with sugar, the sugar crystals cut tiny pockets of air into the fat, which expand in the oven. Incorporating the sour cream at this stage adds acidity and richness, which further tenderizes the gluten in the flour. Make sure all your wet ingredients are at room temperature to prevent the batter from curdling or separating.
Step 5: Incorporate Dry and Wet Elements
Slowly sift half of your dry flour mixture over the wet ingredients and mix on low speed until barely combined. Gradually pour in half of your whole milk, blending gently to keep the batter smooth and uniform. Repeat this process with the remaining flour and milk, mixing only until the streaks of flour disappear to avoid overworking the gluten. Finish by beating on high speed for exactly five seconds to fully emulsify the batter before folding in your fresh raspberries. Overmixing is the main culprit behind dense, rubbery cakes, so keep your mixer on the lowest setting during this stage. Alternating dry and wet ingredients prevents the batter from becoming too saturated or too dry at any one point. Once the batter is fully emulsified and smooth, use a silicone spatula to gently fold in the fresh raspberries. Be careful not to crush the berries, as you want pockets of fruit scattered throughout each layer rather than pink streaks.
Step 6: Bake and Cool the Cake Layers
Divide your pink-speckled batter evenly between the two prepared eight-inch round cake pans, smoothing the tops with an offset spatula. Bake for twenty-five to thirty minutes, or until the tops are lightly golden and a wooden skewer inserted into the center comes out clean. Transfer the pans to a wire rack and let them cool for twenty minutes before running a knife around the edges to loosen the sides. Invert the layers onto the rack, peel off the parchment paper, and let them cool completely. As the cakes bake, your kitchen will fill with the warm aroma of vanilla and sweet berries. Watch the oven closely around the twenty-five minute mark, as overbaking can dry out the delicate crumb. The cakes should feel springy to a light touch in the center. Letting them cool in the pans for a short window allows the structure to set, making them less fragile when you transfer them to the wire racks to cool down completely.
Step 7: Create the Velvety White Chocolate Ganache
Place your finely chopped white chocolate into a large heatproof bowl and set it aside while you heat your cream. In a small saucepan, bring half a cup of heavy cream and your scraped vanilla bean seeds to a simmer over medium heat. Once simmering, immediately pour the hot cream over your white chocolate, cover the bowl, and let it sit for two minutes to melt. Whisk the mixture until smooth and silky, then let it cool slightly before stirring in the remaining cold heavy cream. This two-stage ganache method is a brilliant shortcut to achieving a rich, mousse-like frosting without the hassle of traditional buttercream. Chilling this mixture for at least two hours is crucial, as the chocolate fats need to solidify before they can trap air. If you are baking on a tight schedule, you can prepare this liquid ganache base the night before and let it sit in the refrigerator. Once thoroughly chilled, use your hand mixer to whip the cold ganache into thick, billowy clouds that hold their shape beautifully.
Step 8: Assemble Your White Chocolate Raspberry Anniversary Cake
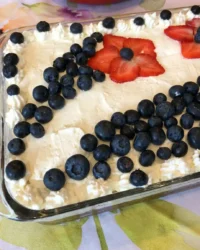
Set your first cooled cake layer onto a serving plate or stand to prepare for assembly. Fill a piping bag with a cup of your whipped ganache frosting and pipe a thick border around the top edge of the cake layer. This frosting wall acts as a barrier, preventing your luscious raspberry filling from leaking out the sides when you stack the layers. Spread the chilled raspberry sauce evenly inside this border, then place your second cake layer directly on top, aligning the sides. Press down very gently on the top layer to secure it, making sure the cake is level from all angles. Use your remaining whipped ganache to cover the top and sides of the cake, using an offset spatula to create elegant swooshes and rustic swirls. If you have any leftover raspberry filling, you can dollop small spoonfuls onto the top layer of frosting and use a toothpick to create beautiful swirls. Finish by decorating the top with fresh, glossy raspberries for a beautiful, celebration-ready look.
Easy-Baker Texture Tricks

To keep your berries from sinking to the bottom of your layers, toss them in a teaspoon of flour before folding them into the batter. This light coating helps the fruit cling to the starch in the batter, keeping them suspended as the layers bake. This trick guarantees a gorgeous distribution of fruit in every single slice.
If your whipped ganache becomes grainy or separates, here is why and how to fix it. This usually happens when the white chocolate mixture is over-whipped or was not completely cold before you started mixing. To fix this, stir in a tablespoon of unwhipped cold heavy cream and gently fold it with a spatula until the texture becomes smooth and silky again.
Always use high-quality white chocolate bars rather than baking chips for your frosting. Baking chips often contain stabilizers that prevent them from melting smoothly, which can leave your ganache lumpy or greasy. A high-quality bar will melt down into a silky liquid that whips into a beautiful, cloud-like texture.
Should you want to read more about how fats and sugars interact in these delicate batters, you can check out the baking science behind raspberry cakes to master the science of your oven. Understanding how fruit moisture affects the rise will help you achieve the ideal crumb every time.
For those who want to prepare ahead of a big celebration, you can bake your cake layers a day in advance. Once they are completely cool, wrap them tightly in plastic wrap and store them at room temperature. This actually makes them easier to slice and assemble because the crumb has had time to settle.
Anyone who loves the combination of sweet vanilla and summer fruit should also try our decadent blackberry vanilla cake for your next gathering. It uses a similar tender crumb structure that pairs beautifully with fresh berries and rich frosting.
Frequently Asked Questions
Can you freeze a white chocolate raspberry cake?
Storing these cake layers in the freezer is quite successful. For the best results, wrap the unfrosted baked layers tightly in plastic wrap and aluminum foil, then freeze them for up to three months. When you are ready to assemble, thaw the layers overnight in the refrigerator before frosting.
Should a White Chocolate Raspberry Anniversary Cake be refrigerated?
Yes, because of the whipped ganache frosting and fresh raspberry filling, this cake should be stored in the refrigerator. Keep it in a cake keeper or loosely covered with plastic wrap to prevent it from drying out. For the best flavor and texture, let slices sit at room temperature for fifteen minutes before serving.
Does white chocolate pair well with raspberries?
White chocolate pairs beautifully with raspberries because the intense tartness of the berries cuts through the sweet richness of the cocoa butter. This combination creates an ideal flavor balance that is neither too sweet nor too tart. It is a classic pairing that always feels luxurious.
Why do my raspberries sink in my cake batter?
Berries sink when the cake batter is too thin or if the fruit is too heavy with moisture. Tossing your fresh berries in a tiny amount of flour before folding them in helps them stick to the batter. This ensures they stay distributed throughout the layers instead of falling to the bottom.
Can you use white chocolate chips for the frosting?
It is highly recommended to avoid using standard baking chips for a whipped ganache frosting. Baking chips contain stabilizers designed to help them keep their shape when heated, which prevents them from melting smoothly. High-quality baking bars or couverture chocolate will melt down much better and whip into a fluffier frosting.
Is it possible to use frozen raspberries for the filling?
Yes, frozen raspberries work beautifully for the cooked filling. You do not even need to thaw them before cooking, though you may need to simmer the mixture for a few minutes longer to evaporate the extra liquid. Be sure to let the filling cool and thicken completely before using it inside the cake.
Fast Flavor Swaps
Chocolate lovers can swap out the white chocolate in the frosting for high-quality dark chocolate. This creates a rich, decadent ganache that pairs beautifully with the bright tartness of the raspberry center. It is an excellent option for those who find white chocolate a bit too sweet.
You can easily add a zesty brightness to this celebration dessert by folding fresh lemon zest into the cake batter. This simple addition cuts through the rich frosting and highlights the natural tartness of the fresh fruit. For a similar flavor profile with a citrus punch, check out our popular raspberry white chocolate cake which features a similar delicate balance.
For a lovely contrast in texture, fold half a cup of finely chopped toasted almonds into the cake batter along with the fruit. You can also press toasted sliced almonds onto the sides of the fully frosted cake before serving. This adds a warm, nutty aroma and a satisfying crunch that heightens the eating experience.
Bring It to the Table Fast
When you are ready to serve this stunning dessert, use a sharp, thin-bladed knife dipped in hot water and wiped dry before each slice. This clean-cut method keeps the layers looking beautiful and prevents the whipped ganache from smudging into the red raspberry filling. Serving this cake slightly chilled or at cool room temperature highlights the contrasts between the rich chocolate and the tart fruit.
For an extra touch of romance, serve each slice with a fresh dusting of powdered sugar or a few extra fresh berries on the side. A light drizzle of leftover raspberry sauce over the plate creates an elegant, restaurant-style presentation with almost zero effort. If you are looking for more berry-forward inspiration for your next event, our delicious blackberry lemon cake is another gorgeous option that looks spectacular on any dessert table.
Pair this rich dessert with a freshly brewed cup of black coffee or a delicate herbal tea to balance the sweet tones. The bitterness of a dark roast coffee cuts through the sweetness of the white chocolate, cleansing your palate between bites. It makes for a quiet, indulgent moment that turns any normal night into a special celebration.

The Weeknight Wrap-Up
Baking a beautiful layer cake does not have to be a stressful, multi-day project that leaves you too tired to celebrate. With this recipe, you can easily pull off a luscious dessert that feels incredibly special without losing your whole afternoon to prep. The combination of velvety whipped ganache and soft raspberry cake layers is guaranteed to bring a smile to anyone sharing a slice with you.
Should you find yourself craving a deeper chocolate experience next time, be sure to try our gorgeous chocolate raspberry cake for a rich twist on this flavor combination. Both recipes prove that you can achieve bakery-quality results right in your own kitchen on any day of the week. Gather your ingredients, prep your pans, and get ready to enjoy a sweet, rewarding slice tonight.
We would love to see your beautiful baking creations, so please share your celebration photos with us on social media. You can find us and connect with other home bakers on Pinterest, Facebook, and TikTok. Happy baking, and enjoy every single decadent bite of your celebration!


