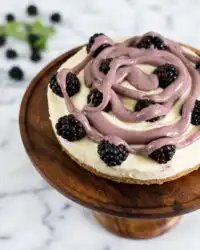
A caramelized crown of wild berries resting on a structured, buttery sponge depends entirely on precision, and this methodical approach guarantees both textures succeed.

Baking a Blackberry Upside Down Cake is an exercise in managing moisture and heat to prevent a dense crumb. When wild berries release their juices during the 25-minute bake, the cake structure must remain firm enough to support them without becoming wet or sodden. Our methodical ratio of soft butter to plain flour creates a reliable emulsion that suspends the berries beautifully. This balanced pastry crumb guarantees that the final fruit layer caramelizes beautifully without compromising the structural skin of the underlying sponge.
The Case for This Method of Making Blackberry Upside Down Cake
Prep: 10 min · Serves: 16 · Difficulty: Medium
- Precise butter ratios prevent soggy pastry crumb.
- Caster sugar ensures a delicate, even rise.
- Rapid baking sets the delicate fruit layer.
- Simple steps yield consistent, stable crumb structure.
This approach guarantees a stable crumb structure every single time. Weigh it, time it, trust it. You will find that our approach minimizes moisture transfer, allowing the sponge to bake cleanly without collapsing. If you appreciate precise results, you may also enjoy comparing this with our classic peach upside down cake to see how different stone fruits behave under identical thermal conditions.
Get The Full Cake Recipe
Print
Blackberry Upside Down Cake
- Total Time: 80 mins
- Yield: 16 servings
Description
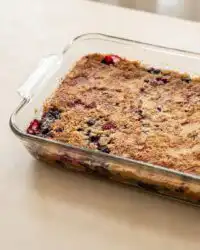
This Blackberry Upside Down Cake features a perfectly caramelized crown of tart wild berries atop a light, buttery sponge. By managing moisture and utilizing precise ingredient ratios, this method produces a stable crumb that is never soggy.
Ingredients
- 400 g wild blackberries
- 100 g plain flour
- 100 g unsalted butter
- 100 g caster sugar
- 2 large eggs
- 2 tablespoons full-fat milk
- 1 teaspoon vanilla extract
- 1 teaspoon baking powder
- 0.5 teaspoon bicarbonate of soda
- 2 tablespoons light brown sugar
- 1 tablespoon softened butter (for greasing)
Instructions
- Calibrate and prep. Set the oven to 180 degrees Celsius, grease a 24 cm baking dish with butter, and sprinkle the base evenly with light brown sugar.
- Dehydrate the fruit. Rinse the blackberries, pat them completely dry on kitchen paper for five minutes, and arrange in a single layer over the sugar.
- Mix the batter. Process the flour, baking powder, bicarbonate of soda, butter, sugar, eggs, milk, and vanilla for 45 seconds until smooth.
- Spread the batter. Gently spread the batter over the blackberries in an even layer, ensuring it reaches the edges to seal the fruit.
- Bake the cake. Bake on the center rack for 25 minutes until a skewer inserted in the center comes out clean.
- Cool the dish. Rest the dish on a wire rack for 10 minutes, then run a knife around the perimeter to loosen the edges.
- Invert the cake. Place a platter over the dish, invert quickly, and let sit for one minute before lifting the dish away.
- Final cooling. Cool the cake for at least 45 minutes before slicing with a warm, sharp knife.
Notes
- Ensure the blackberries are completely dry to prevent a soggy cake texture.
- Use a digital scale for accuracy, as volume measurements like cups are often inconsistent.
- Avoid over-mixing the batter in the processor to maintain a delicate, light crumb.
- Use a solid ceramic or cast-iron dish for better heat retention and even caramelization.
- Wait for the cooling stage to pass before slicing to allow the starches to set properly.
- Prep Time: 10 mins
- Cook Time: 25 mins
- Category: Dessert
- Method: Baking
- Cuisine: Modern British
The Working Components

Sourcing correct ingredients is critical when balancing the high moisture content of wild blackberries. We balance every component precisely by weight to secure an ideal emulsion during mixing. Each element performs a specific structural task during the baking cycle.
- Wild Blackberries: These berries supply tart acidity and rich color. We dry them thoroughly to prevent excess water from breaking the starch structure.
- Plain Flour: Providing the structural gluten network, plain flour holds the crumb together under the weight of the fruit.
- Unsalted Butter: Softened butter builds a stable emulsion with sugar, trapping air pocket networks that expand when heated.
- Caster Sugar: This fine sugar dissolves quickly, stabilizing the egg foam structure while caramelizing at the base.
- Fresh Eggs: Eggs yield structure and moisture, coagulating at 65 degrees Celsius to lock in the rising sponge.
- Baking Powder and Bicarbonate of Soda: These chemical leaveners provide direct lift, neutralizing berry acidity while keeping the crumb tender.
| Ingredient | Weight / Measure | Why It Matters |
|---|---|---|
| Wild Blackberries | 400 g | Delivers acidity and moisture that caramelizes under heat |
| Plain Flour | 100 g | Builds the gluten network supporting the fruit |
| Unsalted Butter | 100 g | Captures air and provides tender crumb structure |
| Caster Sugar | 100 g | Stabilizes the emulsion and sweetens the crumb |
| Eggs | 2 large | Coagulates during baking to secure crumb framework |
From Bench to Bake

Step 1: Calibrate the Oven and Prep the Pan
Set the oven to 180 degrees Celsius (350 degrees Fahrenheit, 160 degrees fan-assisted) and confirm the temperature with a standalone oven thermometer. Prepare an ovenproof baking dish measuring exactly 24 cm in diameter and 5 cm in height by greasing the bottom and sides with one tablespoon of softened butter. Sprinkle two tablespoons of light brown sugar evenly over the bottom to form the foundation for the caramel layer. This dry layer of sugar will draw out the natural juices of the fruit to create a rich glaze during baking.
Step 2: Dehydrate the Fruit Surface
Rinse 400 grams of fresh wild blackberries under cold water, taking care not to rupture their delicate outer skins. Transfer the washed berries immediately to a flat plate lined with three layers of thick kitchen paper to absorb all surface moisture. Excess surface water is the primary cause of a soggy bottom, as it prevents the starch in the batter from gelatinizing correctly. Let the berries dry completely for five minutes before arranging them in a single, tight layer over the brown sugar.
Step 3: Create the Batter Emulsion for Blackberry Upside Down Cake
Sift 100 grams of plain flour, one teaspoon of baking powder, and half a teaspoon of bicarbonate of soda into the bowl of a food processor. Add 100 grams of softened butter, 100 grams of caster sugar, two large eggs, two tablespoons of full-fat milk, and one teaspoon of vanilla extract. Process the mixture on medium speed for exactly 45 seconds until it achieves the classic ribbon stage batter consistency. This brief processing time forms a stable emulsion without overworking the gluten, keeping the cake delicate.
Step 4: Layer the Batter Evenly
Using a small offset palette knife, spread the batter smoothly over the arranged blackberries in a uniform, thin layer. Do not disturb the berries underneath, as keeping them in direct contact with the sugar is vital for caramelization. The batter must extend completely to the edges of the baking dish to seal the fruit beneath, creating an airtight steam chamber. This seal is crucial because it allows the berries to cook in their own syrup while the cake rises above them.
Step 5: Bake the Sponge to Set the Structure
Slide the baking dish onto the middle rack of the preheated oven and bake for exactly 25 minutes without opening the door. Thirty seconds decides everything when it comes to the transition between a tender crumb and an overbaked, dry sponge. Watch for the sponge to turn a deep golden brown, and test the center with a thin metal skewer. The skewer must emerge clean, indicating that the starch network has set and the interior temperature has reached 95 degrees Celsius.
Step 6: Cool and Release the Edges
Place the hot baking dish on a wire cooling rack and leave it undisturbed for exactly 10 minutes. During this brief cooling window, the sugar glaze begins to thicken slightly, yet remains fluid enough to release from the pan. Run a thin, sharp paring knife carefully around the perimeter of the dish to loosen the sponge from the sides. This prevents the cake from tearing when you perform the delicate inversion process.
Step 7: Invert and Reveal the Caramelized Top
Position a large, flat serving platter over the top of the warm baking dish, pressing it firmly against the rim. In one swift, confident motion, invert both the dish and the plate together, then set the platter down on the bench. Allow the dish to sit inverted for one full minute to let gravity pull the caramelized blackberries down onto the sponge. Gently lift the baking dish away to reveal the glossy, deep purple fruit layer resting securely on the golden cake.
Step 8: Cool Completely Before Slicing
Leave the cake to cool on the counter at room temperature for at least 45 minutes before attempting to slice it. Slicing too early, while the caramel is still hot, will cause the delicate wild blackberries to slide off the sponge. The cooling process allows the starches to lock together, guaranteeing clean, sharp slices that showcase the distinct structural layers. Cut the cake with a warm, sharp chef knife, wiping the blade clean between each individual slice.
Pastry Bench Tips

Weighing your ingredients on a digital scale is the single most important factor in pastry precision. Volume measurements like cups are highly inaccurate and can lead to a dry cake if too much flour is scooped. A precise weight of 100 grams of plain flour makes certain that the cake remains light while maintaining enough structural integrity to hold the fruit.
If your cake is dense or wet in the center, this is usually because the wild blackberries were not dried thoroughly before assembly. Excess water dilutes the sugar glaze and prevents the batter from baking through correctly, leaving a soggy middle. Always spend time drying the fruit on kitchen paper to prevent this starch gelatinization failure.
To achieve an ideally caramelized berry layer, choose a solid ceramic or cast-iron baking dish rather than a thin aluminum pan. Heavier materials distribute thermal energy more evenly, preventing the brown sugar from scorching before the cake is fully baked through. If you are seeking alternative baking techniques for seasonal fruits, studying our brown sugar peach upside down cake reveals how thermal retention affects different pan materials.
When working with the food processor method, avoid over-mixing the batter beyond the recommended 45 seconds. Excessive mixing develops too much gluten, which results in a tough, rubbery sponge rather than a tender crumb. Stop the processor as soon as the batter appears smooth and uniform.
Always check your oven calibration with an independent probe thermometer before sliding the cake inside. Ovens frequently run up to 15 degrees hot or cold, which can disrupt the delicate timing of the starch setting. A precise temperature of 180 degrees Celsius is essential to balance the rate of caramelization with the rise of the sponge.
If the caramelized fruit sticks to the pan during inversion, the pan was likely not greased thoroughly. To fix this, always apply an even layer of softened butter right into the corners of the dish before adding the sugar. If you prefer a completely different cooking mechanism that avoids oven-baking entirely, look into our no bake caramel peach upside down cake for a structured, gelatin-set alternative.
Frequently Asked Questions
How do you keep an upside-down cake from getting soggy?
To prevent sogginess, you must thoroughly dry the berries on kitchen paper before placing them in the pan. Additionally, making certain your oven is calibrated to 180 degrees Celsius helps the sponge bake rapidly enough to set its structure before the fruit releases too much juice. This balanced rate of baking keeps the caramelized layer on top of a firm, dry sponge.
Do I have to thaw frozen blackberries for a cake?
Yes, frozen blackberries must be thawed completely and drained thoroughly before baking. If used frozen, they will release excessive water during the bake, which lowers the oven temperature and leaves you with a wet, underbaked center. Let them thaw in a colander, then pat them dry with paper towels.
Why is my upside-down cake sticking to the pan?
Sticking occurs when the pan is not greased adequately, or if the cake cools for too long before inversion. If you wait longer than 10 minutes, the caramelized sugar cools and acts like glue, binding the sponge to the dish. Always invert the cake while it is still warm to let the fluid caramel release smoothly.
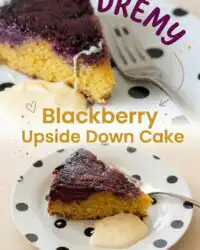
What goes well with blackberry upside-down cake?
A lightly sweetened creme fraiche or a pouring of cold double cream complements the warm, tart profile of the blackberries. The clean fat of dairy balances the sharp acidity of the wild fruit without overwhelming the delicate vanilla sponge. Avoid overly sweet toppings, as they can mask the caramelized brown sugar flavors.
Can I use this recipe with other berries?
This structural formula works well with raspberries or blueberries, provided you maintain the same 400-gram weight ratio. Keep in mind that softer berries like raspberries release their juices faster, which might require a slightly shorter cooling window of 8 minutes before inversion. Always select fresh, firm berries for the best structural results.
Can I bake this recipe in a springform pan?
We do not recommend using a springform pan for this upside-down recipe. The caramelized sugar and berry juices will leak through the seams of the pan, causing a mess in your oven and leaving the cake dry. A solid ceramic dish, glass pie plate, or cast-iron skillet is much more reliable.
How should I store leftover blackberry cake?
Store any remaining slices in an airtight container in the refrigerator for up to three days. Because of the fresh fruit layer, leaving the cake at room temperature can cause mold to develop quickly. Warm individual slices in a 150-degree oven for five minutes to restore the soft texture of the butter crumb.
Considered Adjustments
Substituting a portion of the plain flour with finely ground almond flour yields an exceptionally tender crumb. Swap 30 grams of the flour for ground almonds to introduce a subtle nutty flavor and a softer texture. This alteration increases the fat content slightly, so reduce the milk by one teaspoon to maintain the structural balance of the emulsion.
Incorporating fresh citrus zest into the sugar layer provides a bright contrast to the deep flavor of wild blackberries. Whisk one teaspoon of finely grated lemon zest into the light brown sugar before scattering it over the bottom of the dish. For an alternative profile that highlights citrus notes throughout the entire batter, read our guide on the blackberry lemon cake to see how acid balances sweet cake bases.
If wild blackberries are out of season, you can successfully employ cultivated blackberries, though you must cut them in half if they are exceptionally large. Large berries carry more water, which can create pockets of steam that disrupt the baking sponge. Splitting them in half and placing them cut-side down prevents excess pooling of juice during the bake.
Finishing & Plating
Serving this dessert at the correct temperature is essential to appreciate the interplay between the tart fruit and the rich sponge. Present the cake warm, approximately twenty minutes after inversion, when the caramel is still wonderfully fluid. At this stage, the sponge is exceptionally soft, providing the ideal vehicle for a pouring of cold, unsweetened heavy cream.
For a more formal presentation, plate individual slices with a neat quenelle of vanilla bean chantilly cream. The subtle specks of vanilla bean tie the cream back to the sponge, while the cold temperature contrast highlights the warmth of the caramelized blackberries. If you prefer a simpler pairing, a warm cup of Earl Grey tea provides a clean, tannic finish that cuts through the buttery richness of the crumb.
If you are hosting a late afternoon gathering, displaying this cake on a footed pedestal stand allows the beautiful purple crown to take center stage. To learn more about selecting the right accompaniments for fruit-focused bakes, consider reading our analysis on blackberry vanilla cake to discover how dairy fats stabilize fruit acids on the palate.

What the Technique Gives You
Mastering the ratios of this bake proves that structure is what makes the melt possible. When you control moisture, temperature, and mixing times with precision, a basic combination of flour, butter, and sugar becomes a beautiful canvas for wild berries. This method guarantees that your cake is never soggy, but always ideally balanced.
We invite you to practice this precise method in your own kitchen and share your technical success with us. Follow our kitchen updates and join our community of bakers on Pinterest and Facebook to discover more structural pastry discussions. You can also connect with us on TikTok or join our Telegram channel for real-time pastry calibration tips.
By focusing on the science behind the rise and the caramelization, you build confidence that carries over into every pastry project. Keep your scales balanced, your oven calibrated, and your ingredients weighed with care. Happy baking to you and your bench partners.
