Many home bakers watch their chocolate mousse frosting collapse into a soupy puddle, but a structured gelatin emulsion creates stable, perfectly defined piped rosettes.

Achieving a visually striking dessert requires a marriage of structural integrity and deep flavor. This Chocolate Rosette Cake relies on a high-hydration cocoa batter and a stabilized mousse frosting to deliver rich taste alongside sharp, clean decorative lines. By mastering the delicate balance between crumb tension and piping temperature, you can craft an elegant showpiece that tastes as exceptional as it looks. We will analyze the exact scientific techniques required to make this bakery-quality creation on your home bench.
The Case for This Method: Achieving the Perfect Chocolate Rosette Cake
Prep: 45 min · Serves: 14 · Difficulty: Advanced
- Stabilized mousse frosting ensures sharp piped details.
- Hot coffee gelatinises starches for intense moisture.
- A firm crumb resists tearing during assembly.
- Balanced cocoa percentages offer a refined bite.
- No artificial stabilizers are required for structure.
This technique guarantees a cake that holds its shape beautifully while melting luxuriously on the tongue, showing that a reliable chocolate layer cake relies entirely on mechanical precision.
Get The Full Cake Recipe
Print
Chocolate Rosette Cake
- Total Time: 1 hour 35 mins
- Yield: 14 servings
- Diet: Vegetarian
Description
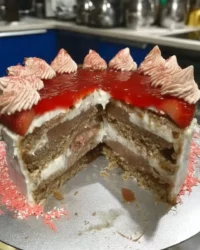
This sophisticated chocolate cake features a high-hydration cocoa sponge paired with a structurally stabilized chocolate mousse frosting. Perfect for advanced home bakers, this recipe uses gelatin to achieve crisp, professional-grade piped rosettes that maintain their form while delivering a velvety melt-in-the-mouth texture.
Ingredients
- 220g All-purpose flour
- 90g Unsweetened cocoa powder
- 12g Baking soda
- 5g Salt
- 400g Granulated sugar
- 2 Large eggs
- 110g Vegetable oil
- 240g Buttermilk
- 10g Vanilla extract
- 240ml Hot coffee
- 10g Gelatin powder
- 60g Cold water
- 460g Semisweet chocolate
- 300g Whipping cream (35% fat)
- 500g Heavy whipping cream (for mousse)
- 16g Cocoa powder (for mousse)
Instructions
- Prepare the pans. Preheat the oven to 350°F (180°C) and grease two 9-inch round cake pans, lining the bottoms with parchment paper and dusting the sides with flour.
- Sift dry ingredients. Sift the flour, cocoa powder, baking soda, and salt into a bowl, then whisk for 30 seconds to ensure even distribution.
- Whisk wet ingredients. In a separate bowl, combine granulated sugar, eggs, and vegetable oil until pale, then incorporate the buttermilk and vanilla extract.
- Combine the batter. Fold the wet mixture into the dry ingredients until just combined, being careful not to overwork the batter.
- Add hot coffee. Slowly whisk in the hot coffee until the batter is fluid, then divide equally between the prepared pans and bake for 30 to 35 minutes.
- Cool the cakes. Allow the cakes to rest in the pans for 15 minutes before inverting onto a wire rack to cool completely.
- Bloom the gelatin. Sprinkle gelatin over cold water and let stand for 10 minutes, then gently heat over simmering water until completely dissolved.
- Build the base. Melt the chocolate with 300g of cream, then whisk in the dissolved gelatin and 16g of cocoa powder until smooth.
- Whip and fold. Whip the remaining 500g of cream to stiff peaks and gently fold in the cooled chocolate ganache base before piping.
Notes
- Use a digital scale to weigh your ingredients, especially the gelatin, as precision is critical for the mousse set.
- Ensure the chocolate ganache base has cooled to room temperature before folding into the whipped cream to prevent melting the fat.
- Chill your mixing bowl and whisk attachments thoroughly to improve the air-trapping capacity of the heavy cream.
- If the frosting feels grainy, massage the piping bag with your hands to slightly warm the fats and restore a smooth texture.
- Prep Time: 45 mins
- Cook Time: 35 mins
- Category: Dessert
- Method: Baking
- Cuisine: Contemporary American
The Working Components

Success in high-end pastry begins with the rigorous selection and measurement of raw ingredients. Each component in this formula serves a distinct structural or chemical role, directly influencing the final hydration and stability of the crumb. We must analyze how these elements interact before we begin mixing on our bench.
- All-Purpose Flour (220g): Provides the gluten network necessary to support the high rise and moist crumb without collapsing.
- Unsweetened Cocoa Powder (90g): Adds deep, bittersweet complexity while acting as a dry structural agent that absorbs liquid.
- Baking Soda (12g): Reacts instantly with acidic buttermilk to release carbon dioxide, creating a light, airy texture.
- Vegetable Oil (110g): Coats gluten strands to ensure a remarkably tender crumb that remains soft even when chilled.
- Hot Coffee (240ml): Blooms the cocoa powder to release aromatic compounds while gelatinising the flour starches.
- Gelatin Powder (10g): Acts as the primary structural stabilizer, locking the whipped cream emulsion into clean, pipeable rosettes.
- Semisweet Chocolate (460g): Establishes a firm yet melting mouthfeel as the cocoa butter sets in the refrigerator.
- Whipping Cream (35% Fat): Provides the necessary fat globules to trap air, creating a luxurious and stable mousse texture.
| Ingredient | Why It Matters |
|---|---|
| Hot Coffee | Blooms cocoa and gelatinises starches for hydration |
| Gelatin Powder | Locks the whipped cream emulsion to prevent collapsing |
| Vegetable Oil | Prevents gluten overdevelopment for a tender texture |
| Buttermilk | Provides acidity to activate the baking soda rise |
| Cocoa Powder | Contributes deep flavor and structural dry weight |
From Bench to Bake

Step 1: Prepare the Pans and Preheat
Position your oven rack in the center and preheat the oven to 350°F (180°C). Grease two 9-inch (23 cm) round cake pans with unsalted butter, ensuring the bottom and corners are thoroughly coated. Line each base with parchment paper circles, then dust the sides with flour, tapping out any excess. This dual-barrier system prevents the delicate batter from sticking, allowing for clean release and precise structural margins.
Step 2: Sift and Whisk the Dry Components
Sift the 220g of all-purpose flour, 90g of unsweetened cocoa powder, 12g of baking soda, and 5g of salt into a large mixing bowl. Sifting is non-negotiable; it aerates the dry components and removes tight cocoa clumps that resist hydration. Whisk the mixture for 30 seconds using a balloon whisk to distribute the leavening agent evenly. This thorough distribution prevents localized over-expansion during the baking cycle.
Step 3: Emulsify the Wet Ingredients
In a separate medium bowl, combine the 400g of granulated sugar, two large eggs, and 110g of vegetable oil. Whisk vigorously for 45 seconds until the mixture is homogeneous and slightly pale in color. Whisk in the 240g of buttermilk and 10g of vanilla extract until completely incorporated. The buttermilk provides the crucial acidic environment needed to trigger the baking soda reaction.
Step 4: Combine and Hydrate the Batter
Make a well in the center of the dry ingredients and pour in the wet mixture. Using a flexible silicone spatula, fold the ingredients together using circular strokes, working from the center outward. Continue until the flour is barely incorporated and no dry pockets remain. Take care not to overwork the batter, as excess agitation develops gluten strands, which yields a tough, rubbery crumb.
Step 5: Bake the Chocolate Rosette Cake Layers
Pour the hot coffee slowly into the thick batter, whisking gently to combine. The batter will become highly fluid and runny, which is correct; the hot liquid blooms the cocoa and gelatinises the starches. Divide the liquid batter equally between the prepared baking pans. Bake for 30 to 35 minutes, testing the center with a wooden skewer. It must emerge dry or with a few moist crumbs attached, confirming the starches are fully set.
Step 6: Cool and Release the Cakes
Place the hot cake pans on wire cooling racks and allow them to rest for 15 minutes. This cooling period allows the delicate starch structure to firm up slightly. Gently run a thin offset palette knife around the inner perimeter of each pan to release the crust. Invert the pans to release the cakes onto the wire racks, peel away the parchment circles, and allow them to cool to room temperature.
Step 7: Swell and Dissolve the Gelatin
Sprinkle the 10g of gelatin powder evenly over the 60g of cold water in a small heatproof bowl. Let the mixture stand undisturbed for 10 minutes to bloom, allowing the water to fully hydrate the protein granules. Once swelled, place the bowl over a pan of barely simmering water, heating gently until the gelatin dissolves into a clear liquid. Do not boil, as excessive heat degrades the protein structure, weakening its setting power.
Step 8: Build the Chocolate Ganache Base
Combine the 460g of semisweet chocolate and 300g of whipping cream in a medium saucepan over low heat. Stir continuously with a rubber spatula, observing the chocolate melt and emulsify with the fat of the cream. Once the mixture is glossy and smooth, remove it from the heat source. Stir in the warm, dissolved gelatin and 16g of cocoa powder, mixing until completely smooth, then let the base cool to room temperature.
Step 9: Whip and Fold the Stabilized Mousse
Pour the chilled 500g of heavy whipping cream into a cold bowl and whip until stiff peaks form. Slowly pour the cooled chocolate ganache base into the whipped cream while folding gently with a silicone spatula. Use broad, sweeping motions to maintain the trapped air bubbles. Stop folding as soon as the color is uniform, then let the mousse sit for 10 minutes to stabilize before piping.
Pastry Bench Tips

Temperature control is critical when working with gelatin-stabilized frosting. If the chocolate base is too hot when added to the whipped cream, it will melt the fat globules and collapse the structure. Conversely, if it is too cold, the gelatin will set prematurely, creating rubbery flecks throughout your smooth mousse.
Always chill your metal mixing bowl and whisk attachment for 15 minutes before whipping the heavy cream. Cold equipment encourages fat crystallization, helping the cream trap air faster and hold its shape longer. This stability is vital when creating detailed chocolate cake decoration work.
If your chocolate mousse frosting begins to set and feel grainy in the piping bag, here is why and how to fix it. The frosting has sat too long, allowing the gelatin and cocoa butter to form a rigid crystalline network. Gently massage the piping bag with your warm hands for 30 seconds to soften the fats and restore a smooth, pipeable consistency.
To ensure clean cuts and flawless presentation, use a hot, dry chef’s knife when slicing the finished cake. Dip the knife blade in boiling water for 10 seconds, wipe it dry with a clean towel, and slice through the cake layers. Wipe the blade clean and reheat it between every single cut to prevent the chocolate mousse from smearing.
Frequently Asked Questions
How do you make rosettes on a cake?
Fit a piping bag with a closed star tip, such as a 1M or 2D nozzle. Hold the bag perpendicular to the cake surface, squeeze from the top to form a center star, then rotate the tip in a tight spiral around that center. Release pressure gently at the end of the rotation to create a clean finish.
What is the best piping tip for rosettes?
The open star tip like the 1M or the closed star tip like the 2D are the industry standards for piping rosettes. These tips feature deeply grooved ridges that produce realistic petal-like details on the chocolate frosting. Ensure your piping bag is twisted tightly at the top to maintain even pressure throughout the piping process.
Why are my buttercream rosettes melting?
Warm hands transferring body heat through the plastic piping bag are the usual cause of melting rosettes. If the butter or cream fat starts to separate, place the filled piping bag in the refrigerator for 5 to 7 minutes. Working quickly in a cool kitchen environment also prevents the fat crystals from breaking down.
What frosting works best for a chocolate rosette cake?
A stabilized frosting, such as a gelatin-infused chocolate mousse, a Swiss meringue buttercream, or a high-fat cream cheese frosting works best. Standard whipped cream lacks the structural integrity required to support its own weight in a stacked rosette format. The addition of gelatin or real butter ensures the piped lines stay sharp.
Can you make an ombre design with rosettes?
Yes, you can divide your stabilized frosting into three separate bowls and add varying amounts of cocoa powder or dark chocolate to each. This technique creates a beautiful gradient from deep dark chocolate at the base to a light cocoa cream at the top. Fill separate piping bags for each shade to keep the transitions clean.
How long does this cake keep in the refrigerator?
This cake will keep covered in the refrigerator for up to 4 days. The gelatin in the mousse frosting prevents it from weeping or drying out, while the oil-based cake layers remain wonderfully tender. Let individual slices sit at room temperature for 15 minutes before serving to soften the cocoa butter.
Considered Adjustments
For a lighter decorative finish, you can swap the rich mousse frosting for a cocoa-infused Swiss meringue buttercream. The whipped egg white base offers a silken texture that pipes beautiful easy chocolate cake rosettes. It remains stable at warm room temperatures due to the cooked sugar syrup matrix.
You can alter the flavor profile by infusing the hot coffee with dried lavender buds or orange peel before blooming the cocoa. Strain out the botanicals before adding the liquid to the dry ingredients. This subtle change adds an aromatic dimension that pairs wonderfully with the bitter notes of dark chocolate.
To introduce a textural contrast, sprinkle a thin layer of toasted, finely chopped hazelnuts onto the crumb-coated cake before piping the rosettes. This hazelnut layer provides a pleasant crunch that breaks up the soft, velvety mouthfeel of the chocolate cake layers and the whipped mousse decoration.
Serving the Structure
This rich dessert is best presented on a footed ceramic cake stand to emphasize its architectural, piped exterior. Serve the cake slightly chilled, around 50°F (10°C), so the mousse rosettes maintain their clean edges during slicing. Pair each slice with a bitter espresso or a clean, hot cup of black tea to cut through the intense chocolate fats.
To plate this dessert elegantly, place a single slice in the center of a minimalist white plate. The contrast between the dark chocolate rosettes and the light plate highlights the intricate piping patterns of your rose cake masterpiece. Avoid pouring heavy sauces over the rosettes, as they will obscure the sharp design lines.
For festive occasions, garnish the base of the cake stand with fresh, unsweetened raspberries or blackberries. The bright acidity of the berries offers a refreshing contrast to the bittersweet chocolate mousse. Keep the fruit dry and separate from the cake until serving to preserve the structural skin of the frosting.

What the Technique Gives You
Baking is a science where precision always dictates the final texture. By measuring your ingredients by weight and managing the setting point of the gelatin, you can create a professional-grade dessert. This elegant chocolate creation proves that structured technique is what makes a luxurious melt possible on the palate.
We encourage you to master this chocolate cake recipe and share your stunning piping results on social media. Tag us and show off your beautiful kitchen creations with our pastry community.
Find more inspiration and troubleshooting tips on our social channels:


