An emulsion is the silent foundation of a stable crumb, specifically the microscopic suspension of fats within the aqueous sugar and egg mixture to ensure a uniform bake.

This Two-Layer Marble Cake relies on a structural balance between the dense richness of 70% dark chocolate and the light, tender crumb of a sour cream vanilla batter. The method requires a patient approach to assembly, allowing starches in the pastry cream to fully set during a mandatory six-hour chilling period. By respecting the physics of the marble swirl and the temperature of the fillings, you create a dessert that maintains its clean lines through every slice. Precision here is not merely about aesthetics; it is what ensures the weight of the ganache does not compromise the soft interior layers.
What Makes the Texture Right
Prep: 60 min · Serves: 12 · Difficulty: Advanced
- Technical balance between chocolate and vanilla batters
- Stable pastry cream provides structural interior support
- Sour cream provides a dense and moist crumb
- Deep chocolate ganache creates a crisp exterior finish
- Precisely timed chilling ensures clean and professional slices
Structure is what makes the melt possible.
Get The Full Cake Recipe
Print
Two-Layer Marble Cake
- Total Time: 7 hours 45 mins
- Yield: 12 servings
Description
This professional-grade marble cake combines a tender vanilla sour cream crumb with deep dark chocolate ribbons. It is meticulously layered with a silky vanilla pastry cream and finished with a crisp, decadent chocolate ganache shell.
Ingredients
- 2 cups all-purpose flour
- 1 cup granulated sugar
- 1/2 cup salted butter, softened
- 1/2 cup sour cream
- 2 large eggs
- 2 tbsp natural cocoa powder
- 1 tbsp brewed espresso
- 1 tsp baking soda
- 1/2 tsp baking powder
- 1/2 tsp salt
- 1 tsp vanilla bean paste
- 1/2 cup heavy cream
- 1/2 cup milk
- 3 tbsp corn starch
- 4 oz 70% dark chocolate
Instructions
- Prepare the oven. Preheat the oven to 350 F and position the rack in the center to ensure even heat distribution for the cake layers.
- Mix dry ingredients. Whisk together the flour, salt, sugar, baking soda, and baking powder in a large bowl to ensure even leavening distribution.
- Emulsify the batter. Combine the eggs, softened butter, vanilla, and sour cream with the dry mix, beating on high speed for two minutes until light and airy.
- Marble the cake. Stir cocoa powder and espresso into 300g of batter, then dollop vanilla and chocolate mixtures into a 9-inch square pan and bake for 22 minutes.
- Create pastry cream. Whisk corn starch, salt, sugar, milk, and cream in a pot over medium heat until thickened, then sieve and cover with plastic wrap.
- Prepare chocolate filling. Heat milk and starch base, pour over chopped 70% chocolate, and whisk into a glossy emulsion after a sixty-second rest.
- Assemble the layers. Split the cooled cake into two layers, spread with chocolate cream and whipped pastry cream, and sandwich together.
- Finish with ganache. Pour warm heavy cream over chopped chocolate, whisk until smooth, and coat the top of the chilled cake before setting in the refrigerator.
Notes
- Use room temperature eggs and sour cream to ensure a stable batter emulsion.
- Measure all ingredients by weight for the precise starch-to-liquid ratio needed for the pastry cream.
- Use a digital probe thermometer to ensure the pastry cream reaches 180 degrees Fahrenheit for proper thickening.
- Dip your knife in hot water and wipe clean between each slice for sharp, professional edges.
- Always use high-quality bar chocolate instead of chips to ensure the ganache melts into a smooth, stable coating.
- Prep Time: 60 mins
- Cook Time: 45 mins
- Category: Dessert
- Method: Baking
- Cuisine: Modern Pastry
The Working Components

Successful pastry begins with an understanding of how each gram of fat and protein interacts under heat. This recipe utilizes high-fat dairy and specific cocoa percentages to achieve a mouthfeel that is both substantial and delicate.
- 70% Dark Chocolate: Provides the necessary cocoa solids to ensure the ganache sets firmly without becoming brittle at room temperature.
- Sour Cream: The acidity weakens gluten strands while the fat content contributes to a tight, velvety crumb structure.
- Vanilla Bean Paste: Distributes microscopic seeds throughout the pastry cream for a deep aromatic profile that balances the chocolate.
- Natural Cocoa Powder: Reacts with the baking soda to provide lift and a balanced pH in the chocolate portion of the batter.
- Egg Yolks: Act as the primary emulsifier in the pastry cream, providing the lecithin needed for a smooth, stable consistency.
- Espresso: Hydrates the cocoa powder particles while intensifying the natural bitterness of the dark chocolate.
| Ingredient | Why It Matters |
|---|---|
| All Purpose Flour | Provides the gluten framework required to support two layers of heavy cream fillings. |
| Corn Starch | Acts as the thickening agent for the pastry cream through the process of gelatinisation. |
| Salted Butter | Adds both moisture and a subtle salt note that enhances the sugar profile. |
| Baking Soda | Triggers the chemical leavening needed to keep the marbled layers from becoming overly dense. |
The Tested Procedure

Step 1: Initialize the Bench and Dry Components
Preheat the oven to 350 F and position the rack in the center to ensure even heat distribution. In a clean mixing bowl, whisk the flour, salt, sugar, baking soda, and baking powder together until no clumps remain. This step ensures that the leavening agents are distributed evenly throughout the flour to prevent localized bubbling during the bake.
Step 2: Establish the Batter Emulsion
Add the eggs, softened butter, vanilla extract, and sour cream directly into the dry mixture. Use a mixer on high speed for exactly two minutes until the batter appears light and aerated. This duration is critical for developing the structural skin of the cake while incorporating enough air to keep the crumb tender. Scrape the bottom of the bowl twice to ensure every gram of fat is incorporated into the emulsion.
Step 3: Marbling the Two-Layer Marble Cake
Separate 300 grams of the base batter into a secondary bowl and stir in the cocoa powder and brewed espresso. In a parchment-lined 9-inch square pan, dollop the vanilla and chocolate batters in a checkerboard pattern. Use an offset palette knife to smooth the surface without over-mixing the colors, as the goal is distinct marbling rather than a blended grey. Bake for 12 minutes, rotate the pan 180 degrees, and finish for another 10 minutes until the center is set.
Step 4: Gelatinisation of the Vanilla Pastry Cream
Whisk the corn starch, salt, and sugar in a heavy-bottomed pot before adding the milk and heavy cream. Over medium-low heat, whisk the mixture constantly to prevent the starch from settling and scorching on the bottom. Once the mixture reaches a thick, pudding-like consistency, remove it from the heat and pass it through a fine-mesh sieve. Cover the surface immediately with plastic wrap to prevent the formation of a protein skin.
Step 5: Melting the Chocolate Cream Filling
Place the chopped 70% chocolate in a heat-safe bowl while you prepare the milk and starch base in a separate pot. Cook the sugar, starch, milk, and cream over medium heat until bubbles appear, then cook for one additional minute to fully hydrate the starch. Pour this hot liquid over the chocolate and let it rest for sixty seconds before whisking into a glossy, dark emulsion. This resting period allows the chocolate fats to melt gently without seizing from direct high heat.
Step 6: Structural Assembly and Layering
Once the cake is fully cooled, use a serrated knife to split it into two thin 9-inch square layers. Place the bottom layer back into the parchment-lined pan and spread the chocolate cream evenly across the surface. Whip the chilled vanilla pastry cream until smooth, then spread half of it over the chocolate layer with an offset palette knife. Place the second cake layer on top and finish with the remaining pastry cream before refrigerating.
Step 7: Final Ganache Application
Heat the heavy cream until steaming and pour it over the remaining chopped chocolate to create the final ganache. After two minutes of resting, whisk the ganache until it is smooth and allow it to cool for ten minutes to achieve the proper viscosity. Pour the ganache over the chilled cake surface and return it to the fridge for at least 30 minutes. This final set ensures that the ganache holds its shape when the spoon breaks the crust.
Technique Refinements

Temperature is the most critical variable when working with cream-based fillings and butter-based batters. Ensure your eggs and sour cream are at room temperature to avoid breaking the batter emulsion, which would result in a greasy or dense cake. If the batter appears curdled, the fat has likely separated due to temperature shock; continuing to beat on high speed can often reintegrate the mixture.
Weigh every ingredient using a digital scale to ensure the ratio of starch to liquid is exact in your pastry cream. Volume measurements are often inconsistent, and even five grams of extra starch can turn a creamy filling into a rubbery one. For a deeper understanding of cake heights, you might review the two layer smash cake birthday techniques which focus on smaller structural builds.
A probe thermometer is your best tool for determining when the pastry cream is safe to remove from the heat. Aim for 180 degrees Fahrenheit, which is the point at which corn starch molecules fully burst and thicken the liquid. If the cream does not thicken, it is likely because the temperature did not reach this critical threshold.
Clean cuts are only possible when the cake is sufficiently cold and the knife is warm. Dip a sharp chef’s knife into hot water and wipe it clean between every single slice to prevent the chocolate cream from smearing into the vanilla layers. This attention to detail preserves the visual integrity of the Two-Layer Marble Cake design.
Always use high-quality bar chocolate rather than chips for the fillings and ganache. Chocolate chips contain stabilizers designed to help them hold their shape under heat, which prevents them from melting into a smooth emulsion. According to the USDA guidelines on food storage, dairy-heavy cakes must be kept refrigerated and should not sit out for more than two hours.
Frequently Asked Questions
Can I use low-fat sour cream for the cake batter?
It is not recommended because the fat content in full-fat sour cream is essential for the tender crumb structure. Lower fat versions contain more water, which can lead to excess gluten development and a tougher cake texture.
Why did my pastry cream turn out runny after chilling?
This usually happens if the corn starch was not cooked long enough to reach its full thickening temperature. The mixture must reach a gentle boil for about sixty seconds to ensure the starch molecules have fully hydrated and set.
How long will this cake stay fresh in the refrigerator?
When kept in an airtight container, the cake will maintain its texture for up to four days. However, the ganache may lose some of its shine over time due to the moisture in the fridge environment.
Can I substitute the espresso with water?
You can use hot water, but the espresso is specifically included to bloom the cocoa powder and enhance the chocolate flavor. The coffee does not make the cake taste like coffee; it simply provides a more complex cocoa profile.
Why did the layers of my cake slide apart when slicing?
This is a sign that the cake was not chilled for the full six hours required for the pastry cream to set. The starches need that window of time to form a solid bond between the cake layers.
Is it possible to freeze the assembled cake?
Freezing is not advised because the texture of the pastry cream can become grainy upon thawing. The emulsion in the chocolate cream may also break, leading to a watery consistency that ruins the crumb.
Considered Adjustments
For those who prefer a more pronounced bitterness, replace the espresso in the chocolate batter with a double-strength ristretto. This change deepens the cocoa profile without increasing the liquid volume, ensuring the cake’s structural integrity remains unchanged. You can see similar flavor balancing in the classic two layer yellow cake chocolate frosting recipe which pairs simple sponge with rich toppings.
A subtle textural shift can be achieved by adding finely ground toasted hazelnuts to the chocolate batter. Limit the addition to thirty grams to ensure the flour-to-fat ratio is not compromised. The nuts provide a slight crunch that contrasts the soft pastry cream layers while complementing the 70% dark chocolate.
If you prefer a lighter finish, the ganache can be whipped into a mousse-like consistency after it has cooled. This creates a softer exterior that yields easily to a fork, though it lacks the crisp shell of a poured ganache. For alternative icing methods, the two layer watercolor buttercream cake provides excellent guidance on decorative finishes.
Serving the Structure
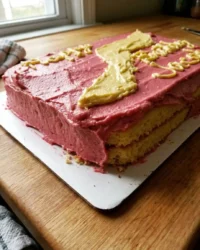
To serve this Two-Layer Marble Cake, use the parchment paper sling to lift the entire block out of the pan and place it on a steady cutting board. Trim half an inch from each edge to reveal the internal marbling and the sharp, clean lines of the cream layers. This provides a professional appearance that highlights the technical precision of the build.
Serve each square chilled or at a cool room temperature to ensure the ganache remains firm. A side of unsweetened whipped cream or a few fresh raspberries can provide a tart counterpoint to the rich chocolate filling. For a different take on cream-filled bakes, consider the two layer boston cream cake which offers a similar textural profile.
Plating should be simple to allow the internal structure of the cake to remain the focus. A white porcelain plate provides the best contrast for the dark chocolate ganache and the yellow vanilla pastry cream. Avoid heavy sauces that might soak into the sponge and compromise the carefully developed crumb.

What the Technique Gives You
Mastering the Two-Layer Marble Cake is an exercise in patience and precision that pays dividends in mouthfeel. By following the measured steps of batter emulsification and starch gelatinisation, you create a dessert that is as structurally sound as it is indulgent. The contrast between the crisp ganache shell and the soft, creamy interior is a hallmark of professional pastry work.
I encourage you to trust the weights and the chilling times specified in this method. These variables are what decide the success of the final presentation and the integrity of each slice. For more technical baking inspiration, please visit our two layer yellow cake guide or join our community on Pinterest, Facebook, and TikTok.


