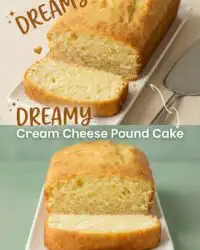
Prepare for a dense, velvety slice that delivers a fast and luscious crumb in only twenty minutes of hands-on effort.

When the craving for a rich dessert strikes, this Cream Cheese Pound Cake is the ideal answer to your prayers. It delivers a melt-in-your-mouth texture that makes twenty-minute desserts that taste like an hour’s work a reality. By combining rich butter with tangy cream cheese, you get a velvety crumb that stays moist for days without complex steps. This is the kind of baking that fits beautifully between dinner and bedtime, leaving you with a warm kitchen and a satisfying treat.
Many home bakers assume that a traditional pound cake requires hours of meticulous temperature monitoring and delicate folding. This recipe proves that you can bypass the stress while still achieving a magnificent, golden-brown crust and a tender interior. By understanding how these basic ingredients interact, you can confidently create a bakery-quality dessert on any weeknight. Let’s look at how this straightforward process delivers maximum flavor with minimal effort.
Why Fast Doesn’t Mean Dry: The Cream Cheese Pound Cake Advantage
Prep: 20 min · Serves: 14 · Difficulty: Easy
- Rich tangy block creates velvety moisture.
- Simple pantry staples require zero shopping trips.
- Heavy mixing bowl cleans up in minutes.
- Thick gold slices feed a whole crowd.
- Golden buttery crust yields a satisfying crunch.
Express doesn’t mean dry when this dense crumb delivers pure satisfaction.
Baking should never feel like a chore, especially when you want a rich slice of cake late in the evening. This recipe strips away the fussiness of traditional baking while preserving the deep, buttery flavor you expect. If you enjoy this texture, you might also love our vanilla pound cake recipe for your next baking session. The addition of cream cheese acts as an insurance policy, keeping the crumb soft and dense even if you leave it in the oven a few minutes too long.
Traditional pound cakes can sometimes turn out dry or crumbly if the oven temperature fluctuates even slightly. The cream cheese in this recipe introduces extra fat and acidity, which coats the flour proteins and prevents tough gluten from forming. This means your cake remains extremely tender, slicing cleanly without falling apart into dry crumbs. It is a reliable method that gives you consistent results every time you bake.
Another reason to love this recipe is the straightforward cleanup process. You do not need multiple bowls, double boilers, or specialized pastry tools to achieve this luxurious texture. A single stand mixer or hand mixer does all the heavy lifting, allowing you to clean your kitchen while the cake bakes. It is the ideal dessert for busy families who want a homemade treat without a mountain of dishes.
Get The Full Cake Recipe
Print
Cream Cheese Pound Cake
- Total Time: 1 hr 40 mins
- Yield: 1 (10-inch) cake
Description
A velvety, rich Cream Cheese Pound Cake that delivers a dense, moist crumb in only twenty minutes of hands-on prep time. Beautifully golden on the outside and soft on the inside, it is the ideal weeknight dessert.
Ingredients
- 1 ½ cups butter, softened
- 1 (8 ounce) package cream cheese, softened
- 3 cups white sugar
- 6 large eggs, room temperature
- 3 cups all-purpose flour
- 1 teaspoon vanilla extract
Instructions
- Prep Oven and Pan: Preheat your oven to 325 degrees F (165 degrees C). Grease and flour a 10-inch tube pan carefully to prevent sticking.
- Cream Fats: Cream the softened butter and cream cheese together in a large mixing bowl until completely smooth and pale yellow.
- Add Sugar: Gradually add the white sugar and beat the mixture on medium speed until fluffy and light.
- Incorporate Eggs: Add the eggs two at a time, beating thoroughly after each addition to maintain a stable emulsion.
- Mix Flour and Vanilla: Add the flour all at once and mix on low speed until barely combined, then stir in the vanilla extract.
- Bake: Pour the thick batter into the prepared pan and bake for 1 hour and 20 minutes, checking for doneness with a toothpick at the 1-hour mark.
- Cool and Serve: Remove from the oven and let cool in the pan on a wire rack for 10-15 minutes before releasing and slicing.
Notes
- Room Temperature: Make sure all ingredients, especially the cream cheese and butter, are at room temperature to prevent curdling.
- Do Not Overmix: Stop mixing immediately after adding the flour to avoid developing excess gluten, which makes the cake dense and rubbery.
- Pan Prep: Use solid shortening and flour to grease the pan instead of oil spray to guarantee a clean release.
- Storage: Wrap the cooled cake tightly in plastic wrap to keep it moist for up to five days at room temperature.
- Prep Time: 20 mins
- Cook Time: 1 hr 20 mins
- Category: Cake
- Method: Baking
- Cuisine: American
Quick-Bake Lineup

This recipe relies on basic ingredients that you likely have sitting in your refrigerator and pantry right now. Bringing these elements together quickly is the secret to achieving a luxurious texture without spending hours preparing your workstation. Let’s look at what makes this simple combination work so beautifully.
- Cream Cheese: This ingredient is the secret to a tender crumb, adding moisture and a subtle tang that balances the sweetness. It replaces some of the traditional butter, providing a unique density that keeps the cake fresh for days.
- Unsalted Butter: Provides the classic rich flavor and creates the structure when creamed with the sugar. Using high-quality butter makes a noticeable difference in the final taste, giving the cake its signature melt-in-your-mouth quality.
- Granulated Sugar: Sweetens the cake while helping to whip air into the fat for a light yet dense texture. It also helps to retain moisture during the long baking process, preventing the outer crust from becoming too hard.
- Large Eggs: Bind the batter together and provide the necessary lift without relying on baking powder. They should be added slowly to maintain a stable emulsion, which is crucial for a uniform crumb.
- All-Purpose Flour: Gives the cake its signature dense, tight crumb that holds up beautifully to slicing. It provides the structural backbone that supports the heavy fats and sugar without collapsing.
- Vanilla Extract: Adds a warm, aromatic depth that rounds out the buttery notes of the batter. A splash of pure vanilla transforms the simple flavor profile into something truly comforting and nostalgic.
| Ingredient | Why It Matters |
|---|---|
| Butter | Creates the rich, traditional base and foundational flavor. |
| Cream Cheese | Adds fat and acidity for an incredibly soft crumb structure. |
| Sugar | Aerates the fat during creaming and keeps the cake moist. |
| Eggs | Provide structure, moisture, and natural leavening to the batter. |
| Flour | Establishes the tight, velvety crumb of a classic pound cake. |
The chemistry of these ingredients is what makes this cake so forgiving and delicious. When butter and cream cheese are beaten together, they trap microscopic air bubbles that expand as the oven heats up. This natural leavening is why we do not need baking powder or baking soda to achieve a beautiful rise. Each ingredient plays a specific role in creating the ideal balance of flavor and structure.
From Bowl to Spoon

Step 1: Prep the Oven and Pan
Preheat your oven to 325 degrees F (165 degrees C) so the heat is steady and even. Generously grease and flour a 10-inch tube pan, making sure to coat every crevice of the inner tube. This prevents the delicate golden crust from sticking when you release the cake later. You can use a pastry brush to distribute the softened butter evenly before dusting with a thin layer of flour. This ensures that the cake rises evenly and releases easily without tearing.
Step 2: Cream the Butter and Cream Cheese
Beat the fats together in a large mixing bowl until they form a completely smooth, pale yellow paste. This process should take about two to three minutes on medium speed. You want to see no lumps of cheese remaining, guaranteeing a uniform texture throughout the batter. Scrape down the sides of the bowl with a rubber spatula to make sure every bit is incorporated. The fats should look light and billowy before you introduce any sugar to the bowl.
Step 3: Gradually Add the Sugar
Pour the sugar slowly into the creamed mixture while keeping the mixer running. Beat this combination until it looks fluffy, light, and slightly increased in volume. This step introduces vital air pockets that help the heavy batter rise in the oven. The mixture should transition from a dense paste to a soft, whipped consistency that clings to the beaters. This is the foundation of your cake’s crumb, so do not rush this part of the process.
Step 4: Add the Eggs Two at a Time
Crack the eggs and add them to the bowl in pairs, beating thoroughly after each addition. This gradual process prevents the batter from separating or curdling under the weight of the liquid. The mixture should look smooth, glossy, and slightly thick before you move on. If the batter begins to look slightly broken, add a tablespoon of your measured flour to bind it back together. The mixture should look like a rich custard, holding a slight shape when you turn off the beaters.
Step 5: Mix in the Flour for the Cream Cheese Pound Cake
Dump the flour into the wet mixture all at once and mix on low speed until barely combined. Be careful not to overmix at this stage, as too much agitation will develop gluten and make the cake tough. Stop mixing the moment you can no longer see any dry white patches of flour. The batter should be extremely thick, holding its shape when you lift the beaters. This step is crucial because over-mixing will ruin the soft, melting texture we want.
Step 6: Stir in the Vanilla Extract
Add the vanilla extract and give the batter one final, gentle fold with a rubber spatula. The batter will be thick, rich, and ribbon-like as it falls from the spatula. Pour this luxurious mixture into your prepared tube pan, smoothing the top with the back of a spoon. Gently tap the pan on the counter a few times to release any large trapped air bubbles. The batter should look glossy and smooth, with a beautiful ivory color throughout.
Step 7: Bake and Test for Doneness
Slide the pan onto the middle rack of your preheated oven and bake for 1 hour and 20 minutes. Around the one-hour mark, check the cake; the top should be deeply golden and split. Insert a wooden toothpick into the thickest part of the cake, and make sure it comes out clean or with a few moist crumbs. The aroma of sweet butter and vanilla should fill your entire kitchen as it bakes. If the top is browning too quickly, you can tent it loosely with aluminum foil for the last twenty minutes.
Step 8: Cool Before Serving
Place the pan on a wire rack and let it cool for about ten to fifteen minutes. Run a thin knife gently around the edges of the pan and the center tube to loosen the crust. Invert the cake onto a serving plate, revealing the beautiful, golden-brown exterior. Let it cool completely before slicing to make sure the interior crumb sets beautifully. This patience rewards you with clean, beautiful slices that hold their shape perfectly.
Keep It Luscious

Always make sure your butter, cream cheese, and eggs are at room temperature before you begin mixing. Cold ingredients will not emulsify properly, which can lead to a dense, flat bake instead of a velvety rise. If you are short on time, you can warm cold eggs by placing them in a bowl of warm water for ten minutes while you prep the other ingredients.
If your cake develops a wet, gummy layer at the bottom, here is why and how to fix it. This common issue happens when the cream cheese and butter are not fully creamed together, or if the eggs were added too quickly without proper emulation. Next time, scrape down the sides of your bowl frequently and beat the fats until they are completely smooth before adding any sugar. This guarantees a uniform distribution of fat throughout the batter.
Sift your flour before measuring to prevent packing too much flour into your measuring cup. Excess flour will dry out the batter, robbing the cake of its signature moist, melt-in-your-mouth texture. If you do not have a sifter, use a spoon to fluff the flour in its container, scoop it gently into the cup, and level it off with a flat knife.
For more quick techniques and sweet inspiration, browse our extensive recipe index to plan your next baking adventure. Having a reliable collection of reliable desserts makes weeknight entertaining completely stress-free. You can find dozens of simple recipes that deliver luscious texture without requiring hours of tedious preparation.
Avoid opening the oven door during the first forty-five minutes of baking. A sudden draft can cause the heavy batter to collapse in the center before the structure has fully set. If you need to check on the progress of the cake, use the oven light instead of opening the door. Only open the door when you are ready to test for doneness near the end of the baking time.
Use a solid fat like shortening or softened butter to grease your tube pan rather than liquid oil. Liquid oil can run down the sides of the pan and pool at the bottom, causing the batter to stick or fry in spots. After greasing, dust the pan with flour and tap out the excess over the sink to guarantee a clean release every single time.
For more scientific insights on pound cake structures, you can read about the classic cream cheese pound cake science to understand how these ingredients interact.
Frequently Asked Questions
What does cream cheese do to a pound cake?
Cream cheese adds wonderful moisture, fat, and a slight acidity to the batter. This breaks down the gluten structure, resulting in a tighter, more velvety crumb that stays soft for days. It also introduces a subtle tang that balances the sweetness of the sugar.
Can you use all-purpose flour instead of cake flour?
Yes, this recipe is designed specifically for all-purpose flour, which provides the sturdy structure needed to support the heavy cream cheese. Cake flour would make the cake too delicate and prone to sinking. All-purpose flour makes sure the cake holds its classic dense shape when sliced.
What is the difference between regular pound cake and cream cheese pound cake?
Regular pound cake relies solely on butter for fat and moisture, resulting in a slightly lighter, crumblier texture. The cream cheese version is denser, richer, and has a subtle tang that balances the sweetness. It also stays moist much longer than a traditional butter-only cake.
Why is my cream cheese pound cake dense or heavy?
If your cake feels overly heavy or gummy, the ingredients may have been too cold, or the batter was overmixed after adding the flour. Overmixing develops too much gluten, which traps moisture and creates a rubbery texture. Make sure you mix only until the flour is incorporated to keep the crumb tender.
Why did my cream cheese pound cake fall or collapse in the middle?
This usually happens if the oven door was opened too early in the baking process, or if the cake was underbaked. It can also occur if too much air was whipped into the eggs, causing the cake to rise too quickly and then deflate. Keep the oven door closed and trust the baking timer for best results.
How do I know when my pound cake is done?
The cake is done when the top is deeply golden, split down the center, and firm to the touch. A toothpick inserted into the deepest part should come out clean or with a few dry crumbs. If you see wet batter on the toothpick, let it bake for another five to ten minutes.
Do the ingredients need to be room temperature?
Yes, having room-temperature ingredients is critical for this recipe. Warm fats blend smoothly together, allowing air to be trapped during the creaming process, which is the cake’s primary source of rise. Cold ingredients will cause the batter to curdle and bake unevenly.
How long does a cream cheese pound cake last?
Wrapped tightly in plastic wrap, this cake will stay extremely moist at room temperature for up to five days. You can also freeze individual slices for up to three months for a quick, sweet treat whenever the craving strikes. This makes it an excellent make-ahead dessert for busy weeks.
Quick Variations
Add the zest of two fresh lemons to the sugar before creaming it with the butter. This infuses the entire cake with a bright, citrusy aroma that cuts through the rich fat of the cream cheese beautifully. If you love quick citrus treats, you can also try our single-serving lemon mug cake for a fast weeknight fix. The bright lemon flavor pairs wonderfully with the sweet, buttery base of the cake.
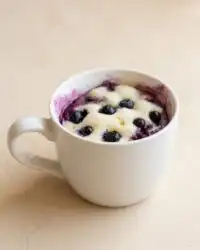
Fold a cup of fresh blueberries and half a teaspoon of almond extract into the batter right before baking. The berries burst during baking, creating pockets of sweet, tart juice that pair wonderfully with the dense crumb. This variation feels extremely elegant while remaining straightforward to execute. You can also use raspberries or blackberries depending on what you have on hand.
Swirl a mixture of cinnamon, brown sugar, and a tablespoon of cocoa powder through the batter once it is in the pan. Use a butter knife to create a marble pattern before baking to add a warm, cozy flavor profile to the cake. This is an excellent option for autumn gatherings or holiday dessert tables. It adds a beautiful visual contrast to each slice when cut.
Spoon It While It’s Warm
Serving this cake warm is a revelation, especially when the golden crust is still slightly crisp. A dusting of powdered sugar is all it takes to make this cake look beautiful on any table. For a fast weeknight indulgence, serve a thick slice alongside a warm cup of coffee or tea while the kettle boils. It is the ideal way to wind down after a busy day without creating a mess in the kitchen.
If you want to dress it up for guests, top each slice with a generous spoonful of warm berry compote or macerated strawberries. The sweet juices soak into the dense crumb, creating a luxurious contrast of textures. If you love berry-infused desserts but want something even faster, check out our easy blueberry mug cake for a quick single-serving option. This addition makes the dessert feel like a fancy restaurant creation with almost zero extra effort.
You can also lightly toast leftover slices in a skillet with a tiny pat of butter. This caramelizes the sugars on the surface, reviving the cake and making it taste as though it was pulled fresh from the oven. Pair it with a scoop of vanilla bean ice cream for a truly decadent dessert experience. The warm cake melts the ice cream slightly, creating a rich sauce that is hard to resist.

A Quick Last Note
Baking a cake from scratch does not have to be a stressful, all-day affair. With this simple method, you can enjoy a rich, velvety dessert that satisfies your sweet tooth with minimal cleanup. If you love the combination of rich cake and cream cheese, be sure to try our carrot cake cupcakes cream cheese frosting for another crowd-pleasing treat. Having a few reliable recipes in your back pocket makes weeknight baking a joy rather than a chore.
We hope you love this recipe as much as we do, making the fast cleanup at the end of an indulgent night a welcome reality. Let us know how your cake turned out by leaving a comment below or sharing your baking triumphs with us. We love seeing how our readers make these recipes their own with different pans or toppings. Your feedback helps us continue to share practical, delicious treats for busy kitchens.
Be sure to follow us on Pinterest and Facebook for more delicious, shortcut-friendly recipes that deliver luscious texture every single time. We are constantly sharing new ideas to help you get sweet treats on the table with minimal fuss. Join our community of home bakers and let’s make every night a little sweeter together. Happy baking!


