Gelatinisation of pumpkin starches determines whether a spiced sponge holds its structure or collapses under the weight of cream cheese frosting.

For those seeking a masterpiece of autumn baking, a Classic Pumpkin Layer Cake represents a masterclass in structural texture. Achieving a crumb that remains moist without sinking requires a careful understanding of starch gelatinisation and lipid emulsion. This Classic Pumpkin Layer Cake uses precise measurements to balance the density of vegetable oil with the lifting power of carbon dioxide gas. When baked to the exact minute, the result is a balanced, structural dessert capable of supporting a rich, silky mantle.
Why Precision Pays Off Here for a Classic Pumpkin Layer Cake
Prep: 45 min · Serves: 20 · Difficulty: Advanced
- Achieves structural stability across multiple levels
- Balances spice density against delicate crumb
- Controls moisture to prevent heavy sinking
- Maintains clean cuts for professional presentation
- Pairs deep pumpkin notes with crisp toffee
This technical recipe guarantees a pristine Classic Pumpkin Layer Cake that stands tall without sagging. Weighing your components allows you to replicate this structured pumpkin spice cake method with absolute accuracy.
Get The Full Cake Recipe
Print
Classic Pumpkin Layer Cake
- Total Time: 2 hours
- Yield: 20 servings
- Diet: Vegetarian
Description
This technical, precision-based recipe produces a moist and structured pumpkin layer cake, balanced with a rich cream cheese frosting and crunchy pecan toffee. It is designed for bakers who value accuracy, ensuring perfectly level layers and a refined crumb that stands tall for any occasion.
Ingredients
- 425g pumpkin puree
- Eggs
- Vegetable oil
- Caster sugar
- All-purpose flour
- Baking powder
- Ground cinnamon
- Kosher salt
- 500g block-style cream cheese
- 250g unsalted butter, softened
- Icing sugar
- Vanilla extract
- Toasted pecans
Instructions
- Prepare the pans. Preheat oven to 180°C (350°F) and line two 38 × 25 cm baking trays with parchment paper, leaving an overhang for easy removal.
- Create the emulsion. Whisk 425g pumpkin puree, eggs, oil, and caster sugar in a bowl for 90 seconds until fully emulsified and glossy.
- Combine dry ingredients. Sift together flour, baking powder, cinnamon, and salt; fold into the wet mixture with a spatula until just combined.
- Divide and smooth. Weigh exactly 735g of batter into each prepared tray, smoothing with an offset spatula and tapping to release air pockets.
- Bake the layers. Bake on the middle rack for 15 minutes; test with a toothpick to ensure the sponge is set and springs back when touched.
- Cool and section. Rest cakes in pans for 10 minutes, cool completely on a rack, then slice each rectangular sheet into two equal halves.
- Prepare the frosting. Beat cream cheese and butter until smooth, then gradually incorporate icing sugar, vanilla, and salt until light and silky.
- Assemble the cake. Layer each sponge with frosting and pecans, stacking four layers high before coating the exterior and chilling for one hour.
Notes
- Use a digital scale for every ingredient to ensure the precise crumb structure required for tall layering.
- Always use block-style cream cheese rather than tub varieties to prevent the frosting from becoming runny.
- Ensure all ingredients, particularly eggs, are at room temperature before mixing to facilitate proper emulsion.
- Let the baked sponges cool completely before attempting to slice or frost to avoid tearing the delicate cake structure.
- Prep Time: 45 mins
- Cook Time: 15 mins
- Category: Dessert
- Method: Baking
- Cuisine: American
The Working Components

A successful bake relies on the chemical synergy of its constituent parts. Selecting the correct fats, sugars, and leavening agents determines whether your sponge rises cleanly or collapses into a heavy pudding. Every gram must be accounted for on a digital scale before you begin mixing.
- Pure Pumpkin Puree: Provides the foundation of moisture and natural sugars, requiring careful moisture control to prevent soggy pockets in your sponge.
- Vegetable Oil: Acts as a tenderising agent that remains liquid at room temperature, yielding a soft mouthfeel without threatening the cake’s physical height.
- Large Eggs: Establish the protein structure through coagulation, trapping air bubbles during the initial mixing phase to aid the rise.
- All-Purpose Flour: Contains gluten-forming proteins that build the essential structural walls, keeping the cake stable when sliced.
- Baking Powder: Acts as the primary chemical leavener, releasing carbon dioxide gas at two critical thermal stages during the bake.
- Kosher Salt: Sharpens the earthy pumpkin flavor while tempering the intense sweetness of the accompanying butter and sugar layers.
- Unsalted Butter: Forms the fat-and-water emulsion necessary for a velvety cream cheese frosting that holds its shape.
- Toasted Pecans: Introduce a contrasting mechanical crunch, disrupting the uniform softness of the crumb and cream with crystalline toffee shards.
| Ingredient | Why It Matters |
|---|---|
| Pumpkin Puree | Stabilises moisture content and adds gelatinised starch structure. |
| Vegetable Oil | Keeps the crumb extremely soft by coating flour proteins. |
| Kosher Salt | Enhances pumpkin notes while balancing sweet frosting. |
| Large Eggs | Provide structural protein webs that prevent sinking. |
| All-Purpose Flour | Establishes the gluten network needed for clean layering. |
The Tested Procedure

Step 1: Prepare the Trays and Preheat
Set your oven to 180°C (350°F) or 160°C for fan-forced models to guarantee even heat distribution. Lightly spray two 38 × 25 cm baking trays with oil, then line them with professional parchment paper, leaving a small overhang. This overhang allows you to lift the delicate layers cleanly without shearing the edges. Accurate pan prep prevents the hot batter from clinging to the metal sides, which can cause uneven shrinking.
Step 2: Establish the Wet Emulsion
In a wide glass bowl, combine 425g of pumpkin puree with the eggs, oil, and caster sugar. Whisk vigorously for 90 seconds until the mixture reaches a smooth, uniform emulsion with no floating oil droplets. This phase is critical because unincorporated fat will lubricate the gluten strands excessively, leading to a greasy, dense sponge. Look for a glossy, slightly thickened state where the sugar has partially dissolved.
Step 3: Sift and Integrate the Classic Pumpkin Layer Cake Dry Base
Whisk together your flour, baking powder, ground cinnamon, and salt in a separate container before adding them to the wet emulsion. Sifting these dry ingredients is necessary to distribute the leaveners evenly, avoiding large pockets of carbon dioxide that ruin the crumb. Fold the dry mixture into the wet base using a large rubber spatula, stopping the moment no dry flour remains. Over-mixing at this stage develops excess gluten, which turns your tender Classic Pumpkin Layer Cake tough.
Step 4: Divide and Spread the Batter
Place your prepared trays on a digital scale and divide the batter equally, pouring exactly 735 grams into each pan. Use an offset palette knife to smooth the batter into a completely flat sheet, pushing it gently into the far corners. Tap each tray assertively against your wooden workbench three times to release any trapped air pockets. This physical shock guarantees the surface remains level during the rapid expansion phase in the oven.
Step 5: Bake and Monitor the Structure
Slide both trays onto the middle rack of your preheated oven and bake for exactly 15 minutes. Avoid opening the oven door before the 12-minute mark, as the sudden drop in temperature can collapse the delicate steam bubbles before the proteins set. Test the centre of the sponge with a clean wooden toothpick; it must emerge dry with no wet batter clinging to it. The surface should spring back under light finger pressure, indicating a set gluten network.
Step 6: Cool and Trim the Layers
Allow the hot sponges to rest in their pans on wire racks for 10 minutes to let the internal steam stabilise. Invert the sheets onto clean baking paper, peel away the original parchment, and let them cool completely for at least one hour. Once cool, place the cake on a sturdy cutting board and slice each sheet cleanly in half lengthways to create four identical rectangular slabs. Wrap each layer individually in parchment paper to make handling and assembly straightforward.
Step 7: Cream the Butter and Cheese
Place 500g of block-type cream cheese and 250g of softened butter in the bowl of a stand mixer. Beat using the paddle attachment on medium-high speed for two minutes until the mixture is light, aerated, and completely lump-free. Gradually add the sifted icing sugar in three distinct batches, mixing on low speed first to prevent a cloud of sugar. Once combined, add vanilla extract and salt, then whip on high for 60 seconds to achieve a silky consistency.
Step 8: Assemble and Chill the Layers
Secure the first cake slab onto your final serving platter using a tiny smear of frosting. Spread exactly one-fifth of the cream cheese frosting over the surface, then scatter a quarter-cup of the chopped pecan toffee over it. Align the second layer of cake on top, pressing down very gently with your palms to seal the structure. Repeat this sequence for the remaining layers, coating the top and outer sides with the final two-fifths of frosting before refrigerating for one hour.
Where Most Bakes Go Wrong

Controlling the moisture in your pumpkin puree is the single most important factor for success. If your batter is too wet, the steam will overpower the expanding gluten walls, causing a dense layer. You can cook fresh pumpkin chunks down and let them steam-dry in a colander for 30 minutes before blending. This extra step removes excess water, concentrating the starches for a superior bake.
If your cream cheese frosting becomes soupy and runs off the cake, your fat emulsion has collapsed due to temperature issues. To fix this, chill the frosting for 20 minutes, then whip it briefly to re-establish the emulsion. Always use block cream cheese rather than spreadable tubs, as the latter contains too much water to hold its structure. Keeping your butter and cheese at a uniform room temperature of 20°C prevents splitting.
To achieve a truly professional finish, use a digital scale for every single step of this process. Eyeballing the batter distribution between the two baking trays will inevitably result in uneven cake layers. Uneven layers bake at different rates, meaning one half of your cake will be dry while the other remains underbaked. Weigh it, time it, trust it.
Understanding the chemical behaviour of sugar is vital when preparing the pecan toffee crumble. If your melted sugar crystallises into a grainy mass, it is because you stirred it too early with a cold spoon. To avoid this, let the sugar melt undisturbed on medium-low heat until the edges liquefy, then use a wooden chopstick to gently guide the dry crystals into the syrup. Working quickly when adding the nuts prevents the caramel from seizing before it coats them.
For those seeking further wisdom on structural bakes, our guide to mastering pumpkin cheesecake provides valuable insights on egg proteins. This cake relies on similar protein coagulation to hold its massive 40-centimetre frame. Treating your eggs with respect by guaranteeing they are at room temperature improves their lifting capacity.
Using an authoritative guide like this detailed assembly method for sheet-pan style layers can help you visualize the stacking technique. Spreading the frosting evenly using an offset palette knife keeps the tall structure balanced and prevents sliding. Always work in a cool kitchen to maintain the firm physical structure of the butter and cream cheese.
Frequently Asked Questions
What is the best frosting for a pumpkin layer cake?
A dense, velvety cream cheese frosting is the ideal match because its lactic acidity cuts through the heavy spice of the sponge. Standard buttercream can make the dessert overly sweet and cloying. Our low-sugar cream cheese frosting formula balances these flavours while maintaining the structural stability needed for stacking.
How do I keep my pumpkin cake perfectly moist?
The key lies in using vegetable oil instead of butter in the cake batter, as oil remains liquid at room temperature. This liquid state prevents the starch molecules from retrograding, which would otherwise dry out the crumb. Additionally, storing the cake in an airtight container in the refrigerator preserves its internal moisture for up to five days.
Can I make the cake layers in advance?
Yes, you can bake and cool the rectangular sponges up to two days before assembly. Wrap each cooled layer tightly in plastic film and store them in the refrigerator to firm up. Chilling the sponges actually makes them much easier to slice and stack without tearing.
How long do the leftovers last?
Leftovers will stay exceptionally fresh for up to five days when stored in an airtight container inside the refrigerator. The frosting acts as a barrier, protecting the inner sponge from drying out. Slices are excellent served straight from the fridge, as the cold temperature firms the layers for a clean bite.
Why did my pumpkin cake sink in the middle?
Sinking typically occurs due to an excess of leavening agents or opening the oven door too early during the bake. If the carbon dioxide gas expands before the egg proteins have coagulated, the air pockets collapse. Always weigh your baking powder accurately and keep the oven door closed for the first 12 minutes.
Can I use spreadable cream cheese from a tub?
Avoid tub cream cheese as it contains stabilizers and extra water that will turn your frosting into a soupy liquid. Only block-style cream cheese has the necessary fat-to-moisture ratio to hold its shape between heavy cake layers. Using the incorrect cheese is the most common cause of frosting failure.
Can I bake this recipe in traditional round cake pans?
Yes, this versatile batter can be baked in three 20-centimetre round pans for approximately 20 to 22 minutes. You must adjust the bake times and monitor the center with a toothpick to ensure it is fully set. Round layers require careful dome-trimming to ensure they stack evenly without leaning.
Considered Adjustments
For a subtle shift in the flavour profile, you can substitute half of the white sugar in the frosting with pure maple sugar. This modification introduces a smoky, woody sweetness that complements the earthy pumpkin notes beautifully. Be sure to sift the maple sugar thoroughly to avoid granular pockets in the final spread. This variation pairs exceptionally well with our autumn-inspired thanksgiving cake layout, bringing a rustic warmth to the table.
To adapt this recipe for gluten-sensitive guests, replace the all-purpose flour with a high-quality 1-to-1 baking blend containing xanthan gum. Xanthan gum mimics the structural elasticity of gluten, which is necessary to prevent the sheet cake layers from crumbling. You must allow the baked layers to cool completely in the refrigerator before cutting them, as gluten-free crumbs are fragile when warm. This adjustment guarantees everyone can enjoy a slice without sacrificing physical height.
If you prefer a sharper spice profile, fold 50g of finely minced crystallised ginger into the dry ingredients. The spicy bite of the ginger contrasts beautifully with the mellow pumpkin puree and the buttery toffee crumble. This addition does not alter the hydration level of the batter, meaning your baking times will remain identical. Verify the ginger is chopped into tiny pieces so it distributes evenly without sinking to the bottom of the trays.
Finishing & Plating
Serving this majestic 40-centimetre Classic Pumpkin Layer Cake requires a thoughtful approach to presentation. Place the fully assembled cake on a long, heavy rectangular platter, as moving it after assembly poses a significant risk to its structural integrity. Use a long, sharp chef’s knife dipped in hot water and wiped dry before each slice to ensure clean, professional cuts. This technique prevents the creamy frosting from dragging through the delicate crumb.
To complement the rich, spiced profile of this autumn masterpiece, serve each slice with a steaming cup of Earl Grey tea or a dark roast coffee. The bitter notes of the beverages cut through the sweet, buttery frosting, cleansing the palate between bites. If you want to vary your autumn dessert rotation, consider studying our guide to a classic vanilla bean layer cake for a lighter alternative. However, this pumpkin creation remains the unmatched king of cold-weather gatherings.
For an added touch of sensory appeal, scatter some leftover pecan toffee crumble directly onto the plate around each slice. The extra crunch provides a delightful contrast to the silky cream cheese frosting and tender crumb. This cake is best served slightly chilled or at cool room temperature, allowing the structural elements to remain firm. It is a dessert designed for appreciation, where every element serves a clear textural purpose.

What the Technique Gives You
Baking is not merely an act of mixing; it is a discipline where precision yields unmatched texture. By controlling the moisture in your pumpkin and maintaining a stable fat emulsion, you create a dessert that is both structurally sound and incredibly tender. Structure is what makes the melt possible, allowing each element to shine in harmony. This Classic Pumpkin Layer Cake is proof that technical accuracy is the key to culinary success.
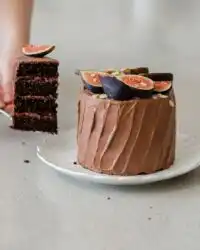
If you enjoyed mastering this structural challenge, expand your baking repertoire with our rich chocolate layer cake recipe. Both cakes share a commitment to balanced hydration and clean presentation. Share your successful bakes with us and join our community of precision-minded home pastry chefs.
For more technical guides and recipe inspiration, follow our official channels on Pinterest, Facebook, TikTok, and Telegram. We invite you to share your baking results, ask technical questions, and refine your pastry skills with us. Let us keep the scales balanced and the ovens hot.


