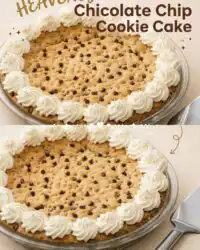
A golden outer rim protects the dense, molten centre of this classic chocolate chip cookie cake, showing how pastry structure dictates mouthfeel.

Baking a Classic Chocolate Chip Cookie Cake requires a shift in how we view dough hydration and fat distribution. When we increase the surface area of a cookie to ten inches, standard baking times fail to preserve the soft interior without burning the edges. This recipe relies on a precise balance of double sugars and starch to create a stable, sliceable structure that maintains a tender core. We achieve a crisp perimeter that seals in moisture, proving that structure is what makes the melt possible.
Classic Chocolate Chip Cookie Cake: What Makes the Texture Right
Structure is what makes the melt possible in this classic cookie cake.
Prep: 15 min · Serves: 12 · Difficulty: Medium
- High-fat ratio guarantees a tender, chewy interior crumb.
- Controlled freezer chill maintains uniform bake thickness.
- Cornstarch helps stabilize the tender central bite.
- Double sugars establish a crisp exterior crust shell.
- Balanced egg yolk proteins prevent dry cakey texture.
This formulation relies on the same chemical principles found in our ultimate chewy cookie cake to guarantee a flawless bite.
This formula delivers the precise bite you expect from professional French-method pastry.
Get The Full Cake Recipe
Print
Classic Chocolate Chip Cookie Cake
- Total Time: 2 hours 45 mins
- Yield: 12 servings
Description
This professional-grade, ten-inch cookie cake features a crisp, golden-brown perimeter and a dense, chewy center. Engineered with precise ratios of sugar, fat, and starch, this dessert maintains its perfect structure while delivering a melt-in-your-mouth experience.
Ingredients
- 255 grams very soft unsalted butter
- 200 grams brown sugar
- 100 grams granulated sugar
- 1 large egg
- 1 large egg yolk
- 2 teaspoons cornstarch
- 360 grams all-purpose flour
- 1.5 cups mini chocolate chips
- Buttercream frosting for decoration
Instructions
- Cream fat and sugars. Combine the butter, brown sugar, and white sugar in a mixing bowl and cream for two to three minutes at medium speed until a cohesive paste forms.
- Bind with wet phase. Add the vanilla, whole egg, and extra yolk to the mixture, blending on low speed until fully emulsified and glossy.
- Whisk dry components. In a separate bowl, thoroughly combine the flour, cornstarch, salt, and baking soda to ensure even distribution of leavening agents.
- Combine the dough. Gradually add the dry ingredients to the wet emulsion on low speed, mixing for less than one minute until just combined.
- Fold in chips. Gently fold the mini chocolate chips into the dough using a spatula until evenly dispersed throughout.
- Chill the dough. Press the dough into a parchment-lined ten-inch springform pan and freeze for fifteen minutes to solidify the fats for better structure.
- Bake the cake. Preheat the oven to 350°F and bake the chilled cake for approximately thirty minutes, draping foil over the edges if they brown too quickly.
- Cool before releasing. Allow the cake to cool completely in the pan for at least two hours on a wire rack to ensure the center sets properly.
- Pipe decorative border. Decorate the perimeter of the cooled cookie cake with buttercream frosting swirls using a star tip for a professional finish.
Notes
- Ensure the butter is soft enough to yield to pressure but not melted to avoid a greasy dough.
- Use a digital kitchen scale for all measurements to maintain the intended dough structure and moisture levels.
- Keep the cake inside the springform ring until it is completely cold to prevent the fragile center from collapsing.
- Avoid using a convection oven setting as the airflow can dry out the surface and prevent the desired chewy core.
- Prep Time: 15 mins
- Cook Time: 30 mins
- Category: Dessert
- Method: Baking
- Cuisine: American
Ingredients & Their Role

Before assembling the Classic Chocolate Chip Cookie Cake, verify that every ingredient is weighed precisely on your digital scale. By understanding how fat melting points and protein networks interact under heat, we can guarantee a predictable bake. Let us examine the weight and role of each component before we begin mixing.
- Very Soft Butter: Two sticks plus two tablespoons (255 grams) of butter, softened to room temperature, provides the fat that coats flour proteins, inhibiting gluten development and producing a tender crumb.
- Brown Sugar: One cup (200 grams) of brown sugar contains molasses, which adds hygroscopic moisture to attract water molecules, producing a dense and remarkably chewy center.
- White Sugar: One-half cup (100 grams) of granulated sugar aids in crisping the outer edges during the bake by drawing moisture away from the perimeter.
- Egg and Egg Yolk: One whole egg and one additional yolk provide the necessary water and lecithin to emulsify the fat phase with the starch phase, stabilizing the entire cookie slab.
- Cornstarch: Two teaspoons of cornstarch act as a tenderizing agent, physically interrupting the flour’s gluten network to prevent a tough, bread-like structure.
- All-Purpose Flour: Three cups (360 grams) of unbleached flour establish the essential gluten scaffolding that holds the heavy chocolate pieces in uniform suspension.
- Mini Chocolate Chips: One and a half cups of miniature chips distribute evenly throughout the dense dough, preventing large pockets of melted chocolate from interfering with the structural slice.
| Ingredient | Why It Matters |
|---|---|
| Very Soft Butter | Inhibits excessive gluten development to maintain a soft, tender interior crumb. |
| Cornstarch | Interferes with protein bonding to keep the large cookie from turning tough or dry. |
| Brown Sugar | Contributes essential moisture and acidity to create a highly dense, chewy texture. |
| Egg Yolk | Supplies natural lecithin to create a stable emulsion between fats and liquids. |
| Mini Chips | Distributes weight evenly across the dough to prevent structural collapse during baking. |
From Bench to Bake

Step 1: Cream the Fat and Sugars
Combine the very soft butter, brown sugar, and white sugar in a spacious mixing bowl. Cream these ingredients together using a paddle attachment for exactly two to three minutes at medium speed. You are looking for a smooth, cohesive paste rather than a light, aerated mixture. Restricting the air incorporation prevents the cake from rising like a soufflé and subsequently collapsing into a wrinkled mess.
Step 2: Bind with the Emulsified Wet Phase
Whisk the vanilla extract with the whole egg and the extra egg yolk in a small beaker. Pour this liquid phase into your creamed butter and sugar, running the mixer on low speed for one to two minutes. The batter should transform into a glossy, fully unified emulsion with no visible separation of fats. This step establishes the structural hydration that will react with your dry ingredients.
Step 3: Whisk the Dry Components
In a separate glass bowl, combine the all-purpose flour, cornstarch, salt, and baking soda. Whisk these dry components vigorously for thirty seconds to distribute the leavening agent and cornstarch evenly throughout the flour. This manual distribution prevents localized pockets of baking soda from creating uneven pockets of carbon dioxide during the bake. A uniform blend is essential for a flat, level cookie surface.
Step 4: Combine the Bench Components
Gradually introduce the dry flour mixture into the wet emulsion while running your mixer on its lowest speed. Watch the bowl closely and stop the motor the instant the last streaks of flour vanish into the dough. Overworking the dough at this stage activates the gluten proteins, which converts a tender cookie cake into a tough, bread-like texture. Keep the mixing time under one minute to preserve the delicate structure.
Step 5: Fold the Miniature Chocolate Chips
Scatter the mini chocolate chips over the surface of the dense dough. Use a sturdy silicone spatula to fold the chips into the mixture with broad, folding strokes from the bottom of the bowl upward. Stop as soon as the dark specks are evenly dispersed through the golden dough. Using mini chips instead of standard chips prevents the heavy chocolate from sinking to the bottom of the pan.
Step 6: Compress and Freeze the Cookie Dough
Line the base of a ten-inch springform pan with a circle of non-stick parchment paper. Press the firm dough into the pan, starting from the center and working outward to create a flat, level surface of uniform thickness. Transfer the filled pan directly to the freezer for exactly fifteen minutes to chill the fats. This rapid drop in temperature solidifies the butter, which controls the spread rate and preserves a dense interior.
Step 7: Bake Your Classic Chocolate Chip Cookie Cake
Preheat your oven to 350°F (177°C) during the final minutes of the freezer chill phase. Slide the cold springform pan onto the center rack of the oven and bake for approximately thirty minutes. At the twenty-five minute mark, observe the surface; if the rim is turning dark amber, drape a sheet of foil loosely over the top. This shield blocks direct heat, allowing the center to reach gelatinisation temperature without burning the perimeter.
Step 8: Cool and Release the Structural Ring
Remove the pan from the oven and place it on a wire cooling rack on your clean bench. The perimeter should feel set and dry to the touch, while the very center will remain soft and slightly jiggly. Allow the cookie cake to cool completely in the pan for at least two hours before releasing the springform ring. Attempting to unmold a warm cake will cause the delicate, molten center to collapse.
Step 9: Pipe the Decorative Buttercream Border
Fit a durable piping bag with a star tip, such as a Wilton 1E, and fill it with smooth buttercream frosting. Pipe consistent, overlapping swirls around the entire perimeter of the completely cooled cookie cake to create a professional border. If desired, scatter sprinkles over the wet frosting before it forms a dry outer crust. The weight of the buttercream border helps anchor the set edges while providing a pleasant visual contrast.
Precision Notes

The temperature of your butter is a critical variable on the pastry bench. It must be exceptionally soft, almost to the point of melting, but not completely liquid. If the butter is completely melted, it cannot hold the sugar crystals in suspension, resulting in an oily dough that spreads flat and greasy during baking.
Weighing your dry ingredients on a digital scale is the only way to achieve consistent pastry results. Measuring flour by volume with a cup can lead to an excess of up to thirty percent, which dries out the dough and leaves you with a crumbly bake. For detailed instructions on baking large-format cookies, observing these weight tolerances is key to success.
If the centre of your cake collapses after baking, here is why and how to fix it. This common failure mode indicates that the starches did not fully cook or the cake was moved too quickly from the oven. Keep the cake in the closed springform pan on a wire rack until completely cool to allow the internal fats to solidify and lock the structure in place.
Using a springform pan is far superior to a standard cake pan for this style of bake. The removable sides allow you to lift the ring away without flipping the fragile cookie cake upside down. This method preserves the delicate buttercream border and prevents any physical damage to the golden crust.
When preparing a standard cookie cake, you must resist the temptation to bake it in a convection oven. The active fan in a convection oven dries out the surface too quickly, creating a thick crust before the heat can penetrate the center. Use conventional heat to guarantee the interior remains beautifully soft and chewy.
If your oven runs hot on the bottom, place the springform pan on a heavy baking sheet rather than directly on the wire rack. The extra layer of metal diffuses the intense bottom heat, protecting the sugar in the dough from burning before the top is golden. This simple adjustment guarantees an even, blonde crumb throughout the bottom layer.
Frequently Asked Questions
What is the difference between cookie and cookie cake?
A standard cookie is formulated to spread and crisp on a flat baking sheet, relying on rapid heat transfer to set its shape. A cookie cake is baked inside a deeper, contained pan with adjusted ratios of starch and moisture to guarantee the center remains soft and chewy without drying out. The high walls of the pan protect the sides, allowing for a thicker, sliceable dessert texture.
Can I make a cookie cake with a normal cookie recipe?
While you can physically press standard cookie dough into a cake pan, the results are often disappointing. Standard recipes typically lack the starch density or the moisture-binding properties needed to hold up as a large, thick slice. Without adjustments like adding cornstarch or extra egg yolk, the center will likely sink or turn greasy.
Is cookie cake just a large cookie?
Structurally, it is much more complex than a scaled-up cookie. A single large cookie baked on a flat sheet spreads outward and thins, whereas a cookie cake uses a contained pan to force vertical growth and heat retention. This creates a distinct contrast between the crispy outer rim and the dense, brownie-like interior.
What makes cookies cakey vs chewy?
The ratio of moisture to fat and flour proteins determines the final texture of the crumb. High moisture combined with whole eggs encourages gluten formation and steam leavening, which results in a light, cakey structure. Conversely, high fat, low moisture, and the addition of brown sugar or extra yolks yield a dense, chewy crumb.
How should I store a completed cookie cake to keep it soft?
To prevent the cake from drying out, store any leftovers in an airtight container at room temperature for up to four days. If you have already sliced the cake, press a piece of plastic wrap directly against the cut edges to seal in the moisture. Avoid refrigerating the cake, as the cold temperature accelerates starch retrogradation, making the crumb firm and dry.
Can this dessert be frozen for long-term storage?
Yes, you can freeze the undecorated cookie cake for up to three months by wrapping it securely in two layers of plastic wrap and one layer of foil. When you are ready to serve, thaw the cake overnight in the refrigerator while it remains wrapped to prevent condensation from softening the crust. Once it reaches room temperature, you can pipe the fresh buttercream border onto the perimeter.
Tested Variations
For a deeper cocoa profile, you can replace thirty grams of the all-purpose flour with high-fat Dutch-process cocoa powder. This change alters the liquid absorption rate, so you must add an extra tablespoon of soft butter to maintain the proper dough consistency. Fold in equal parts white, milk, and dark chocolate chips to create a complex, multi-layered texture. Those who prefer starting with a pre-blended base can adapt these structural steps for cake mix cookies with similar success.
Heating your butter in a saucepan until the milk solids turn golden brown introduces a deeply nutty aroma to the dough. Because browning butter evaporates its water content, you must replenish that moisture by adding one tablespoon of milk to the wet phase. Fold in one cup of finely chopped, toasted pecans alongside the mini chocolate chips to provide a structural crunch that contrasts with the tender interior.
Serving the Structure
Plating a large-format cookie cake requires the same level of care as serving a delicate tart. For clean, professional slices, use a long, sharp chef’s knife dipped in hot water and wiped dry before each cut. The heat from the metal blade glides smoothly through the dense cookie and the chocolate chips, preventing the interior from tearing.
This dessert is best served at room temperature or slightly warmed for ten seconds in the microwave to soften the chocolate chips. Pair each slice with a cold glass of milk or a strong, unsweetened espresso to cut through the rich sweetness of the dough. If you are serving this for a formal gathering, consider presenting it alongside a slice of our classic two layer yellow cake chocolate frosting to give your guests a balanced variety of textures.

What the Technique Gives You
Baking this recipe teaches us that precise ingredient ratios and controlled temperatures are what make a soft, melting center possible. By managing the gluten development and solidifying the fats through freezing, you can turn a simple dough into a structured masterpiece. Every gram of flour and minute of chilling works together to produce a slice that holds its shape beautifully on the plate.
We hope you enjoy bringing this structured bake to your kitchen bench. Whether you are celebrating a milestone or mastering a new pastry technique, this recipe will reward your precision. If you are searching for more chocolate-focused inspiration, check out our detailed guide on the chocolate cake recipe to refine your skills.
Share your baking results with our community of passionate home pastry chefs on our social channels. We love seeing your clean slices and beautiful buttercream piping designs. Connect with us on Pinterest, Facebook, TikTok, and Telegram to stay updated with our latest technical guides and baking formulas.

