Crisp watermelon and succulent berries come together in a Fresh Watermelon Layer Cake that takes only twenty minutes to assemble for your next warm summer gathering.

This Fresh Watermelon Layer Cake delivers a luscious texture that rivals any traditional bake without the need for an oven. Between the sweet berries and the hydrating melon base, you get a dessert that feels indulgent yet remains incredibly light. Fast and luscious results are the hallmark of this construction, providing a centerpiece that looks like an hour of work in a fraction of the time. It is the ideal solution for those days when you need a sweet treat but want to stay cool in the kitchen.
What Makes This Fresh Watermelon Layer Cake Quick & Luscious
Prep: 20 min · Serves: 10 · Difficulty: Easy
- Provides deep hydration with every single bite.
- Assembles faster than a standard box mix.
- Delivers a crisp and refreshing dessert texture.
- Showcases seasonal berries in a beautiful arrangement.
- Requires zero baking time on hot days.
Tuesday-night molten cake? Absolutely, but this chilled version is the shortcut your summer nights actually need.
While this fruit-based treat is refreshing, sometimes you want the comfort of a chantilly cake recipe for a more traditional indoor celebration.
Get The Full Cake Recipe
Print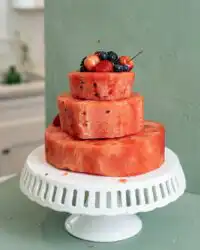
Fresh Watermelon Layer Cake
- Total Time: 20 mins
- Yield: 10 servings
- Diet: Vegan, Gluten-Free
Description
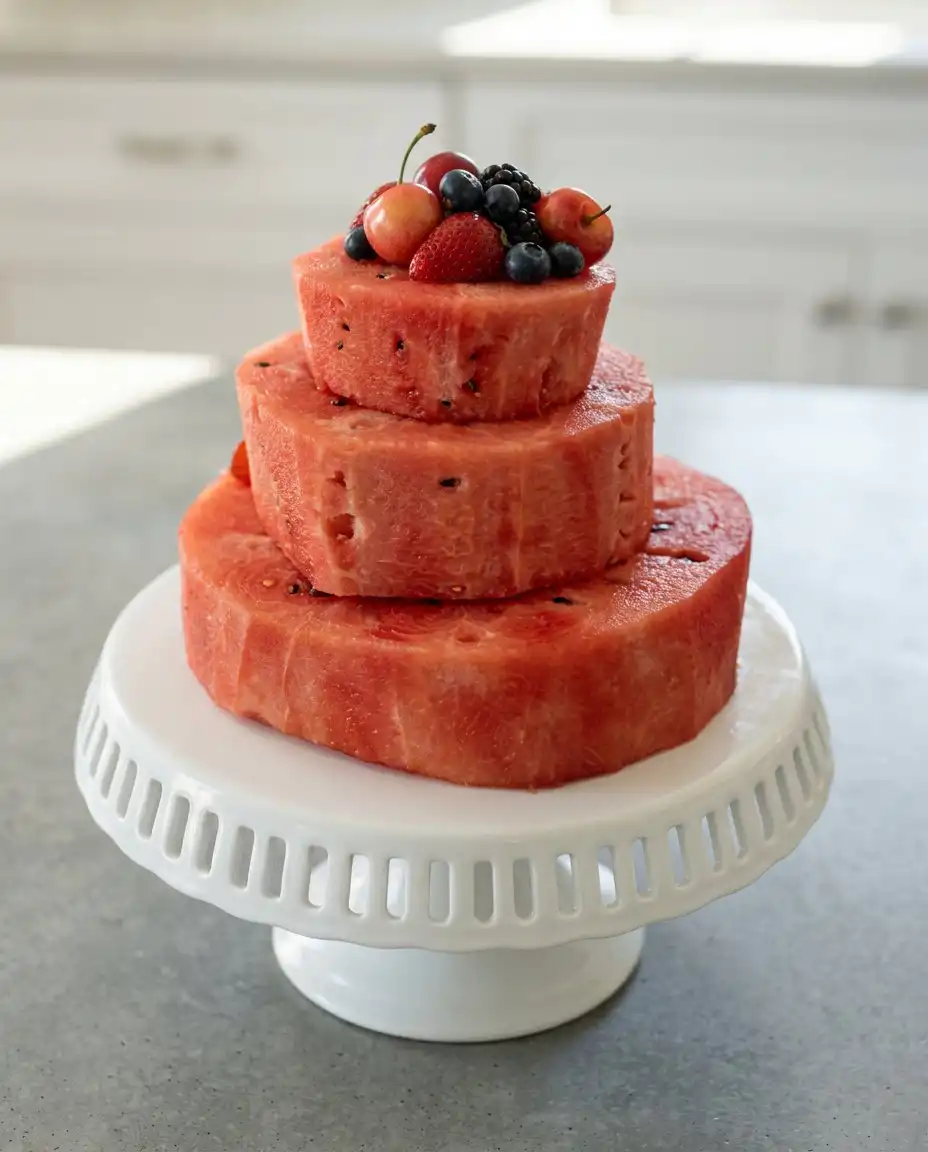
This refreshing, no-bake layered dessert uses fresh watermelon cylinders and a vibrant mosaic of seasonal berries to create a cooling summer centerpiece. It is a quick and healthy alternative to traditional cakes that requires only assembly and minimal prep time.
Ingredients
- Large watermelon
- Small watermelon
- Blueberries
- Blackberries
- Raspberries
- Strawberries
- Grapes
- Fresh mint leaves
- Wood skewers
- Toothpicks
Instructions
- Carve watermelon tiers. Slice your large and small watermelons into three distinct cylinder shapes of decreasing size and ensure the tops and bottoms are perfectly flat.
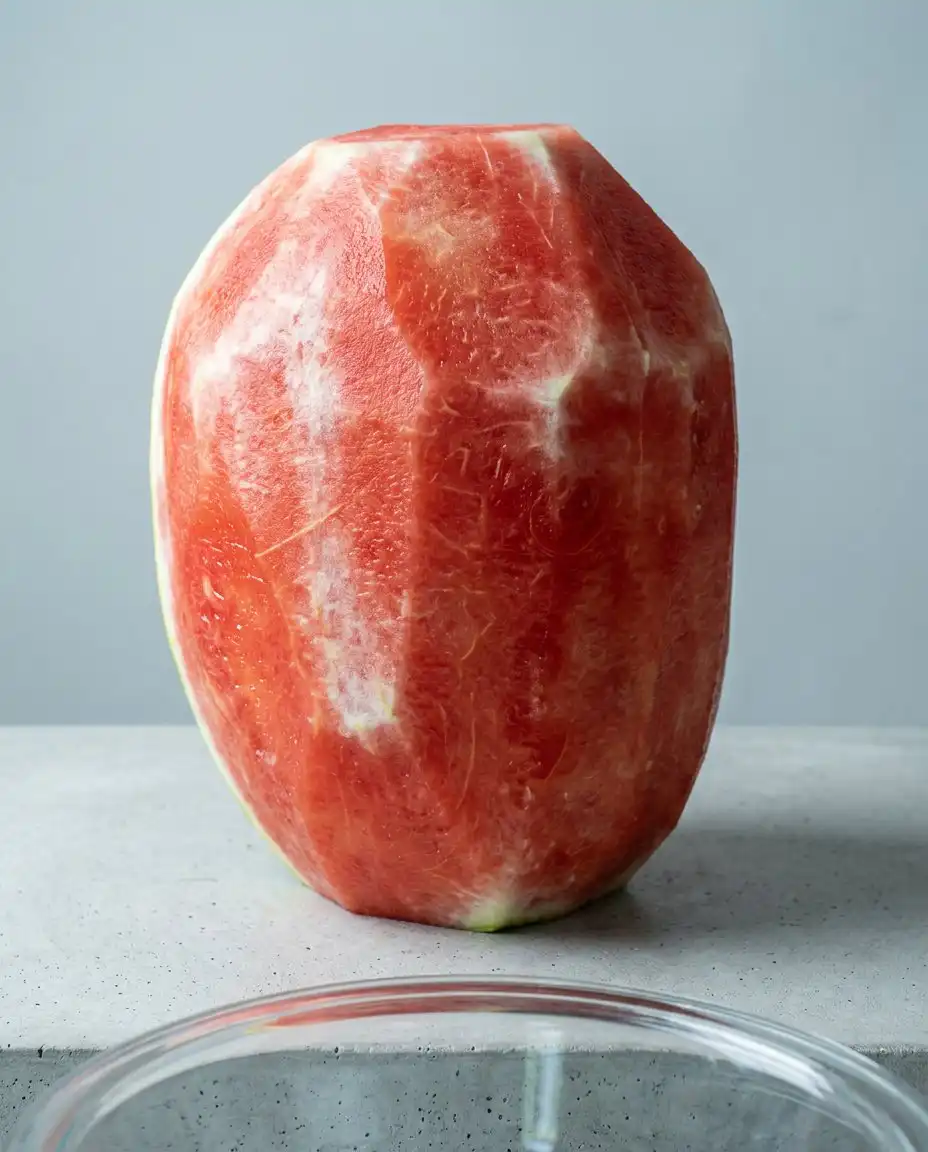
- Trim the rind. Carefully remove the green rind from all three cylinders and smooth any sharp edges for a rounded appearance.
- Stack the base. Place the largest watermelon cylinder onto a sturdy cake stand or serving platter and center the medium cylinder on top of it.
- Insert structural skewers. Press four large wood skewers down through the center of the top two tiers and into the base to provide internal support.
- Add top tier. Press the smallest watermelon cylinder onto the protruding skewers until it rests firmly against the medium tier.
- Decorate with fruit. Use toothpicks to anchor grape clusters and various berries around the sides of the cake to create a cascading effect.
- Add final touches. Fill any remaining gaps with halved strawberries and tuck fresh mint leaves between the berries for a fragrant finish.
Notes
- Pat the watermelon cylinders dry with paper towels before stacking to prevent slippage.
- Choose seedless watermelons to ensure a uniform surface and avoid hard obstructions for your skewers.
- Keep the assembled cake refrigerated until the final moment to maintain the crisp texture of the fruit.
- Use a variety of berry sizes to create dense coverage and a more complex flavor profile.
- Ensure your skewers are inserted at a perfect ninety-degree angle to keep the structure stable.
- Prep Time: 20 mins
- Cook Time: 0 mins
- Category: Dessert
- Method: No-Bake
- Cuisine: American
Quick-Bake Lineup
Building this refreshing dessert requires selecting fruits with high moisture content and firm structures to support the three-tier design. You want a heavy melon that feels full of juice and berries that are firm to the touch for the best presentation.
- Large and Small Watermelons: These form the three tiers of the cake structure and provide the main sweetness.
- Wood Skewers and Toothpicks: These essential tools act as the internal skeleton to hold the tiers and fruit decorations together.
- Grapes and Berries: A mix of blueberries, blackberries, and raspberries adds varied shapes and deep colors to the exterior.
- Strawberries: Used both whole and halved to create depth and fill larger gaps in the fruit mosaic.
- Fresh Mint: These leaves provide a scent of herbal freshness and a pop of dark green against the red melon.
| Ingredient | Why It Matters |
|---|---|
| Watermelon | Provides the structural tiers and primary flavor |
| Wood Skewers | Ensures the tiers remain stable and centered |
| Mixed Berries | Adds tartness and contrasting visual textures |
| Fresh Mint | Offers an aromatic finish to the chilled fruit |
| Toothpicks | Secures smaller berries and grapes to the sides |
The Quick Method
Step 1: Carve the Watermelon Tiers
Begin by slicing your large and small watermelons into three distinct cylinder shapes of decreasing size. You should have one large base, a medium middle tier, and a small top tier to create the classic layered look. Use a sharp chef’s knife to cut straight through the fruit, feeling the crisp resistance as the blade moves through the sweet flesh. Ensure the top and bottom of each cylinder are perfectly flat so the structure does not lean when you stack it later.
Step 2: Trim and Smooth the Rind
Carefully remove the green rind from all three cylinders by slicing downward following the natural curve of the fruit. Once the rind is gone, use the knife to shave off any sharp corner edges to create a smoother, more rounded appearance for each tier. You will notice the scent of fresh melon filling the room as the juicy pink interior is revealed. The goal is to have clean, uniform surfaces that are ready to be decorated with your berry assortment.
Step 3: Stacking Your Fresh Watermelon Layer Cake
Place the largest watermelon cylinder onto a sturdy cake stand or large serving platter. Carefully center the medium cylinder on top of the base, checking from all angles to ensure it is balanced. This is the moment where the Fresh Watermelon Layer Cake begins to take shape and look like a professional dessert. The weight of the fruit should feel solid, providing a stable foundation for the final tier and the fruit decorations.
Step 4: Secure the Structure with Skewers
Take four large wood skewers and press them down through the center of the top two tiers into the base tier. You want to place these near the center so the smallest cylinder can eventually hide the tops of the skewers. This internal support is what allows the fruit to remain upright during transport or while sitting on a party table. Feel the skewers lock the tiers together, ensuring the melon does not slide as you add the weight of the berries.
Step 5: Add the Top Tier
Press the smallest watermelon cylinder down onto the protruding skewers until it rests firmly against the medium tier. If the skewers are too long, you can trim them with kitchen shears before placing the final melon piece. The three tiers should now look like a cohesive cake, standing tall and ready for the colorful fruit mosaic. The surface of the melon will be slightly damp, which helps the first layer of decorations stay in place.
Step 6: Decorate with Grapes and Berries
Use toothpicks to secure grape clusters so they appear to cascade down from the top tier toward the base. Fill in the remaining surfaces with blackberries, blueberries, and raspberries, using the toothpicks to anchor any fruit that does not stay on its own. Try nesting smaller blueberries inside the cavities of the raspberries for a fun visual pop and added texture. The cake should begin to look like a lush, edible garden as you cover the pink melon with deep purples and blues.
Step 7: Final Flourish with Strawberries and Mint
Add halved and whole strawberries to fill any remaining gaps, ensuring the entire surface of the watermelon is decorated. Tuck fresh mint leaves between the berry clusters to provide a splash of green and a refreshing aroma. This final step transforms the fruit assembly into a sophisticated dessert that guests will want to photograph immediately. The cool touch of the fruit and the bright herbal scent of the mint indicate that the cake is ready for the table.
Quick-Texture Tips
To ensure your tiers remain stable, always pat the exterior of the carved watermelon cylinders dry with a paper towel before you begin the stacking process. This removes excess moisture that can cause the layers or the toothpicks to slide out of position during the party.
Selecting a seedless watermelon is a functional choice because it provides a more uniform surface for the skewers to penetrate without hitting hard obstructions. A seedless variety also ensures that every slice served to your guests is easy to eat without the interruption of small black seeds.
If the tiers begin to slide or tilt after stacking, this usually happens because the skewers are not perfectly vertical or the bases are not flat. To fix this, remove the top tiers, re-level the surfaces with a sharp knife, and re-insert the skewers at a strictly ninety-degree angle to the base.
When you are preparing this for an outdoor event, keep the cake in the refrigerator until the very last moment to maintain the crisp bite of the fruit. You can find more advice on watermelon cake preparation to help with long-term stability in high heat.
Using a variety of berry sizes helps you fill every small gap on the melon surface without leaving the pink interior exposed. This dense coverage not only looks better but also creates a more complex flavor profile when guests take a large forkful of the fruit layers.
For those who enjoy a more traditional sweet profile, you might consider serving this alongside a cake with fruit to offer guests a choice between a light fruit base and a baked sponge.
Always transport the cake on a flat surface in your vehicle, preferably on a non-slip mat or nestled in towels to absorb any vibrations from the road. Watermelon has a high water content, so the weight can shift easily if the car takes a sharp turn or encounters a bumpy path.
Frequently Asked Questions
How long can this watermelon cake sit out at a party?
This dessert is best served cold and should not sit out for more than two hours, especially in warm weather. The fruit will begin to release juice and lose its crisp texture as it reaches room temperature. If you are hosting an outdoor event, consider placing the cake stand in a larger bowl filled with ice to keep the base chilled.
Can I make this cake the night before the event?
It is better to carve the watermelon tiers a few hours before serving rather than the night before to prevent the fruit from becoming grainy. You can wash and prep all your berries ahead of time, but the final assembly should happen on the day of the party. Storing the assembled cake overnight can lead to a significant amount of juice pooling at the bottom of the platter.
What is the best way to transport this fruit cake to a party?
Place the cake on a sturdy platter and wrap it gently in cling wrap to keep the fruit in place. Surround the base of the platter with damp towels in a shallow box to catch any juice and prevent the stand from sliding in your car. Keeping the vehicle cool with the air conditioning will also help the fruit maintain its structural integrity during the trip.
Do I need to remove the toothpicks before serving the cake?
You should remove the toothpicks as you slice the cake, especially when serving to children. Alternatively, you can leave the toothpicks in the individual berries so that guests can use them as finger food handles. Always inform your guests that there are internal skewers and toothpicks used for structural support so they can eat safely.
How do I choose the best watermelon for this recipe?
Look for a watermelon that feels heavy for its size and has a creamy yellow spot on one side, which indicates it ripened on the vine. Give the melon a firm thump; a deep, hollow sound suggests the fruit is full of juice and perfectly ripe. Avoid melons with soft spots or cracks in the rind, as these will not provide a stable base for your tiers.
What should I do with the leftover watermelon scraps?
The pieces of melon removed during the carving process are perfect for blending into a refreshing summer drink or dicing into a fruit salad. You can also freeze the scraps to use as ice cubes in a pitcher of water or lemonade. Nothing needs to go to waste when you are working with such a versatile and hydrating fruit.
Quick Variations
For a different flavor profile, you can swap the fresh mint for basil leaves to create a sophisticated herbal note that pairs beautifully with strawberries. This simple change alters the aroma of the dessert and makes it feel more like a culinary centerpiece for a dinner party rather than a casual snack.
If you prefer a more traditional look, you can coat the outside of the watermelon tiers with a thin layer of Greek yogurt or stabilized whipped cream to mimic frosting. This variation provides a creamy texture that contrasts with the crunch of the melon, much like the experience of eating a peaches cream layer cake during the height of summer.
Another option is to carve the watermelon into different shapes, such as squares or rectangles, for a modern geometric appearance. You can then use citrus slices like lime or lemon to add a bright acidity that cuts through the sweetness of the berries and the melon base.
Quick Serving Ideas
When you are ready to serve, use a long serrated knife to cut through the tiers just like you would with a traditional baked dessert. Start at the top tier and work your way down, removing any berries or toothpicks from the immediate area before making your slice. This ensures that every guest receives a clean portion of melon topped with a generous amount of fresh berries.
Serving this alongside a scoop of lemon sorbet or a dollop of honey-sweetened ricotta adds a wonderful layer of complexity to the dish. The tartness of the sorbet brings out the natural sugars in the watermelon, while the ricotta offers a savory depth that balances the fruit. It is a fantastic alternative to the heavy richness of a classic vanilla bean layer cake when the weather is sweltering.
For a festive touch, you can drizzle a small amount of balsamic glaze or a light honey syrup over the individual slices just before they reach the guests. This adds a glossy finish and a hint of extra sweetness that ties the mint and berries together. Provide small plates and forks, as the high juice content of the watermelon can make this a messy but delightful treat to eat.
The Weeknight Wrap-Up
This Fresh Watermelon Layer Cake proves that you do not need an oven or hours of preparation to create a stunning dessert. By using the natural structure of the melon and the bright colors of seasonal berries, you can assemble a treat that is both refreshing and visually impressive. It is the kind of recipe that makes summer entertaining feel manageable and fun, allowing you to spend more time with your guests and less time in a hot kitchen.
If you find yourself craving another fruit-forward dessert that is equally simple, you might enjoy trying a fresh peach cake recipe for your next gathering. This watermelon creation is a testament to the fact that fast and luscious results are always within reach when you work with quality ingredients. Save this idea for those 9 p.m. cravings when only something cool and sweet will do.
Be sure to share your fruit cake creations with our community and let us know which berry combinations worked best for you. Follow us on Pinterest, Facebook, and TikTok for more shortcut-friendly dessert inspiration. We love seeing how you bring these quick and luscious recipes to your own table.